Elastic Stack 简介
- 什么是 Elastic Stack
Elastic Stack 是一套技术解决方案简称为 ELK,是 Elastic 公司的一套开源项目。Elastic Stack 的原名是 ELK Stack ,因为 5.0 版本后加入了小弟 Beats ,因此更名为 Elastic Stack。
ELK 指的是三个开源软件的首字母大写,即:Elasticsearch、Logstash 和 Kibana。
- Elasticsearch 是一个搜索和分析引擎(负责日志检索和存储)
- Logstash 是一个服务器端的数据处理管道,可以同时从多个源获取数据,将其转换为 Elasticsearch 之类的“stash”。(负责日志的收集和分析、处理)
- Kibana 允许用户在 Elasticsearch 中使用图表和图表可视化数据。
业界,经常会组合使用 Elasticsearch、Logstash 和 Kibana 这三种技术,来实现分布式系统的日志管理及可视化,所以,这三种技术的组合就被称为“ELK Stack”。(负责日志的可视化)

Elasticsearch
简介
Elasticsearch 是一个基于 Apache Lucene(TM) 的开源搜索引擎。无论在开源还是专有领域,Lucene 可以被认为是迄今为止最先进、性能最好的、功能最全的搜索引擎库。但是,Lucene 只是一个库。Lucene 本身并不提供高可用性及分布式部署。想要发挥其强大的作用,你需使用 Java 并要将其集成到你的应用中。Lucene 非常复杂,你需要深入的了解检索相关知识来理解它是如何工作的。
Elasticsearch 也是使用 Java 编写并使用 Lucene 来建立索引并实现搜索功能,但是它的目的是通过简单连贯的 RESTful API 让全文搜索变得简单并隐藏 Lucene 的复杂性。
架构
近实时(Near-Real-Time)
这里说的是 ES 的搜索是接近实时(NRT)的。首先搜索的时延定义为: 某个新的文档从索引到可被搜索的时间 。注意这里是说新的文档,也就是说,我们的文档集合新增了一篇文档后,需要多久的时间才能把它给搜索出来。如果是马上就能搜出来,那么就是实时的。而 ES 提供的是 NRT,这里面的时间差默认是 1s
实时分为准实时和近实时,准实时是毫秒级,近实时是秒级。
集群(Cluster)
ES 是高可扩展的。可扩展一般有两方面,垂直扩展是基于单个机器的性能及容量的提升,而这个提升是有限的;水平扩展是得益于机器的增加,理论上是无限的。ES 的高可扩展是基于水平扩展的,使用集群的方式能够充分利用机器的增加去均衡搜索请求和文档存储,提供高性能的搜索服务。
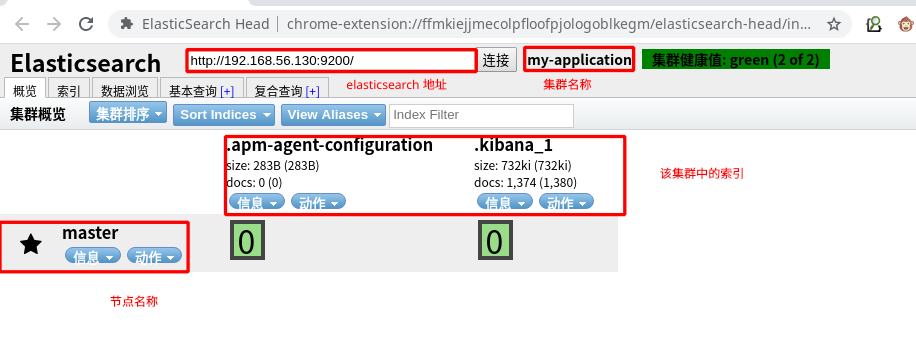
每个 ES 集群包含一个或多个节点来存放数据,这些节点共同提供索引和搜索能力。区分集群的唯一表示就是集群的名称,所以每个节点是根据集群的名称去判断它是属于哪一个集群的。
集群的状态有 Green、Yellow 和 Red 三种:
Green:绿色,健康。所有的主分片和副本分片都可正常工作,集群 100% 健康。
Yellow:黄色,预警。所有的主分片都可以正常工作,但至少有一个副本分片是不能正常工作的。此时集群可以正常工作,但是集群的高可用性在某种程度上被弱化。
Red:红色,集群不可正常使用。集群中至少有一个分片的主分片及它的全部副本分片都不可正常工作。
当集群状态显示 Red 时,虽然集群的查询操作还可以进行,但是也只能返回部分数据(其他正常分片的数据可以返回),而分配到这个分片上的写入请求将会报错,最终会导致数据的丢失。
节点(Node)
一台 ES 服务器就是一个节点,一个节点都必须加入到某一个集群。集群中的每个节点会随机分配一个节点名称。当节点运行时,他们会根据集群名称,自动组成集群。
节点的类型分为:master 节点,data 节点,client 节点
主节点(master node):一个集群一定包含一个 master node。 master node管理集群范围内的所有变更,如索引节点的增删。但是 master node并不会涉及到数据的存储、变更和搜索操作。所以,在拥有多个节点的集群中,流量的增加不会使得主节点成为瓶颈。
数据节点(data node):data node 负责数据的存储和相关的具体操作,比如索引数据的创建、修改、删除、搜索、聚合。
客户端节点(client node):client node 负责请求分发、汇总等,该节点的功能等同于协调节点。其实任何节点都可以完成这样的工作,单独添加这个节点是为了提高并发性。
部落节点(Tribe Node):Tribe Node 跨越多个集群,接收每个集群的状态,然后合并成一个全局的集群状态。它可以读写所有集群节点上的数据。
协调节点(Coordinating Node):协调节点,是一种角色,而不是真实的 Elasticsearch 的节点,我们没有办法通过配置项来配置哪个节点为协调节点。集群中的任何节点都可以充当协调节点的角色。
例如:
当一个节点 A 收到用户的查询请求后,会把查询语句分发到其他的节点,然后合并各个节点返回的查询结果,最好返回一个完整的数据集给用户。在这个过程中,节点 A 扮演的就是协调节点的角色。由此可见,协调节点会对 CPU、Memory 和 I/O 要求比较高。
索引(index)
简单来说,把 ES 的索引看作是关系型数据库的 DB 就很好理解了。索引是同类文档的集合,我们倾向于把比较相似的文档都放在一个索引。这个相似可以是内容特征的相似,也可以是时间的相近等。在一个集群中,索引的数量是可以任意的。
类型(type)
type 理解为关系型数据库的 Table。
映射(mapping)
所有文档写进索引之前会先进行分析,如何将输入的文本分割词条,哪些词条又会被过滤,这种行为被叫做映射(mapping),一般由用户自己定义规则。
文档(Document)
Document 理解为关系型数据库表中的行数据。
字段(field)
field 理解为关系型数据库表中的一列数据。
分片(shard)
当一个索引的存储量超过了一个节点的存储能力,我们就需要多个节点去存储。因此 ES 提供了 sharding 的能力,就是将一个 index 可以分为多个 shard 分别存储在多个 node 上,以此来实现水平扩展能力。在创建 index 的时候,可自定义 shard 的数量,索引的主分片创建完成后就已经固定了,无法进行更改。
副本分片(Replica)
副本分片最大的作用就是故障恢复。在网络环境中,有可能某个分片和节点无法访问,也有可能故障数据丢失,这个时候就需要用副本来恢复。副本这个概念是针对分片的,也就是说我们能够为一个分片创建一个或多个副本。原来的分片叫做主分片,copy 出来的叫副本分片,副本分片可随时调整。
基本操作
这里使用 elasticsearch-head 和 REST Ape 这两个插件
elasticsearch-head
REST Ape
- 新建一个 project

新建一个请求

使用 GET 请求,获取集群信息

创建索引
使用 PUT 方法新建一个 test 索引
1 | PUT http://192.168.56.130:9200/test |

刷新 elasticsearch-head 后,看到 test 索引新建成功

删除索引
1 | DELETE http://192.168.56.130:9200/test |
直接将请求改为 delete,将 body 请求体设为 no body

刷新 elasticsearch-head 后,看到 test 索引删除成功
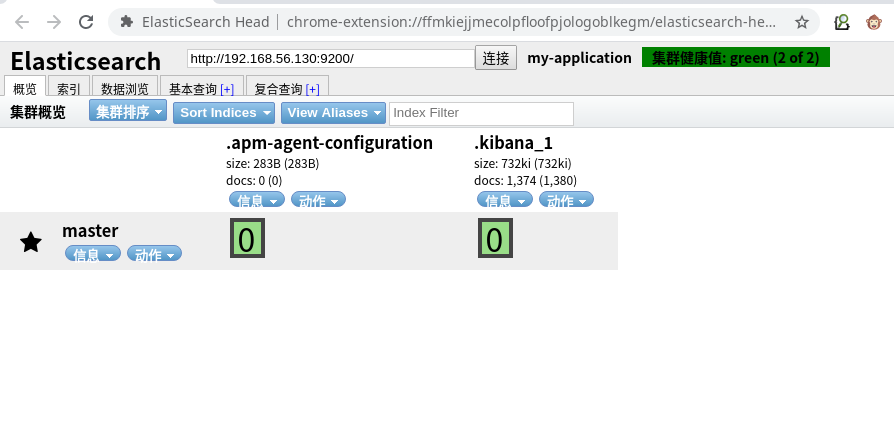
插入数据
使用 post 方式提交数据。
1 | POST http://192.168.56.130:9200/test/user/1001 |

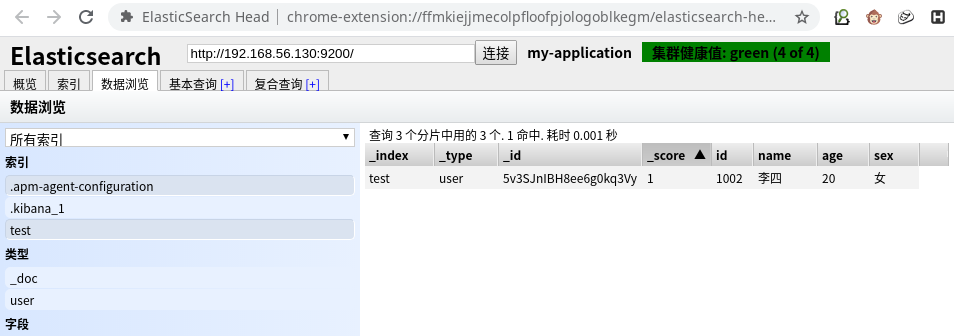
到 elasticsearch-head 数据浏览中查看 test 索引的数据

user:类型名称
1001:指定数据唯一标识(默认随机生成)
_index: 索引名称
_type: 类型名称
_id: 数据唯一表示符
_score: 得分(Elasticsearch 默认是按照文档与查询的相关度(匹配度)的得分倒序返回结果的. 得分 (_score) 就越大, 表示相关性越高.)
更新数据
- 全局更新(针对所有的shard做替换更新)
使用 put 方式,指定数据的唯一标识符(_id )将数据的所有字段进行覆盖更新
1 | PUT http://192.168.56.130:9200/test/user/1001 |

从 elasticsearch-head 数据浏览中查看到 1001 的数据已经更新

- 局部更新(针对一个 shard 做替换更新)
局部更新的步骤:
- 从旧的文档中索引 json
- 修改并生成新的文档
- 删除旧文档
- 索引新文档
1 | POST http://192.168.56.130:9200/test/user/1001/_update |

从 elasticsearch-head 数据浏览中查看到 1001 的数据已经更新

删除数据
1 | DELETE http://192.168.56.130:9200/test/user/1001 |

从 elasticsearch-head 数据浏览中查看到 1001 的数据已经删除
PS:删除一个文档不会立即从磁盘上删除,它只是被标记为已删除。随着你不断的索引更多的数据,Elasticsearch 将会在后台清理标记为已删除的文档。
搜索数据
- 查询指定的数据
1 | GET http://192.168.56.130:9200/test/user/1001/5v3SJnIBH8ee6g0kq3Vy |

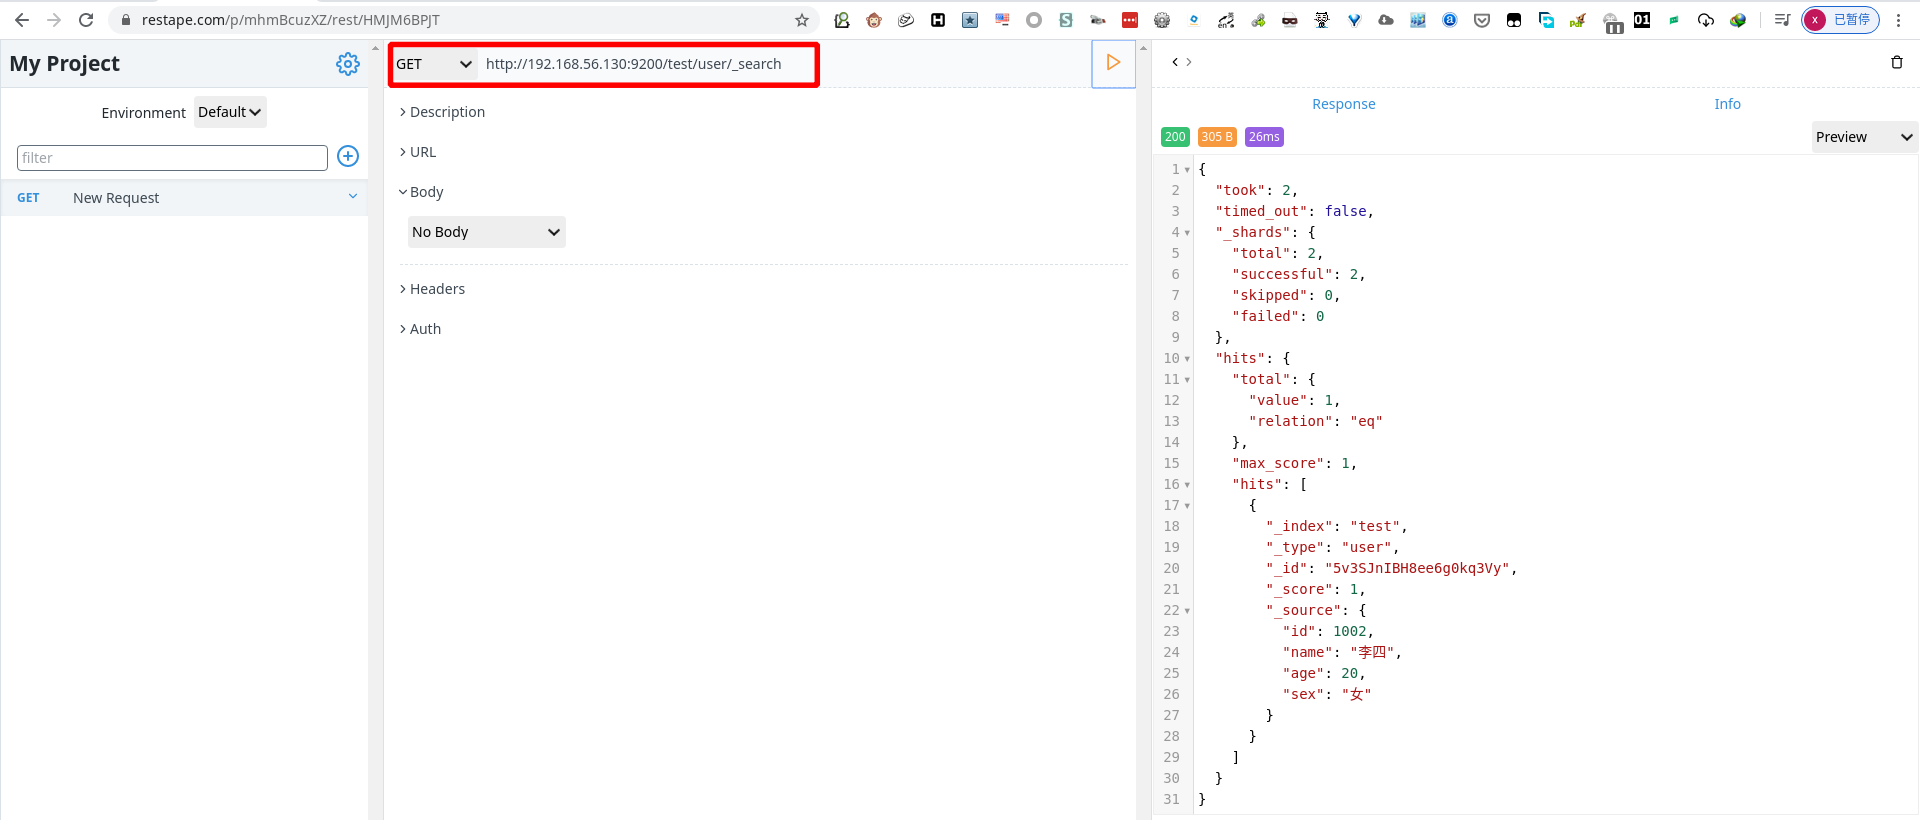
- 查询所有数据(默认指显示10条)
1 | GET http://192.168.56.130:9200/test/user/1001/_search |
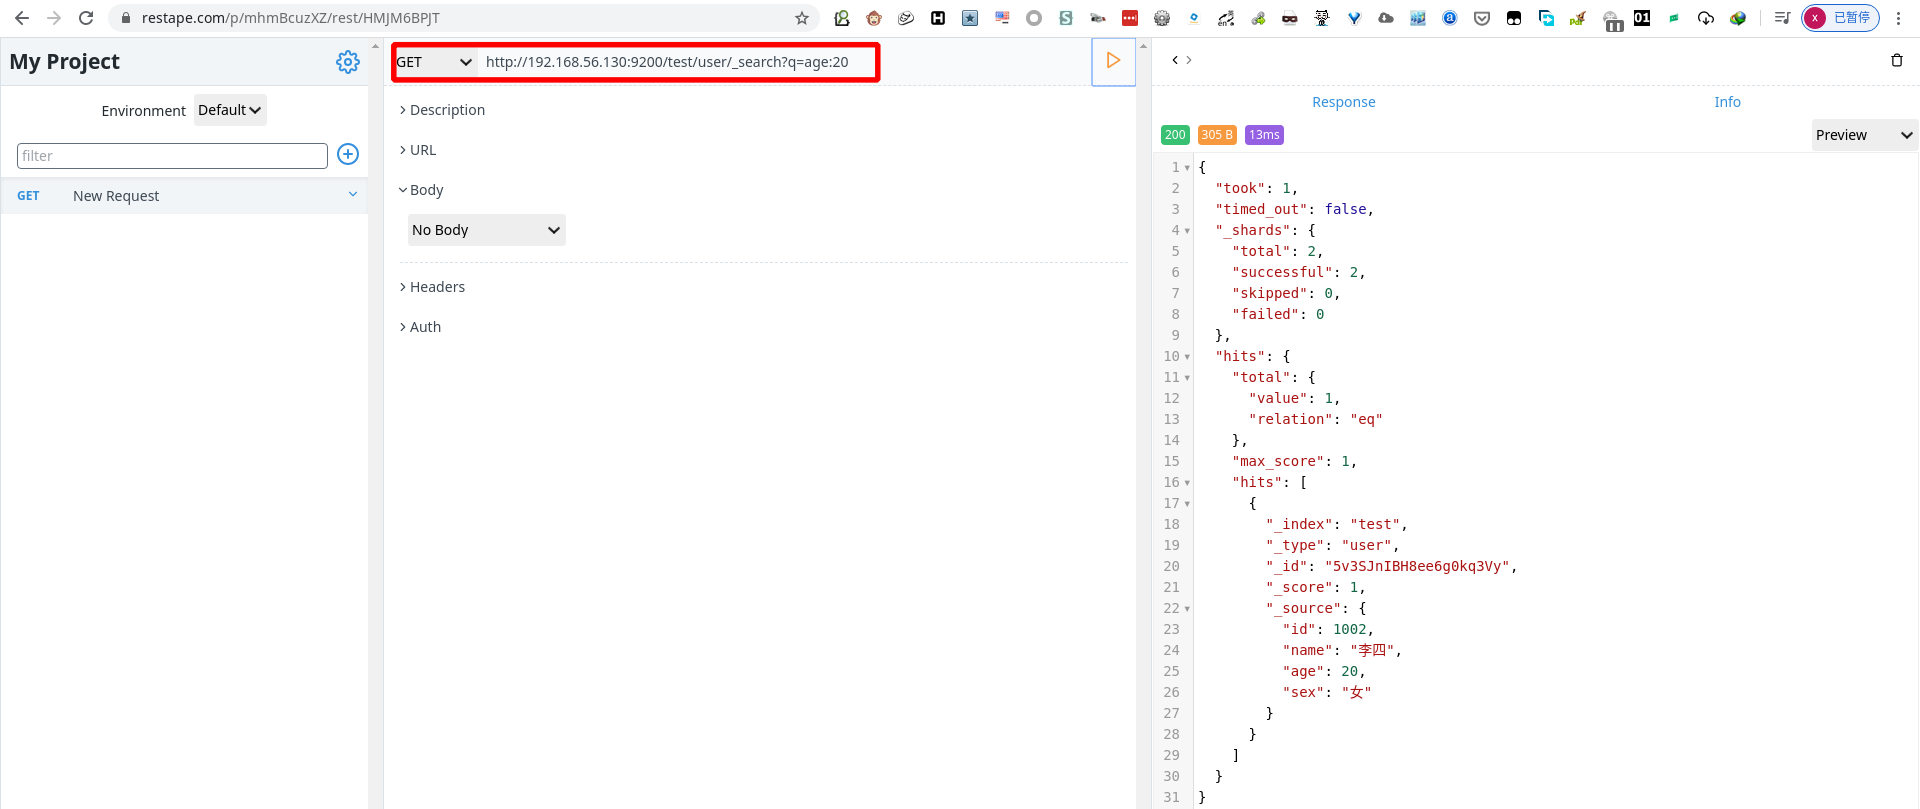
- 关键字查询(查询age=20的数据)
1 | GET http://192.168.56.130:9200/test/user/1001/?q=age:20 |
DLS搜索
提前先新建数据
- 简单查询
查询年龄为 20 的数据
1 | POST http://192.168.56.130:9200/test/user/_search |
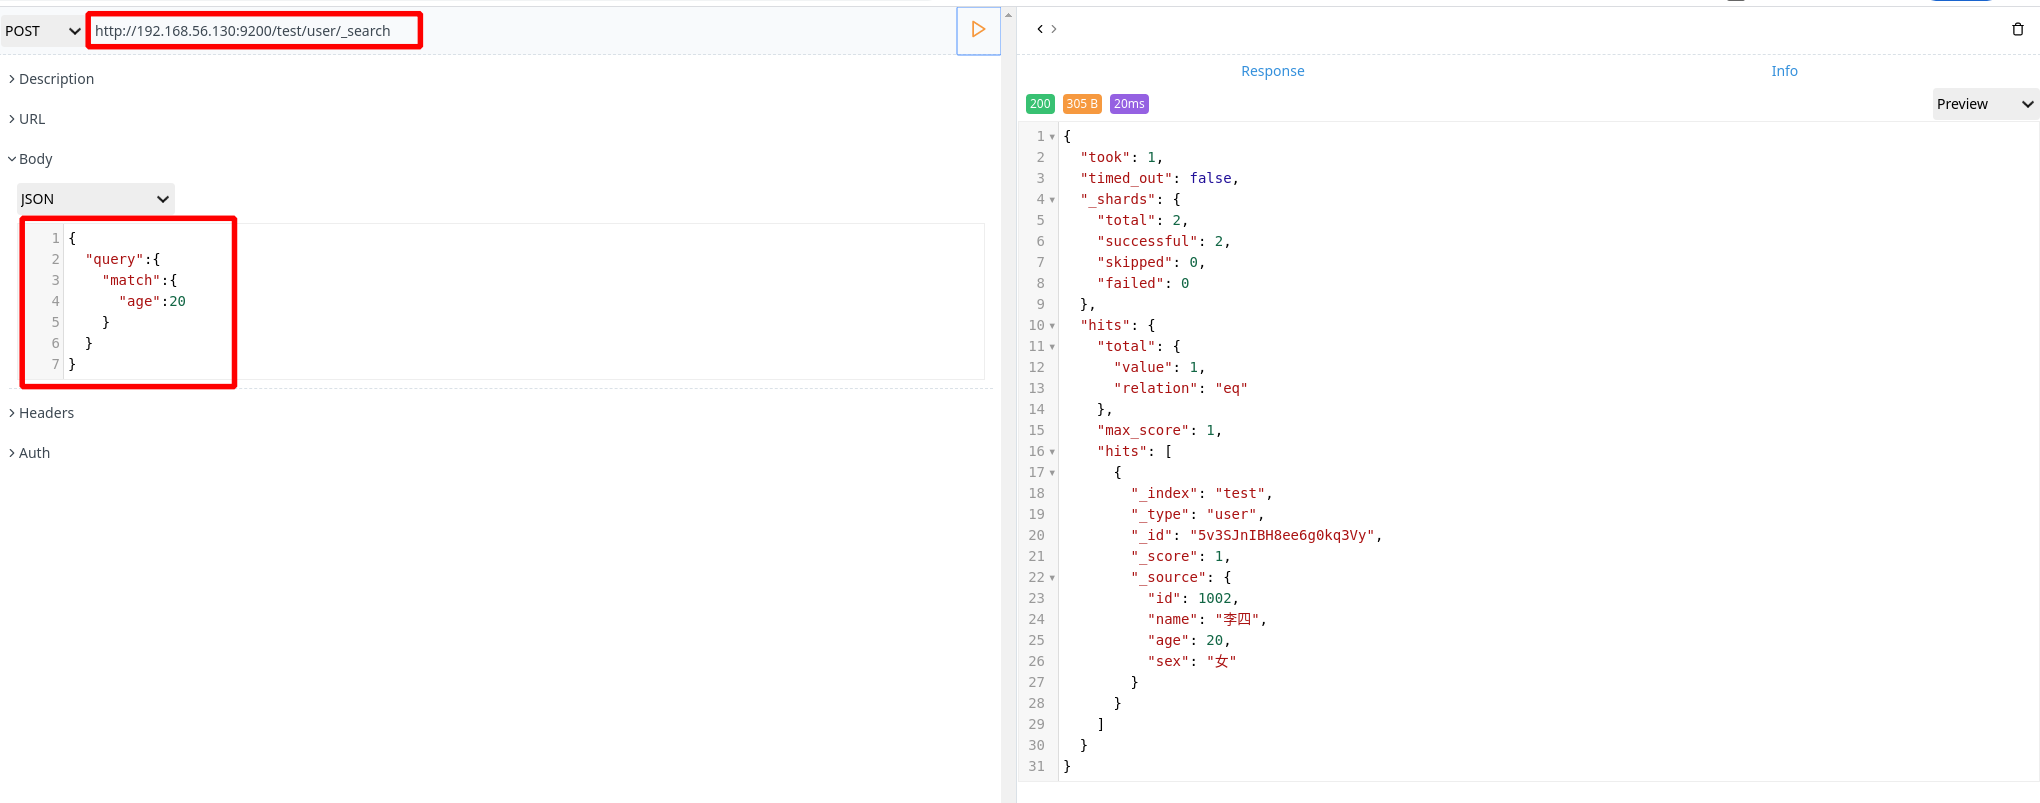
- 复杂查询
查询年龄大于 20 ,且性别为男的数据
1 | POST http://192.168.56.130:9200/test/user/_search |
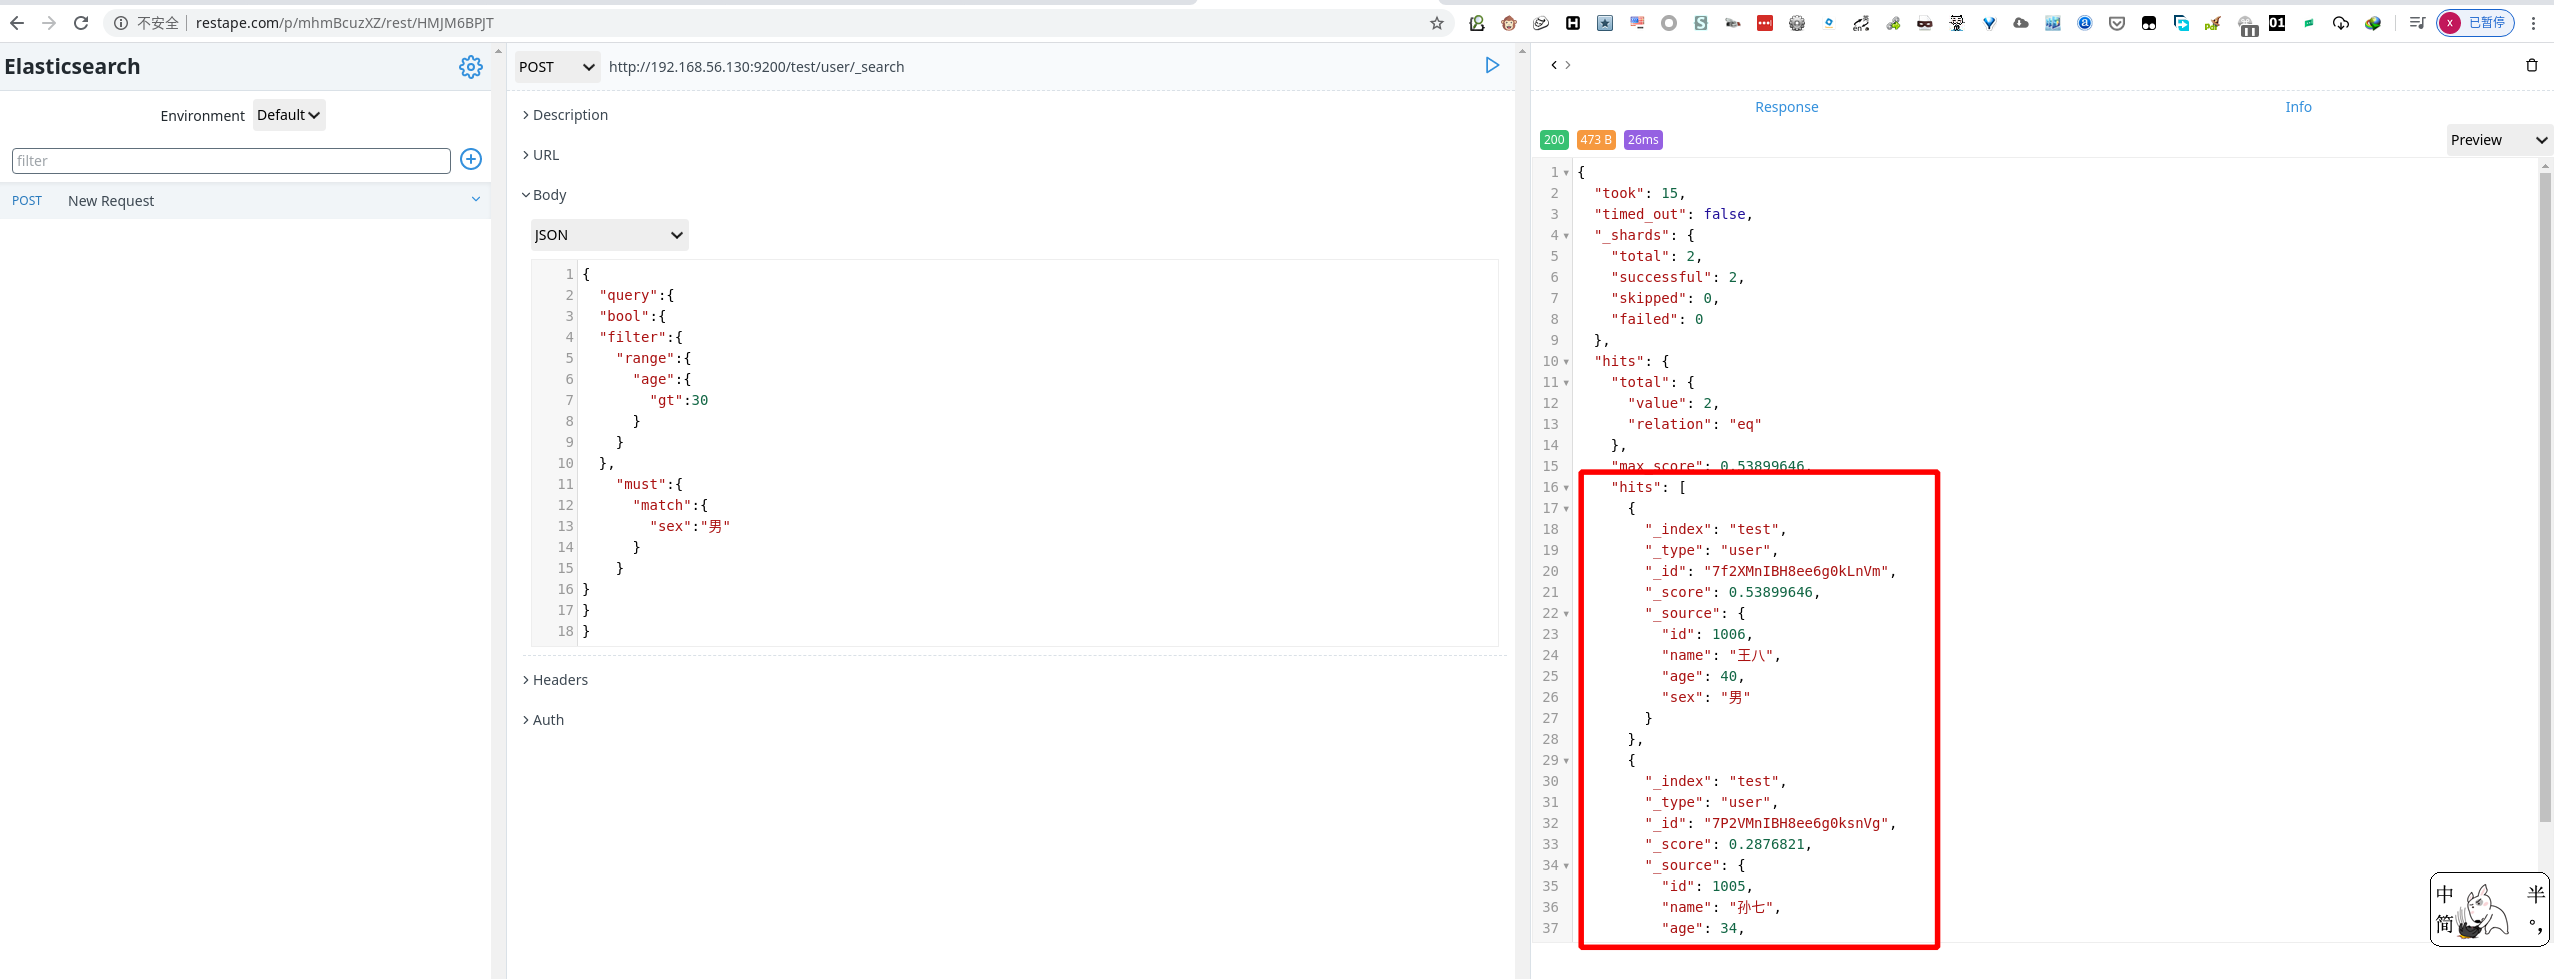
- 针对关键字进行全局搜索
查询 name 为 “张三”“李四”的数据
1 | POST http://192.168.56.130:9200/test/user/_search |

高亮显示
对 “张三”“李四”数据的 name 字段进行高亮显示
1 | POST http://192.168.56.130:9200/test/user/_search |

聚合(相当于数据库的 group by 操作)
以 age 做一个聚合
1 | POST http://192.168.56.130:9200/test/user/_search |
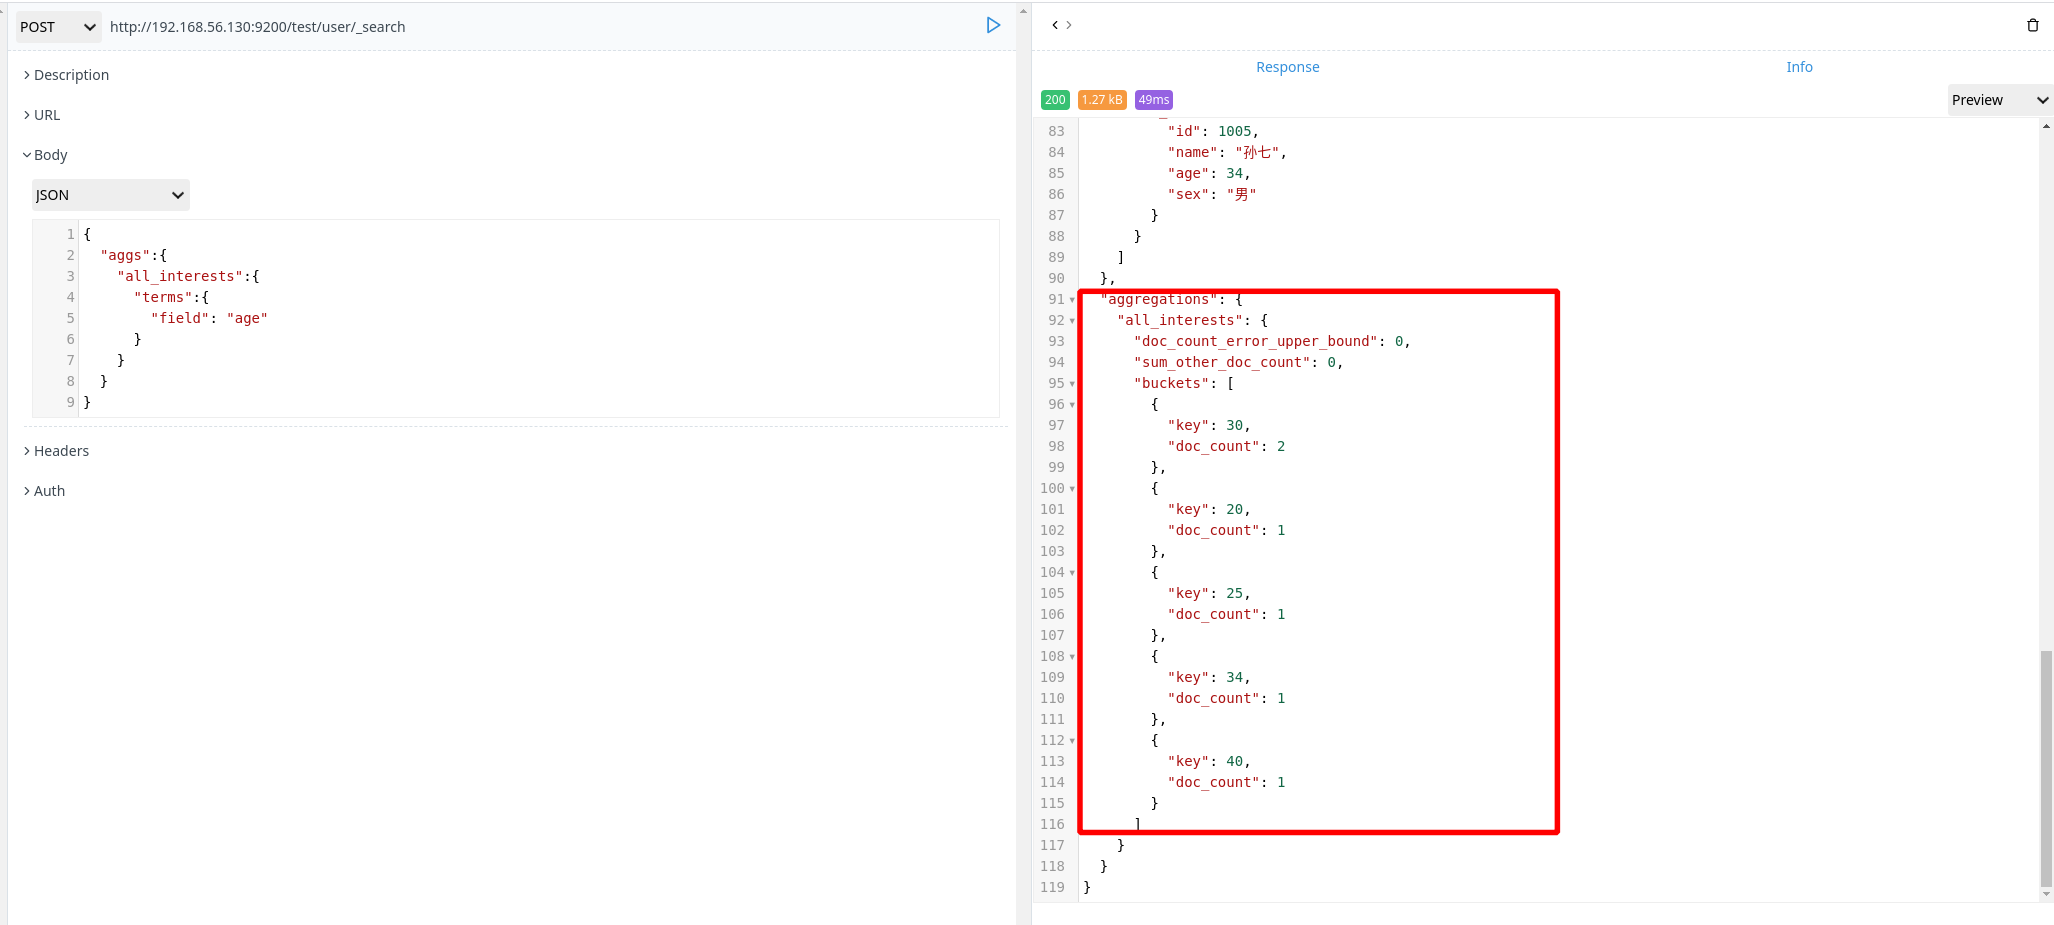
Elasticsearch 核心内容
文档
metadata(元数据)
| 节点 | 说明 |
|---|---|
| _index | 文档存储的地方,在哪个 index 中 |
| _type | 文档代表的对象类,在哪个 type 中 |
| _id | 文档的唯一标识 |
查询响应
- pretty
在不使用工具的时候不易阅读输出的数据,如下图所示:

使用 ”?pretty“ 参数对输出进行优化,如下图所示:

- 字段响应
在搜索过程中都是对整个数据进行搜索。但是在查询过程中需要对数据中的某些字段进行查看,这里就需要使用字段响应。
1 | GET http://192.168.56.130:9200/test/user/6P2QMnIBH8ee6g0kbXVq/_source?_source=id,name |

判断文档是否存在
1 | HEAD http://192.168.56.130:9200/test/user/8f0oNnIBH8ee6g0kB3Vw |
批量操作
批量查询
1 | POST http://192.168.56.130:9200/test/user/_mget |
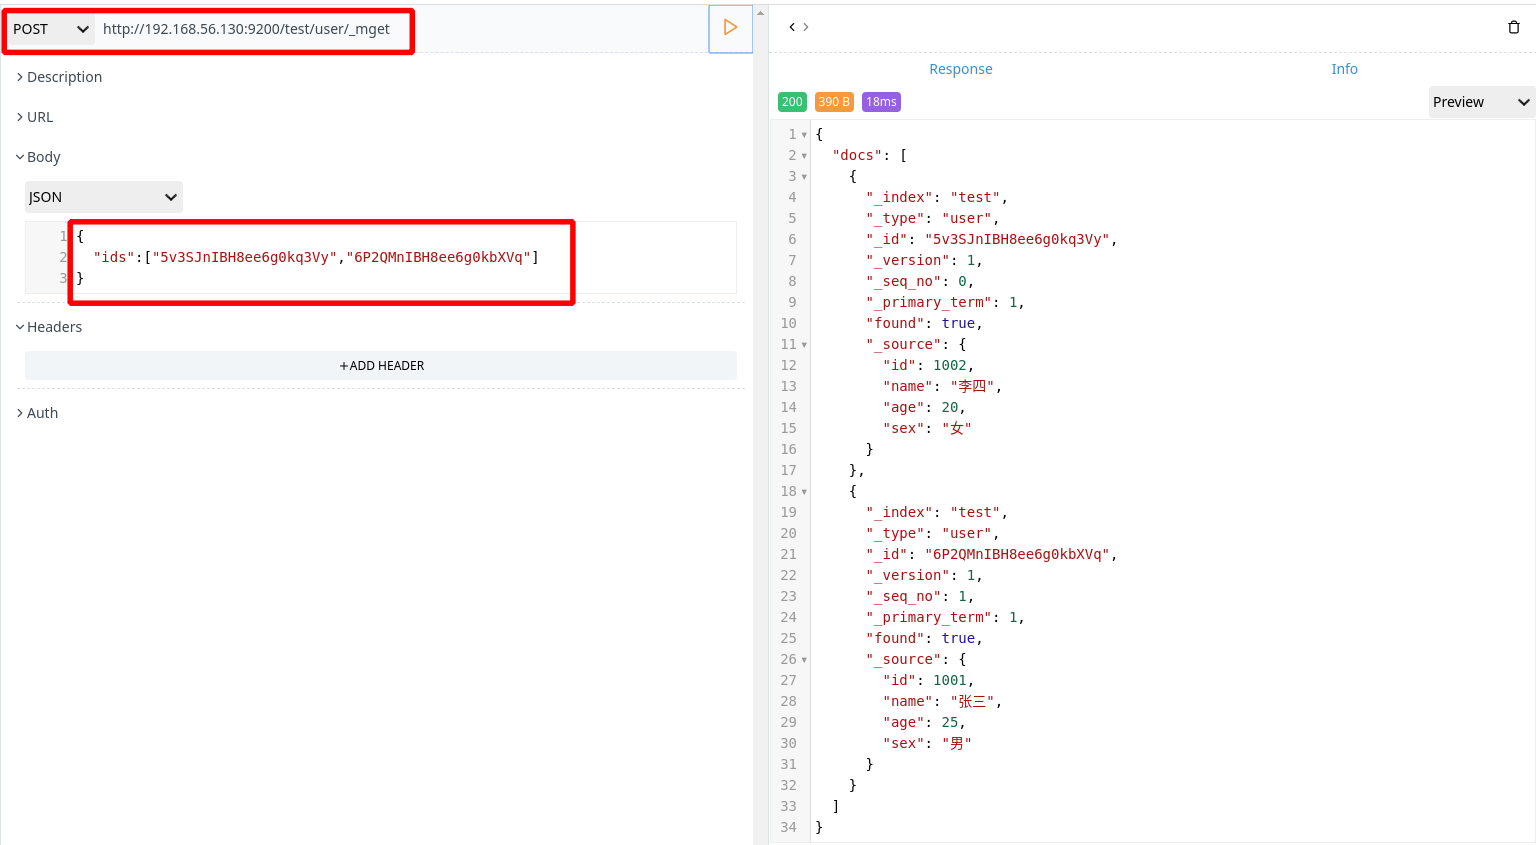
批量插入
1 | POST http://192.168.56.130:9200/test/user/_bulk |
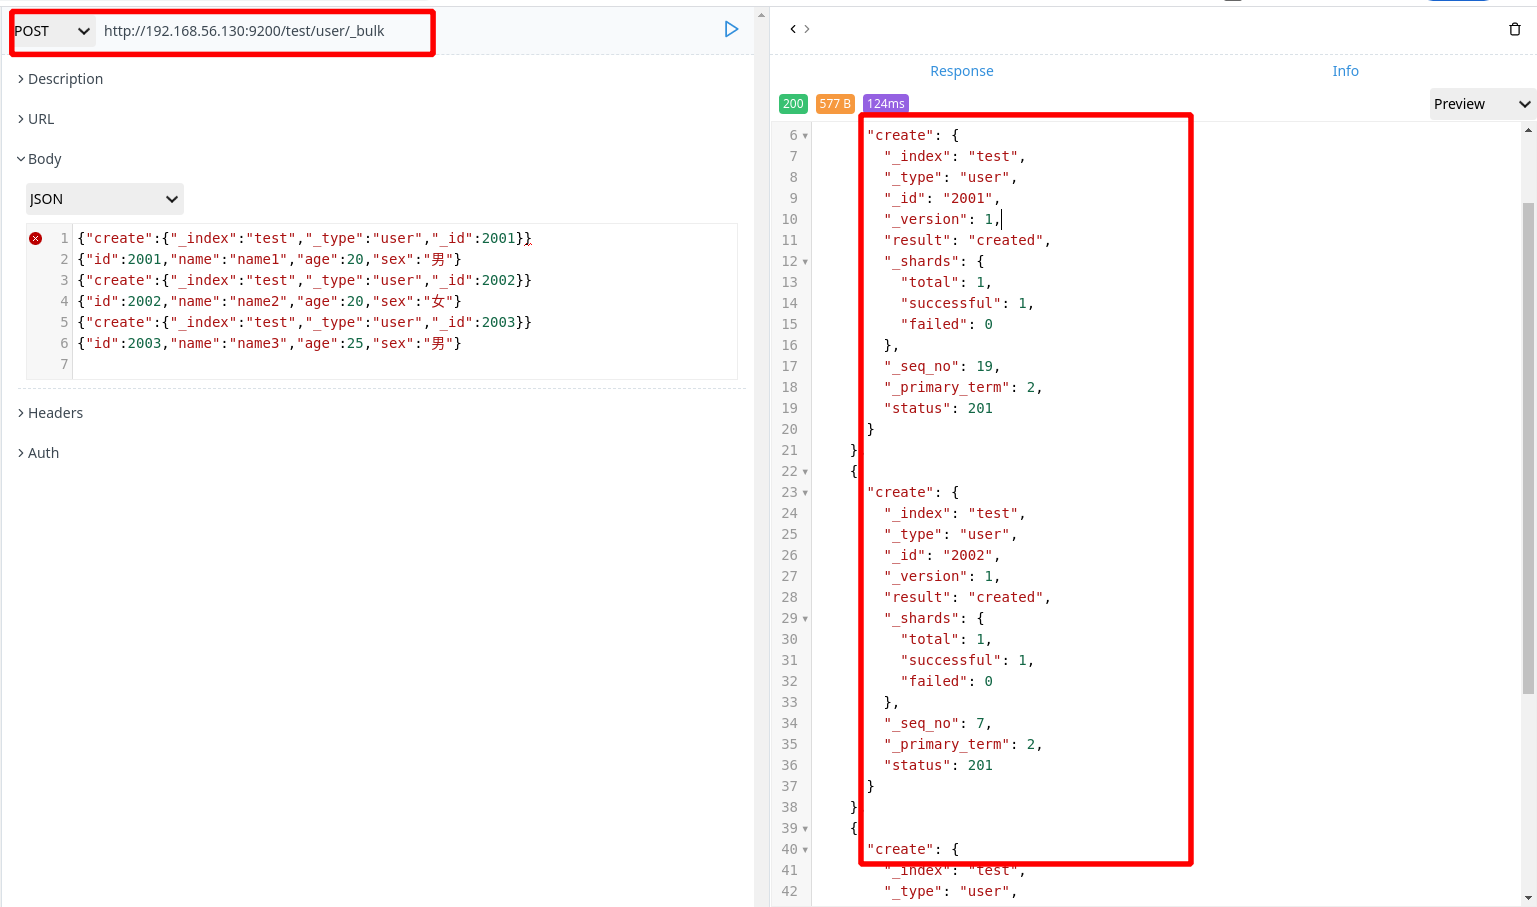

最后一行必须有回车行
批量更新
1 | POST http://192.168.56.130:9200/test/user/_bulk |
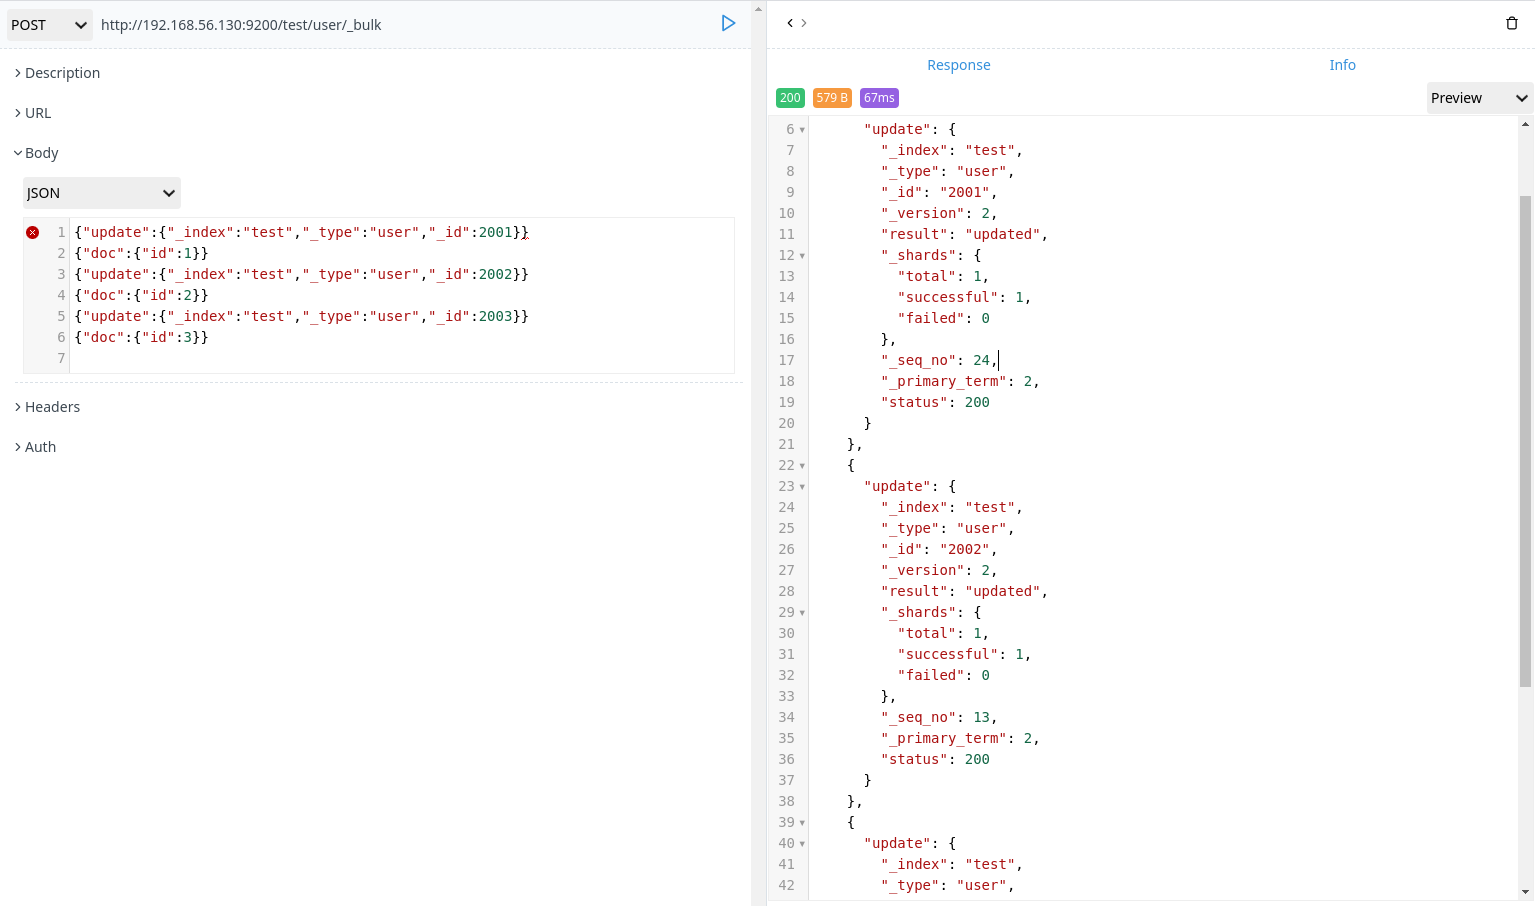

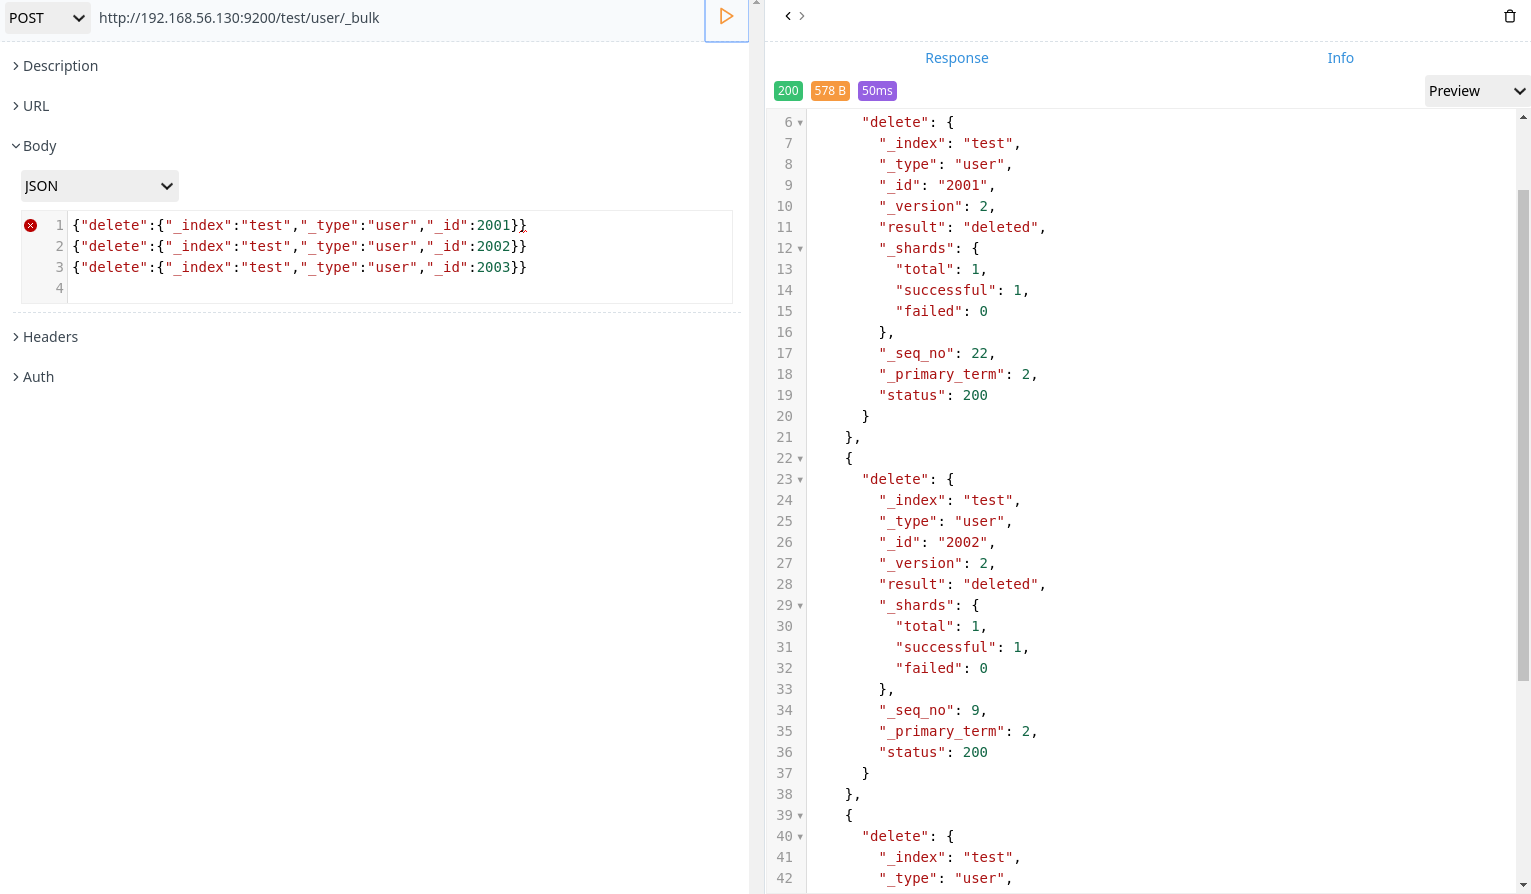
- 批量删除
1 | POST http://192.168.56.130:9200/test/user/_bulk |

分页
elasticsearch 接受 from 和 size 参数
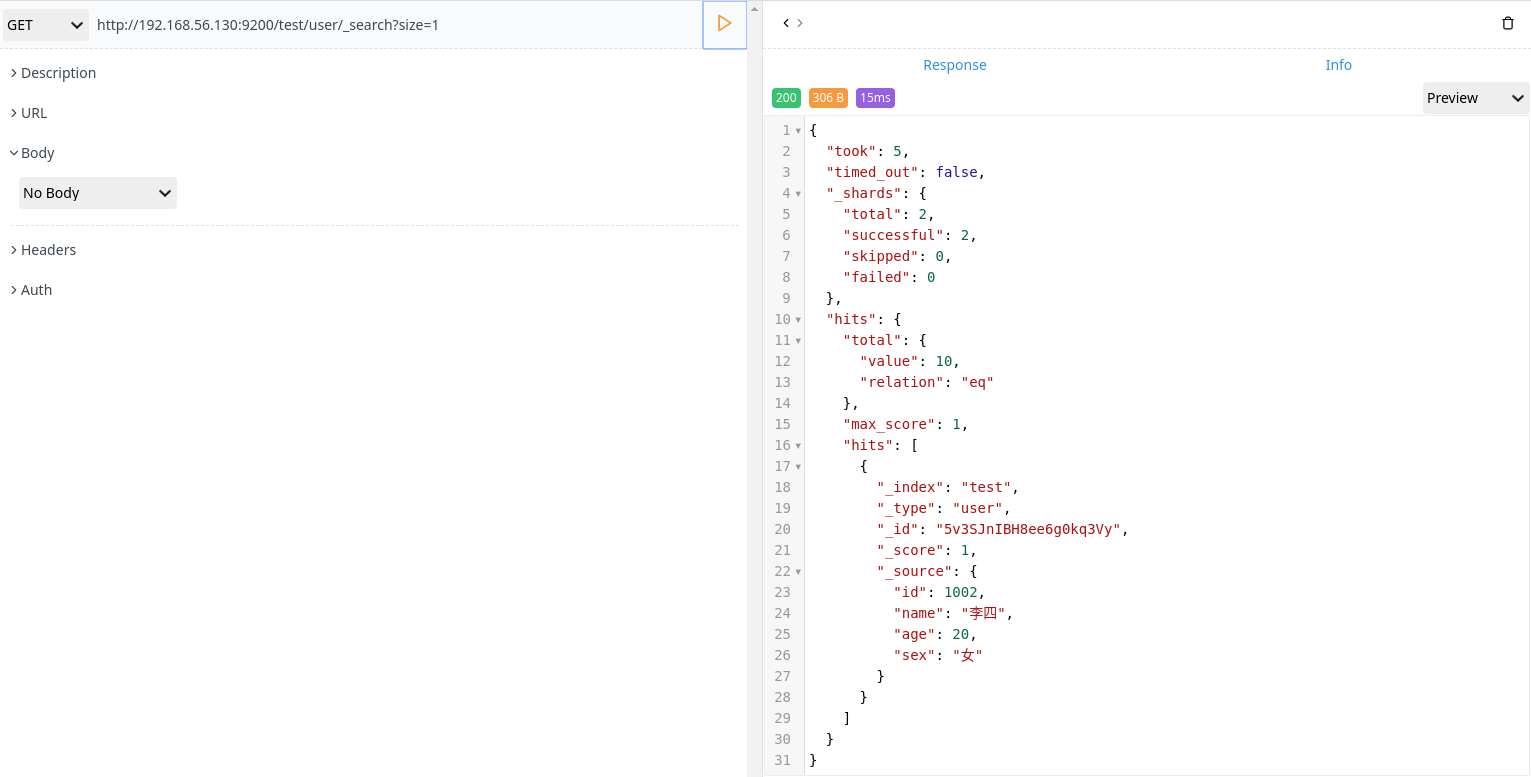
- size:需要搜索数据量,默认是搜索 10 条数据
- from:跳过开始的结果数,默认是0
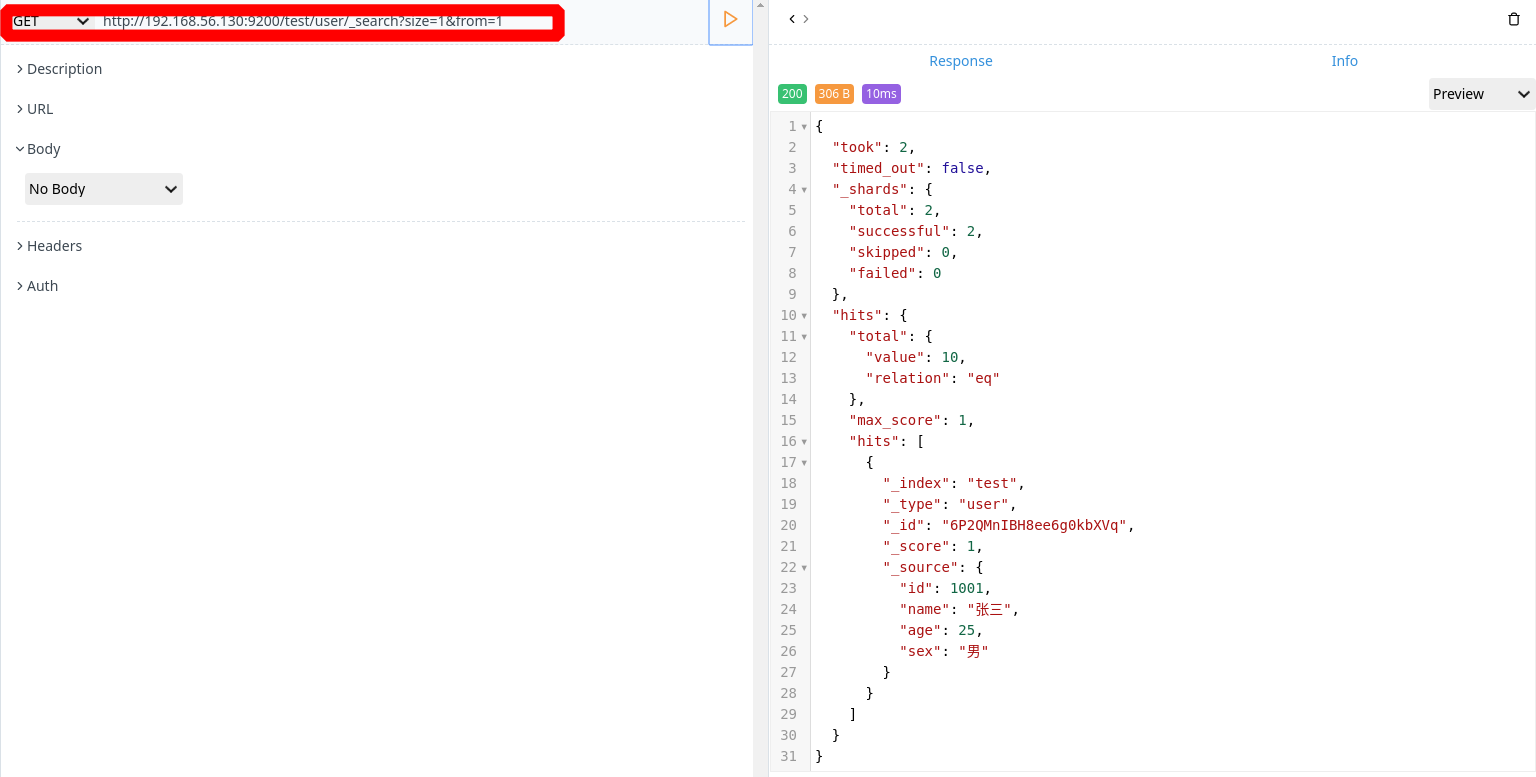
- 从第一条数据开始,搜索一条数据
1 | GET http://192.168.56.130:9200/test/user/_search?size=1 |
- 从第二条数据开始,搜索一条数据
1 | GET http://192.168.56.130:9200/test/user/_search?size=1&from=1 |
映射
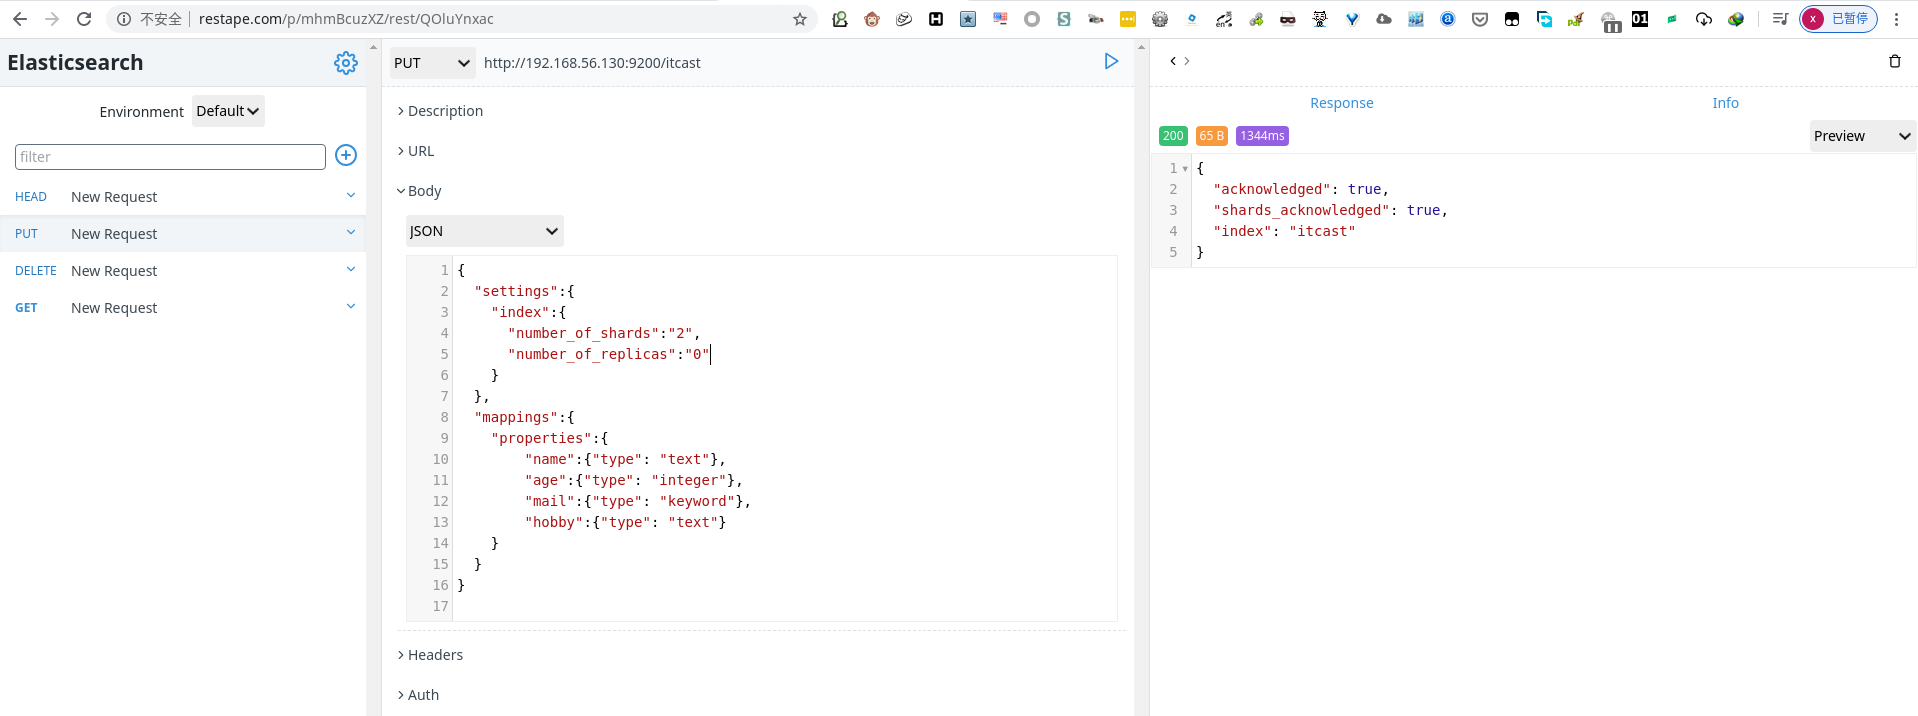
elasticsearch 会进行自动判断类型,但是有些时候我们需要进行明确字段的类型烦人,否则,自动判断的类型和实际需求是不相符合的。
自动判断规则如下:
| JSON type | Field type |
|---|---|
| 布尔值:true 和 false | boolean |
| 整数:123 | long |
| 小数:123.45 | double |
| 时间:”2020-05-24” | date |
| 字符串:”abc” | string |
elasticsearch 中支持的类型:
| 类型 | 表示的数据类型 |
|---|---|
| String | text,keyword |
| Whole number | byte,short,integer,long |
| Floating point | float,double |
| Boolean | boolean |
| Date | date |
keyword 类型无法分词
创建明确类型的索引
1 | PUT http://192.168.56.130:9200/itcast |

查看映射( mapping)
1 | GET http://192.168.56.130:9200/itcast/_mapping |

插入数据
1 | POST http://192.168.56.130:9200/itcast/_bulk |
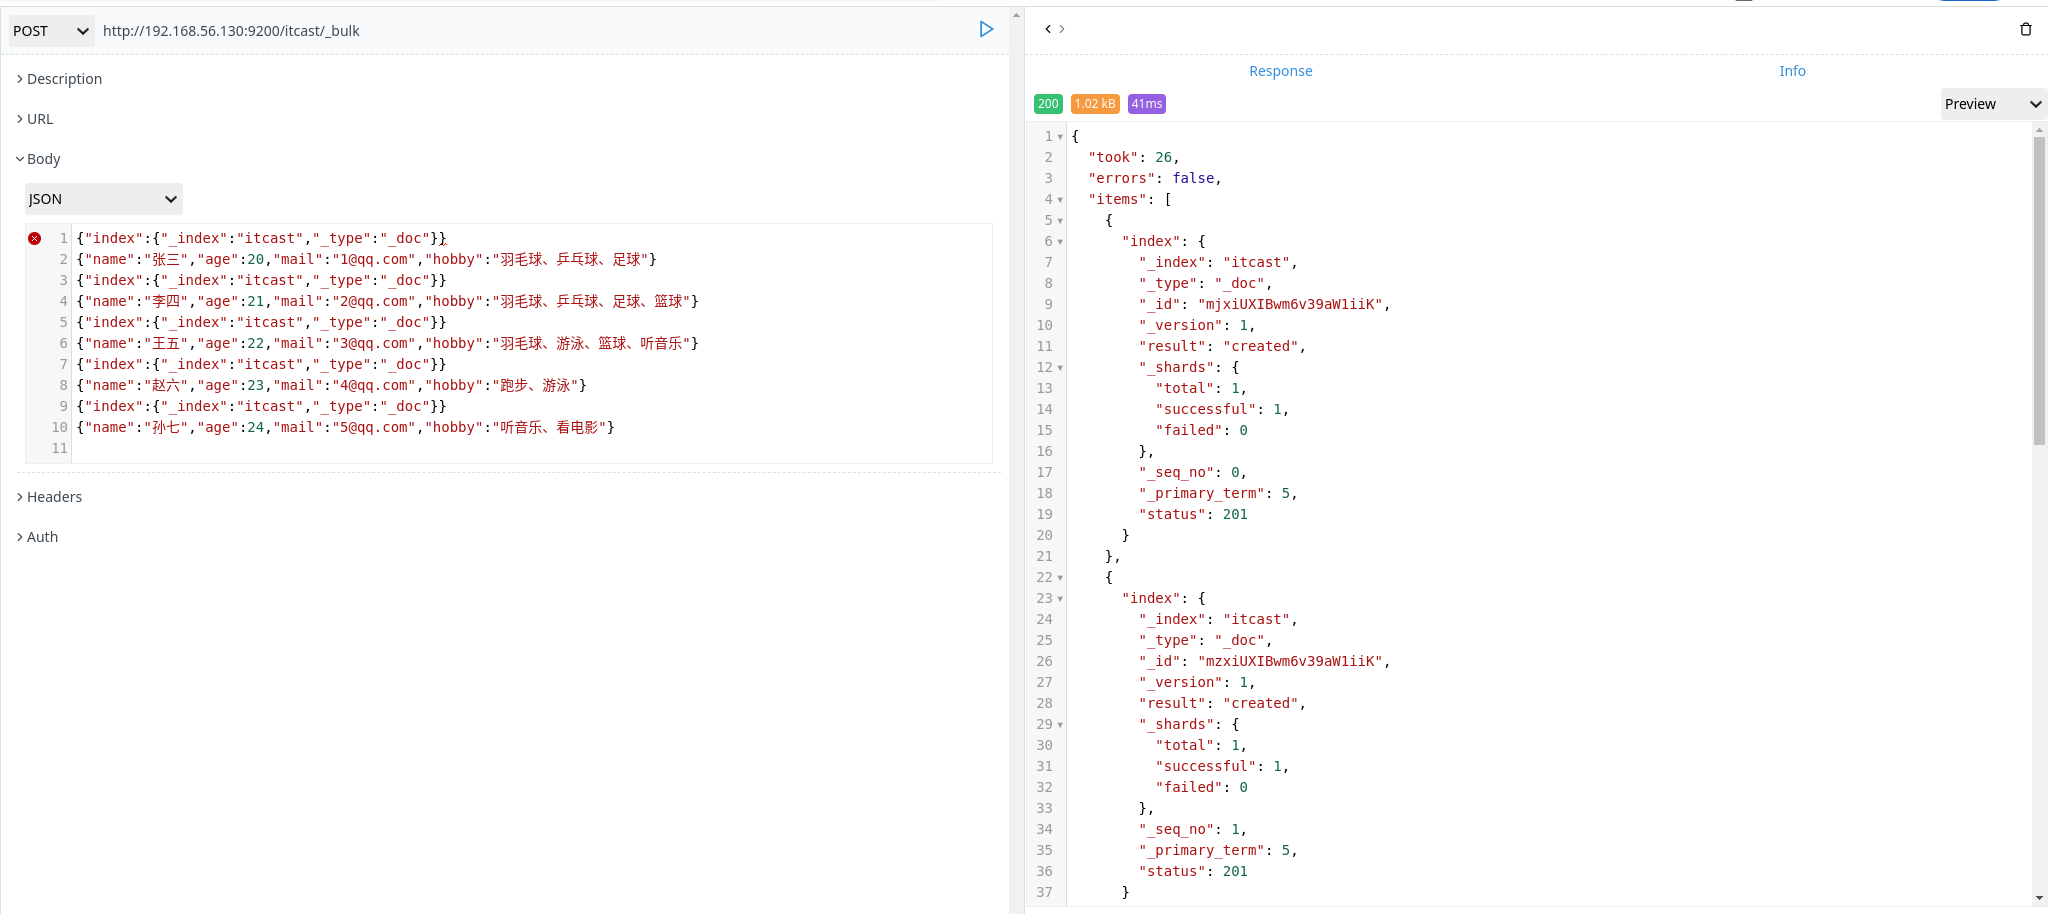
PS:在 elasticsearch 中,mapping 不能指定多个 _type 所以这里指定为默认 _type(_doc)
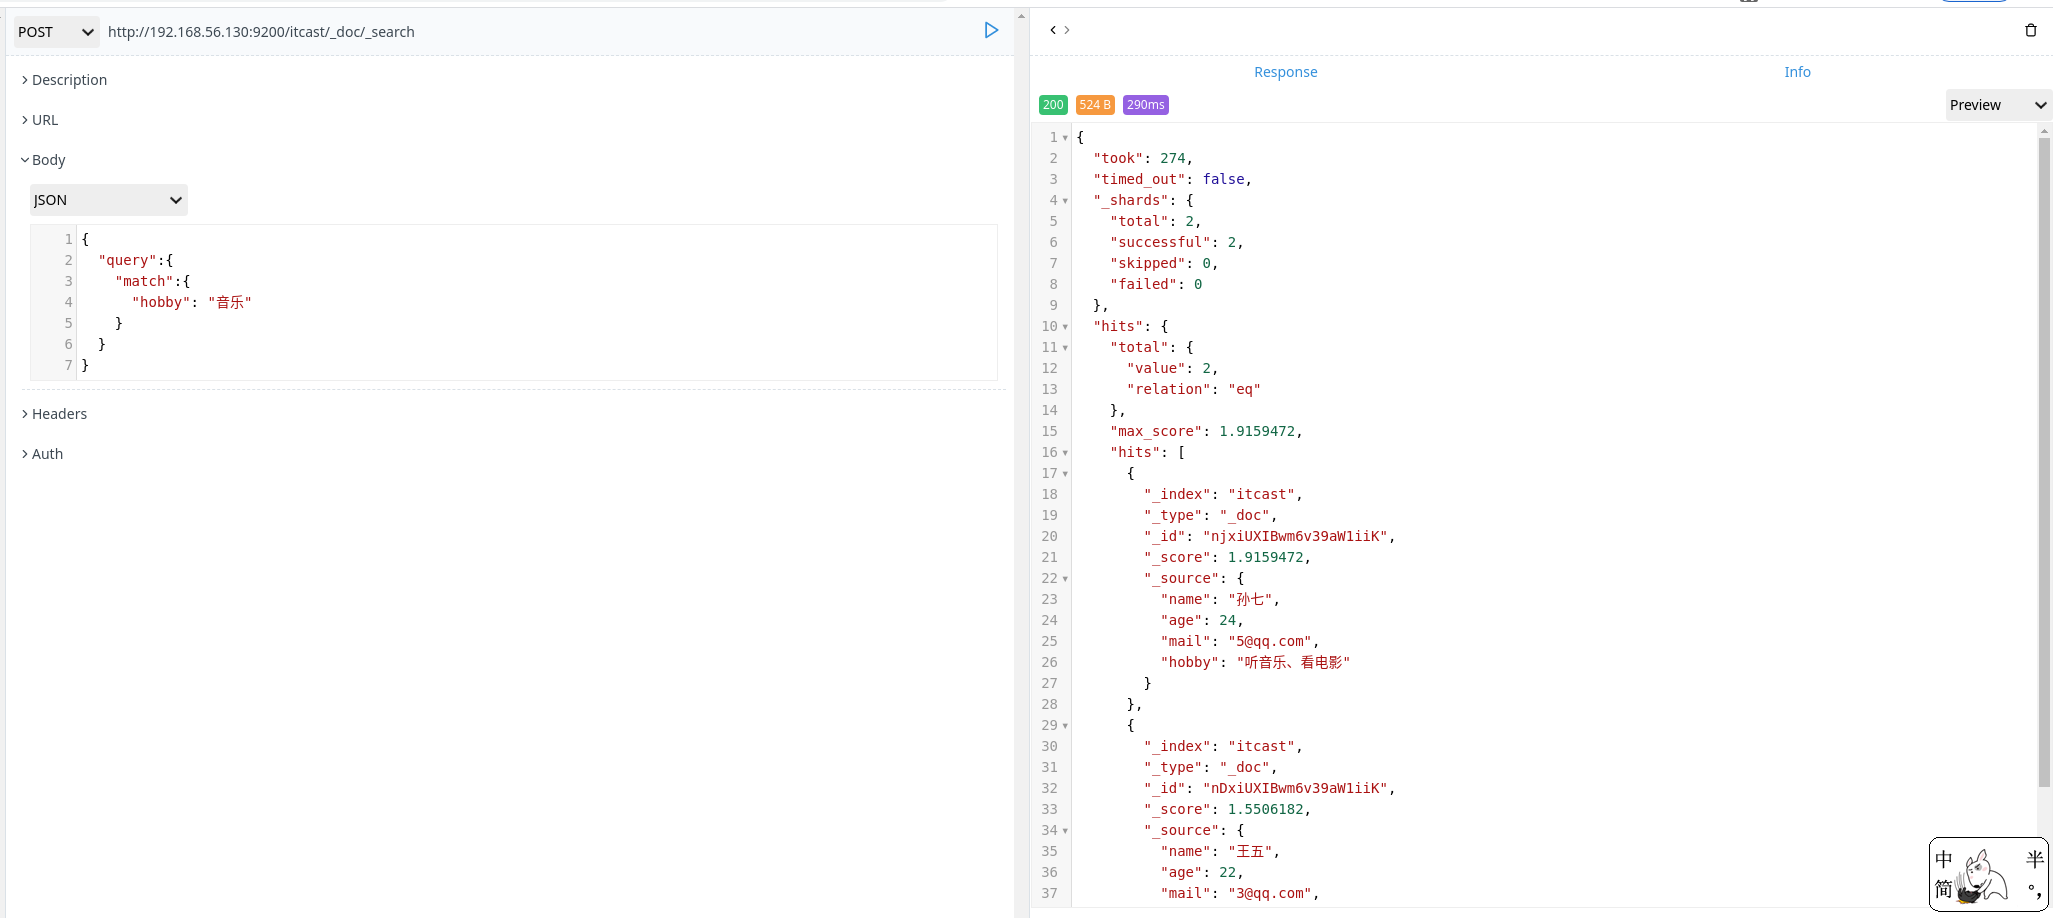
查询数据
1 | POST http://192.168.56.130:9200/itcast/_doc/_search |
结构化查询
term 查询
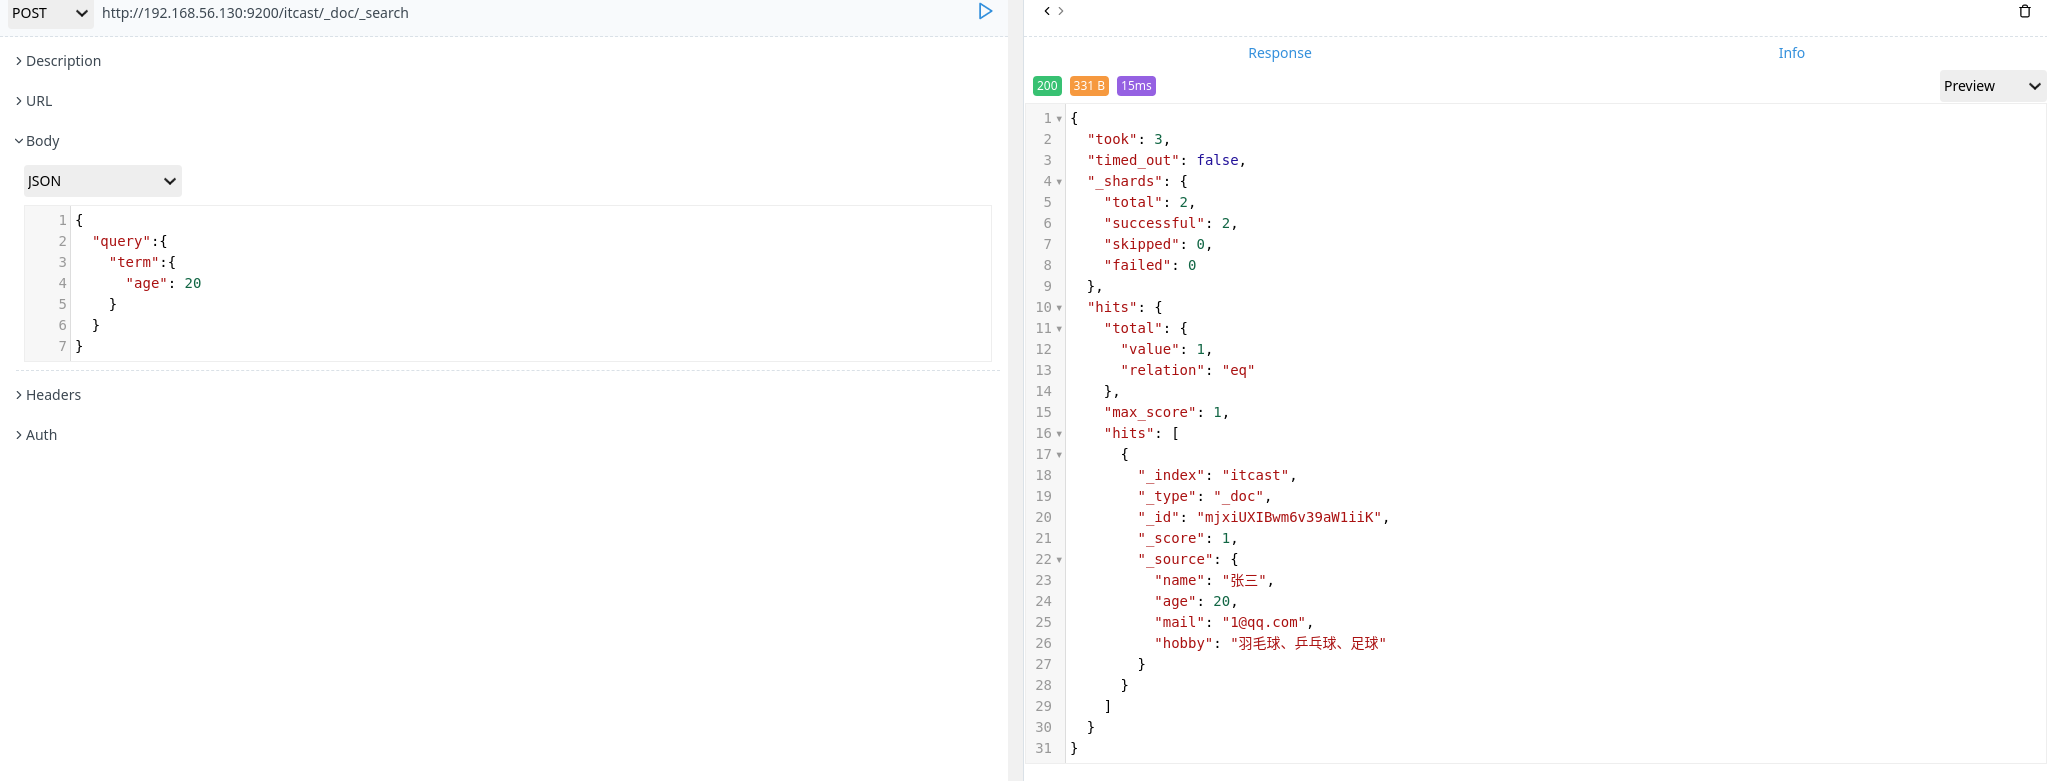
term 主要用于精确匹配数值,比如数字,日期,布尔值或 not_analyzed 的字符串
1 | POST http://192.168.56.130:9200/itcast/_doc/_search |
terms 查询
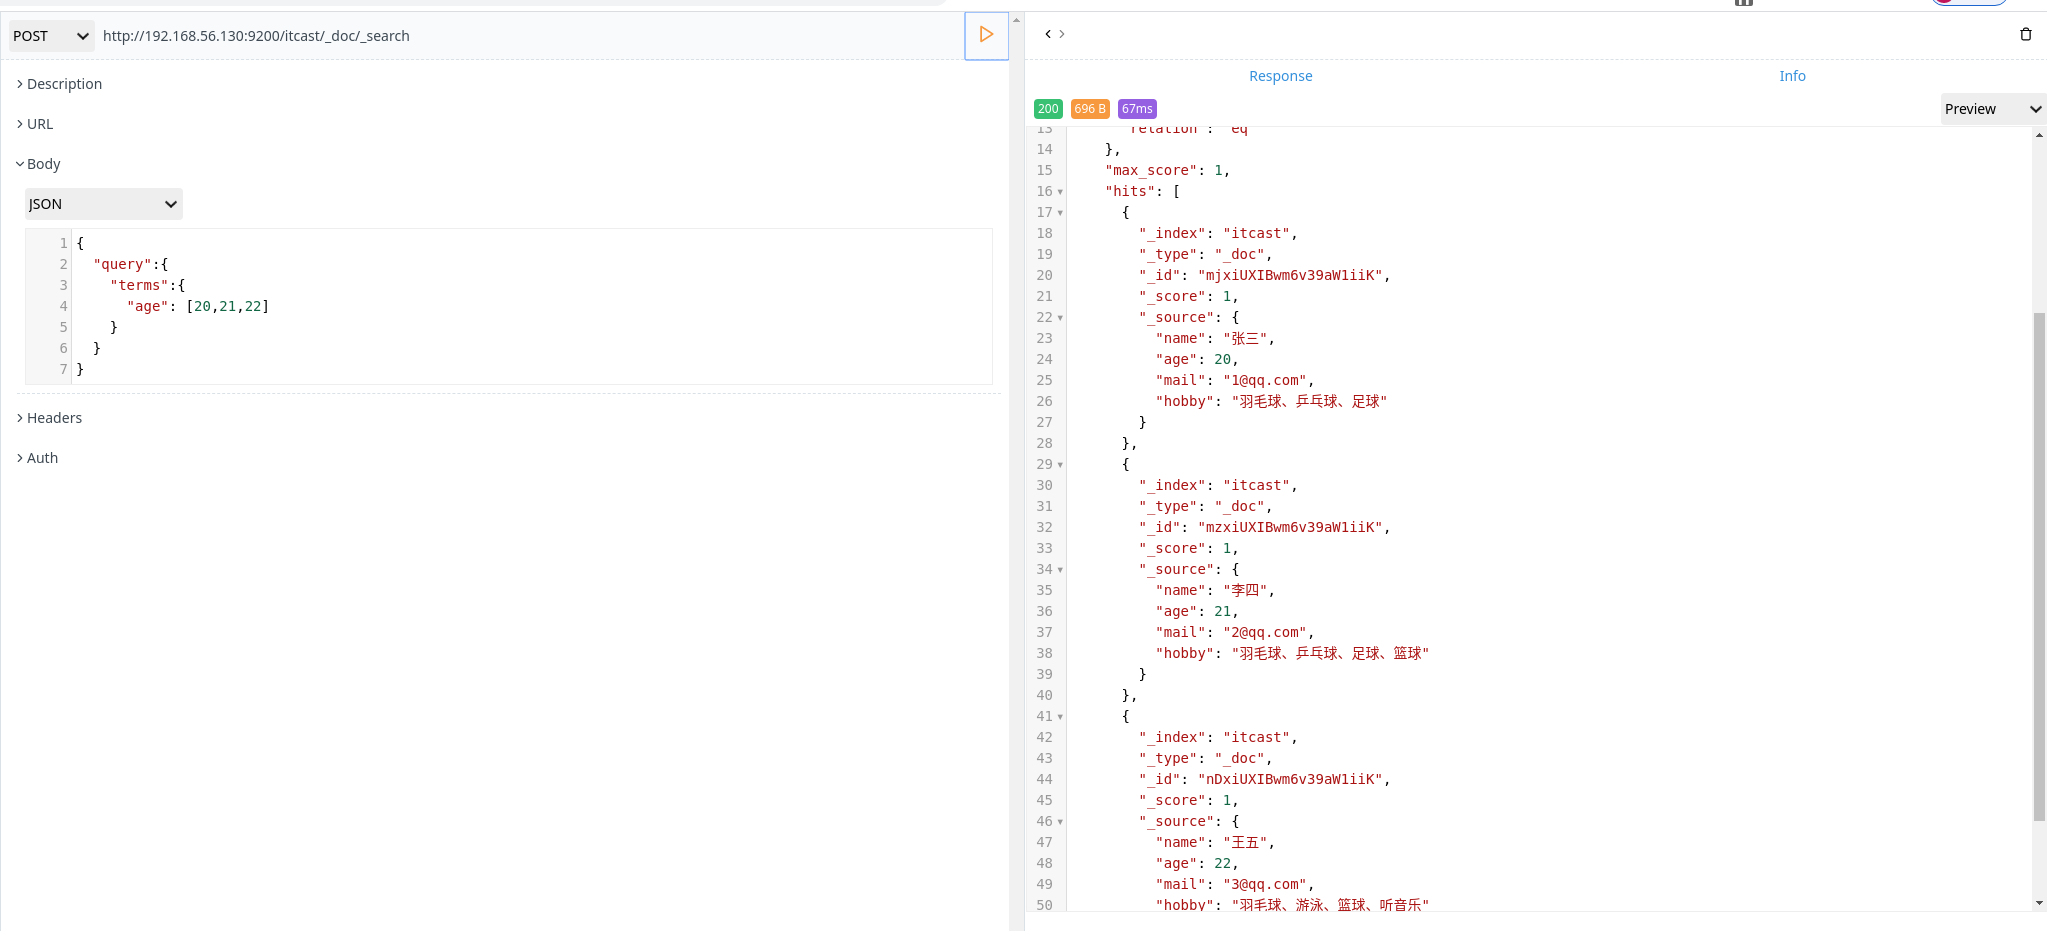
terms 和 term 有些类似,但是 terms 允许制定多个匹配条件,如果某个字段指定了多个值,那么文档需要一起去做匹配
1 | POST http://192.168.56.130:9200/itcast/_doc/_search |
range 查询
range 过滤 允许按照指定范围查找一批数据
1 | POST http://192.168.56.130:9200/itcast/_doc/_search |
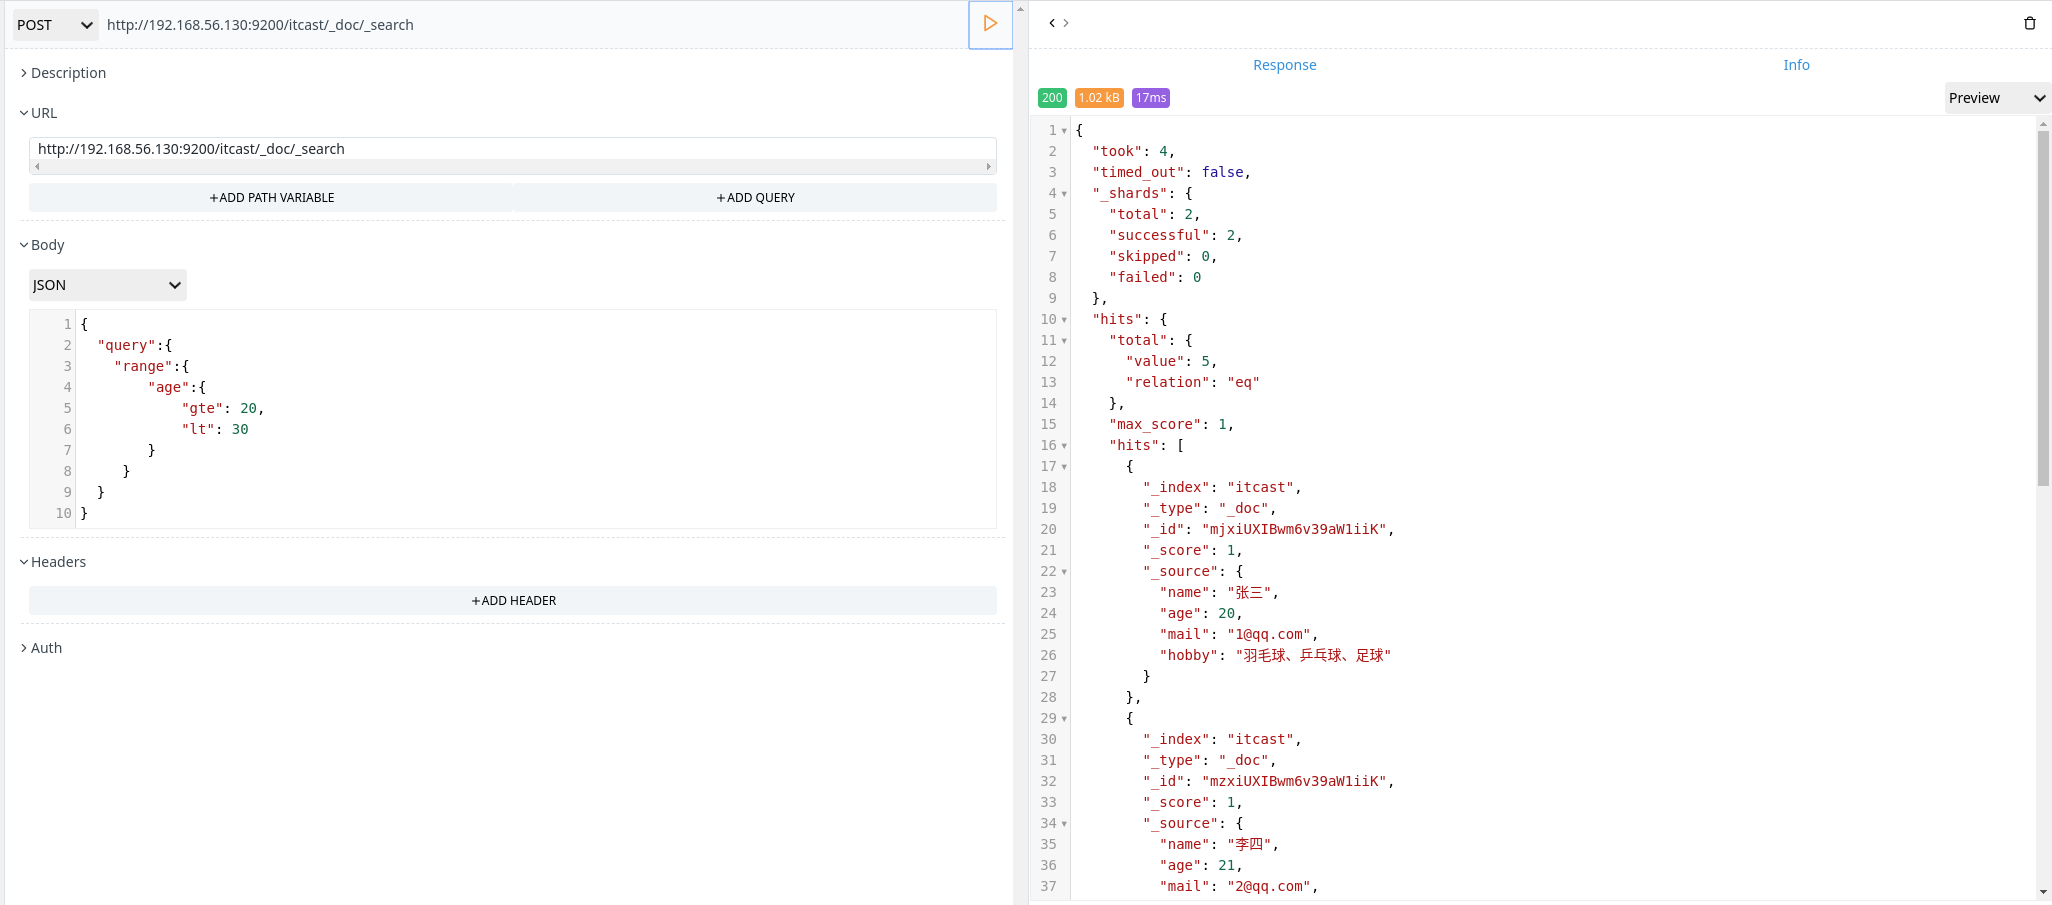
范围操作符包含:
- gt:大于
- gte:大于等于
- lt:小于
- lte:小于等于
exists 查询
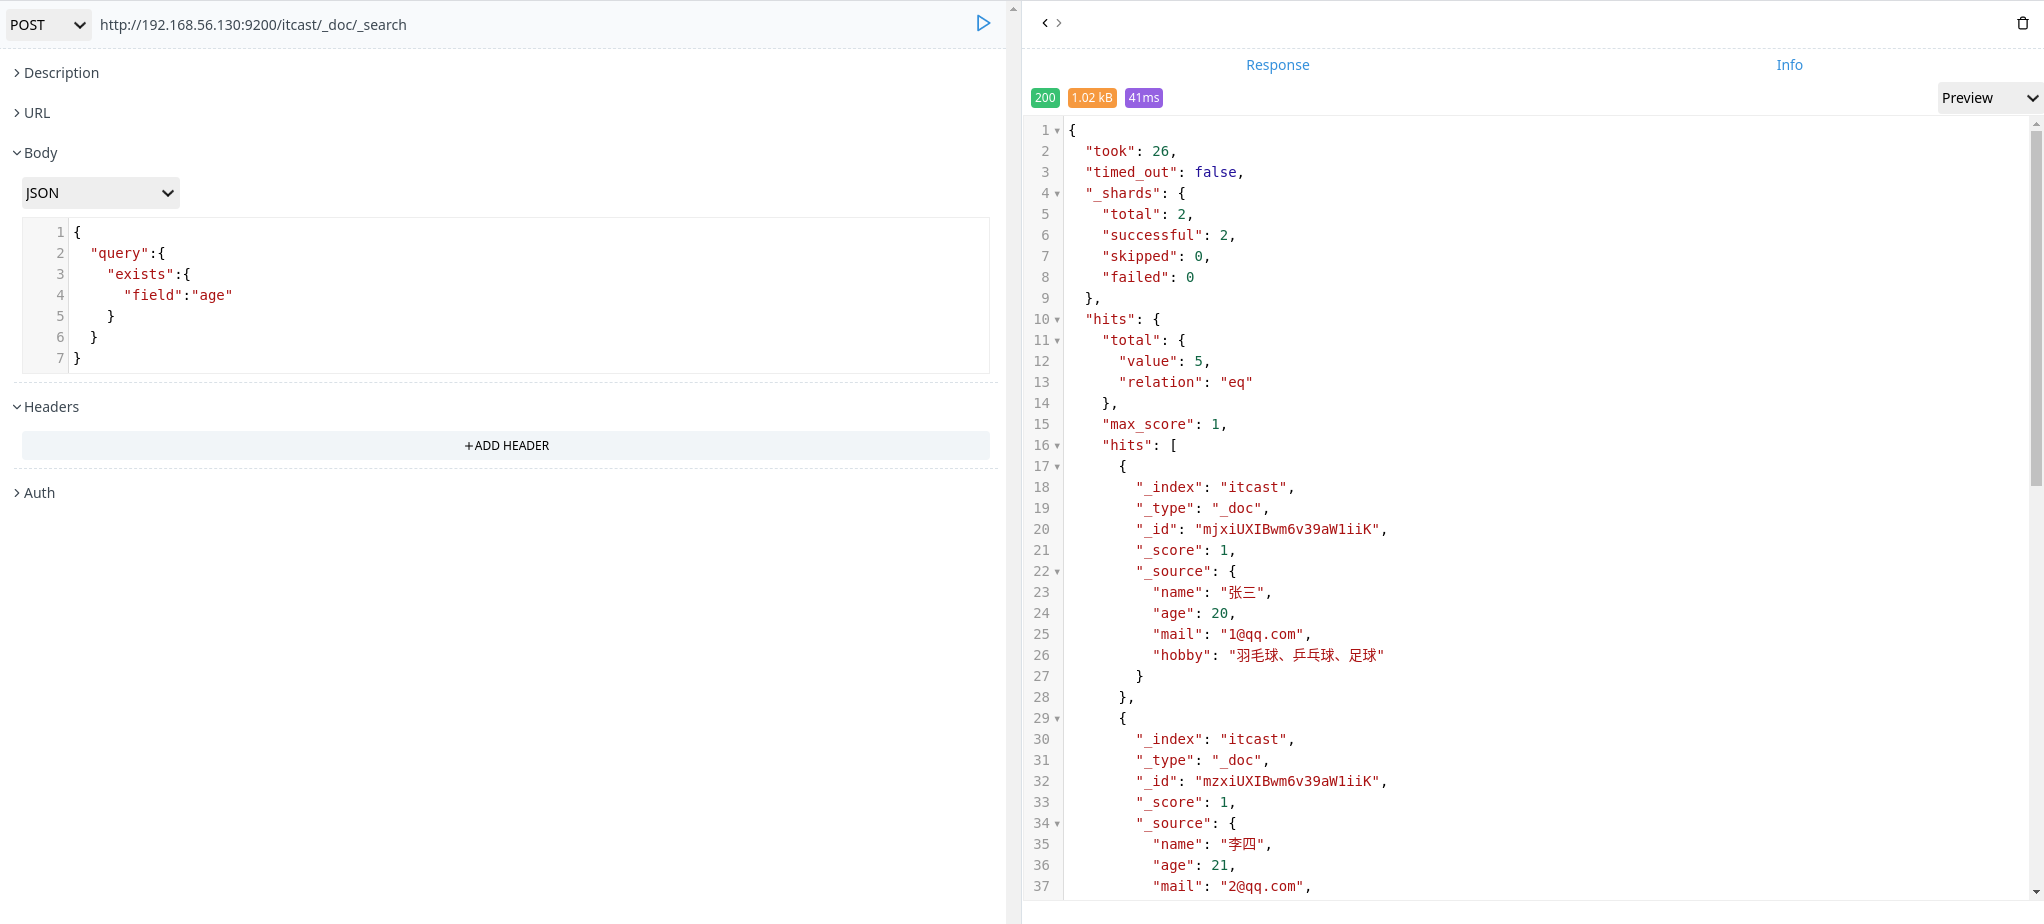
exists 查询可以用于查找文档中是否包含了指定字段或没有某个字段,类似于 SQL 语句中的 IS_NULL 条件
1 | POSt http://192.168.56.130:9200/itcast/_doc/_search |
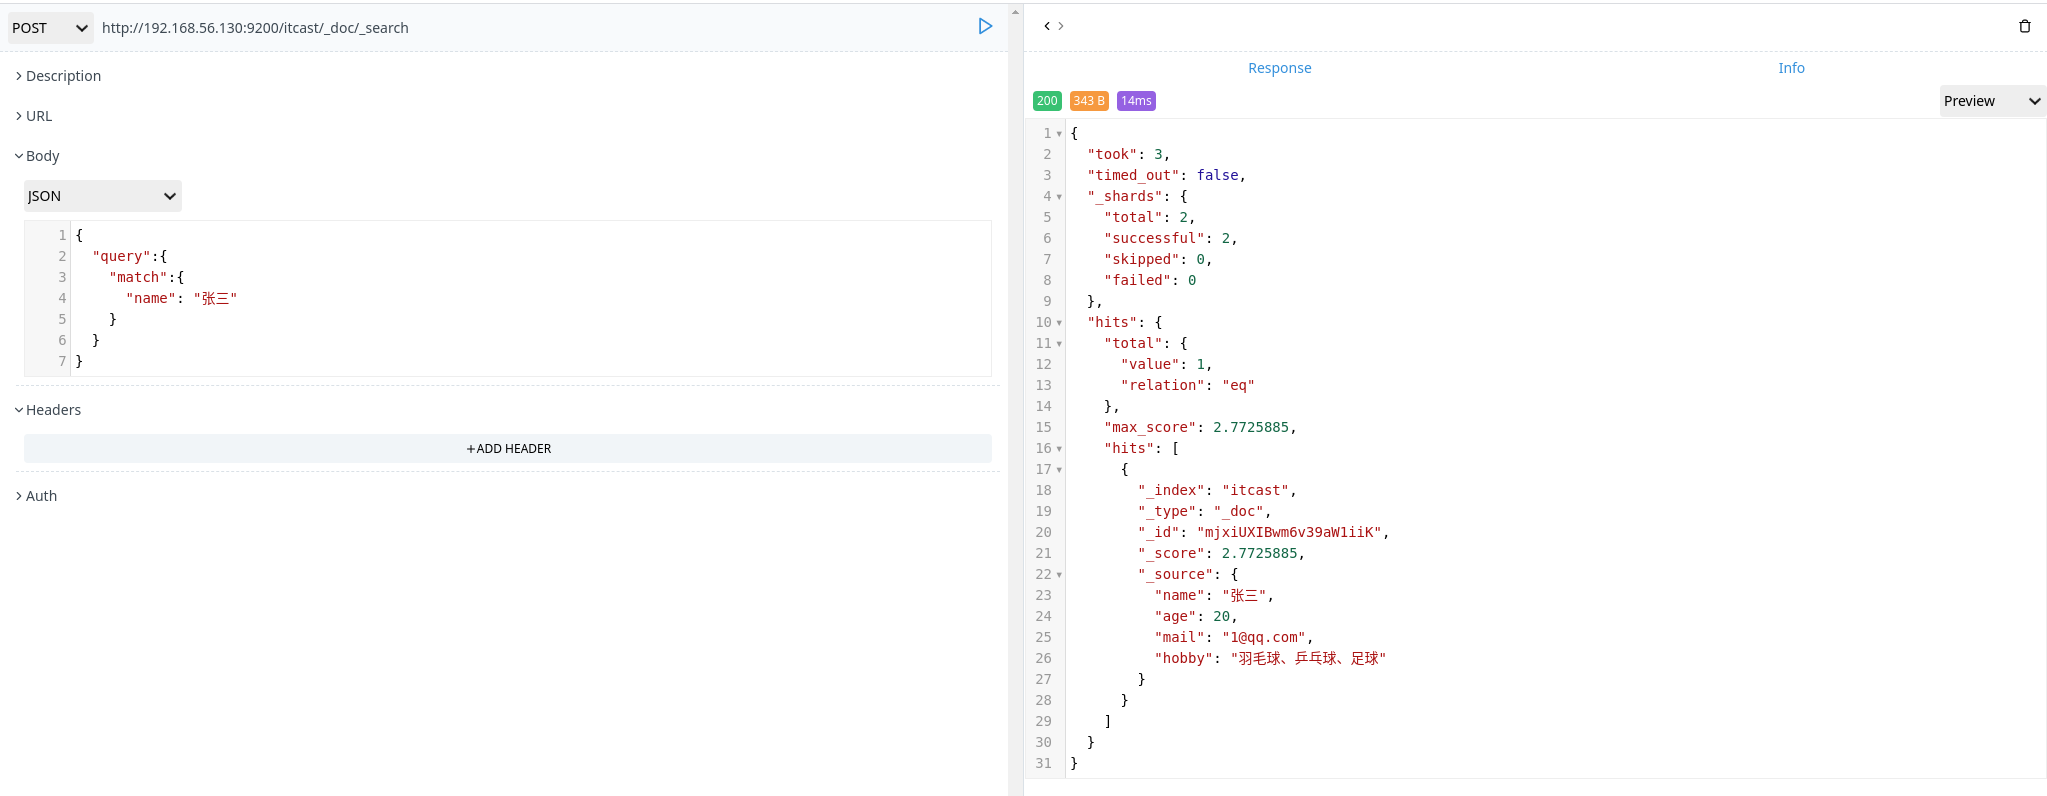
match 查询
match 查询是一个标准查询,不管你需要全文本查询还是精确查询基本上都要用到它。
如果使用 match 查询一个文本字段,它会先分词,然后再匹配。
1 | POST http://192.168.56.130:9200/itcast/_doc/_search |
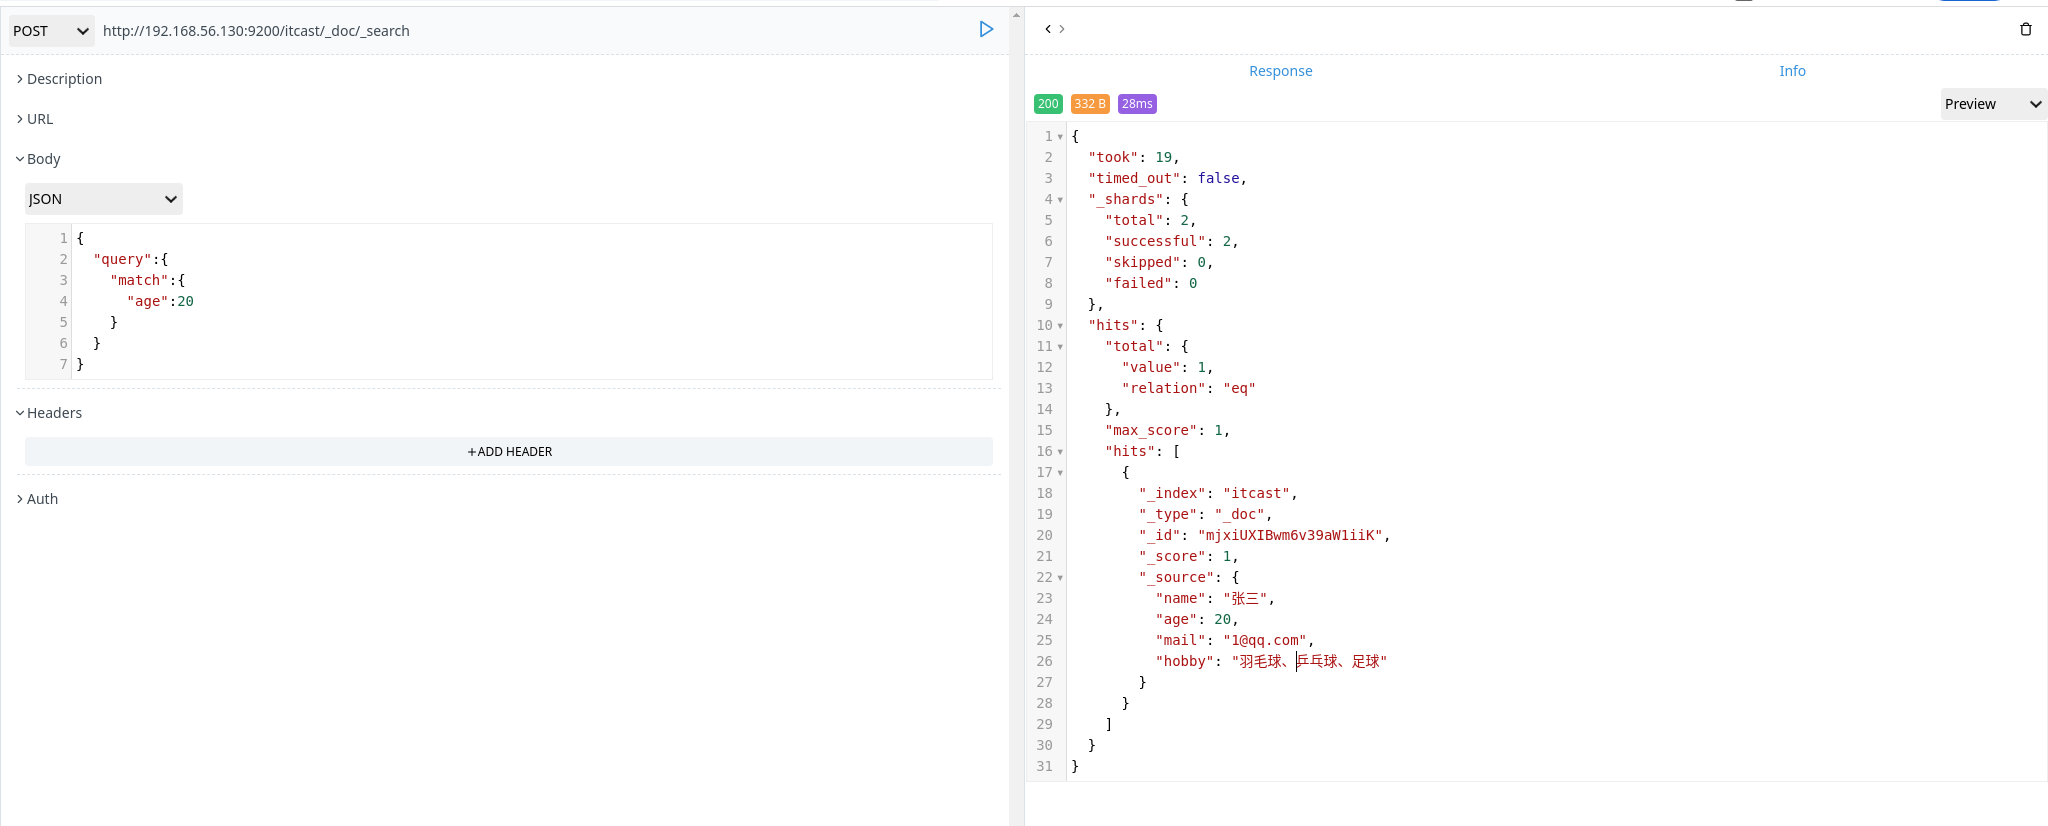
如果 match 查询一个数字、日期、布尔值等,它会根据匹配的数值进行搜索
1 | POST http://192.168.56.130:9200/itcast/_doc/_search |
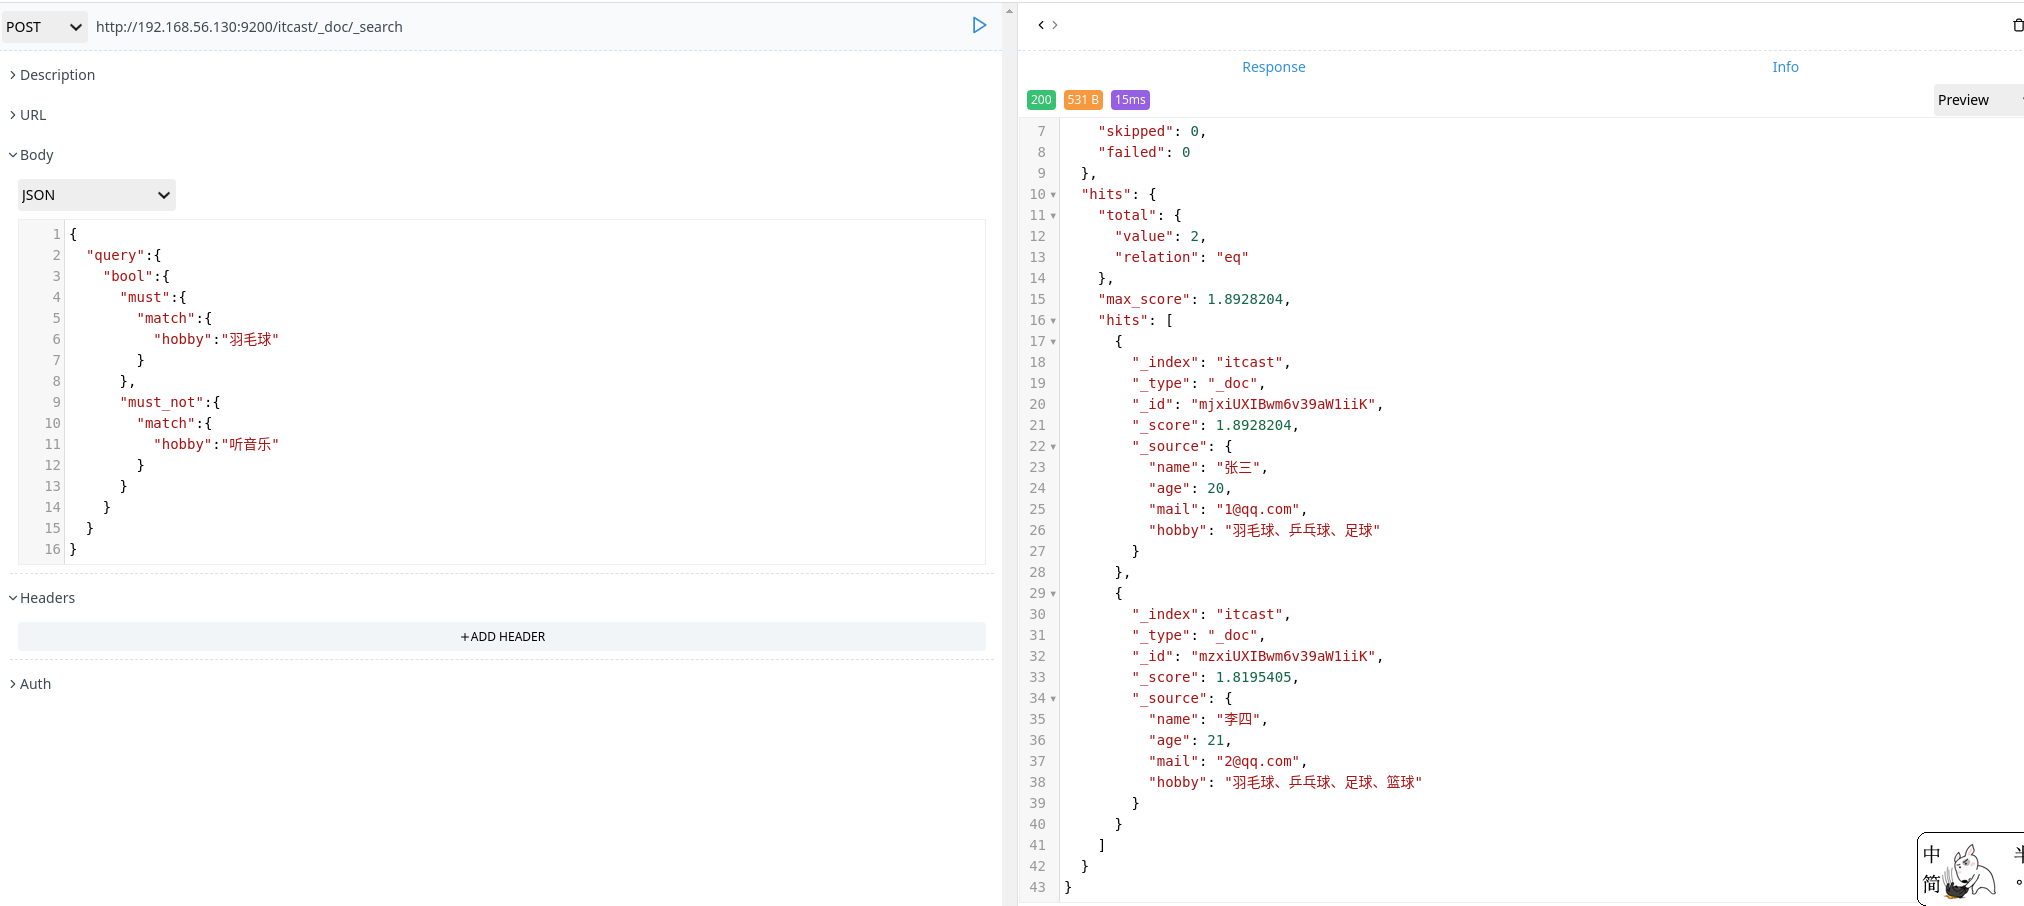
bool 查询
bool 查询可以用来合并多个条件进行数据查询,它包含以下操作符:
- must:多个查询条件的完全匹配,相当于 and
- must_not:多个查询条件相反匹配,相当于 not
- should:至少有一个查询条件匹配,相当于 or
1 | POST http://192.168.56.130:9200/itcast/_doc/_search |
过滤查询
elasticsearch 也支持过滤查询,如term、range、match等
1 | POSt http://192.168.56.130:9200/itcast/_doc/_search |

过滤查询和匹配查询的区别:
- 一条过滤语句会询问每个文档的字段值是否包含着特定值
- 查询语句会询问每个文档的字段值和特定值的匹配程度如何
- 一条查询语句会计算每个文档与查询语句的相关性,并给出评分 _score,并且按照 _score 的值对匹配到的文档进行排序。这种评分方式非常适用于一个没有完全配置结果的全文搜索
- 过滤特定值时会将相关文档的列表缓存到内存当中,这样后续查询会更加高效
总的来说就是:匹配查询消耗的性能比较大,所以一般来说查询语句比过滤语句更耗时,并且查询结果不可缓存。
中文分词
什么是分词
分词就是将一个文本转化成一系列单词的过程,也叫文本分析,在 elasticsearch 中称之为 Analysis。
举例:我是中国人 –> 我/是/中国人
分词 api
指定分词器进行分词
1 | POST http://192.168.56.130:9200/_analyze |
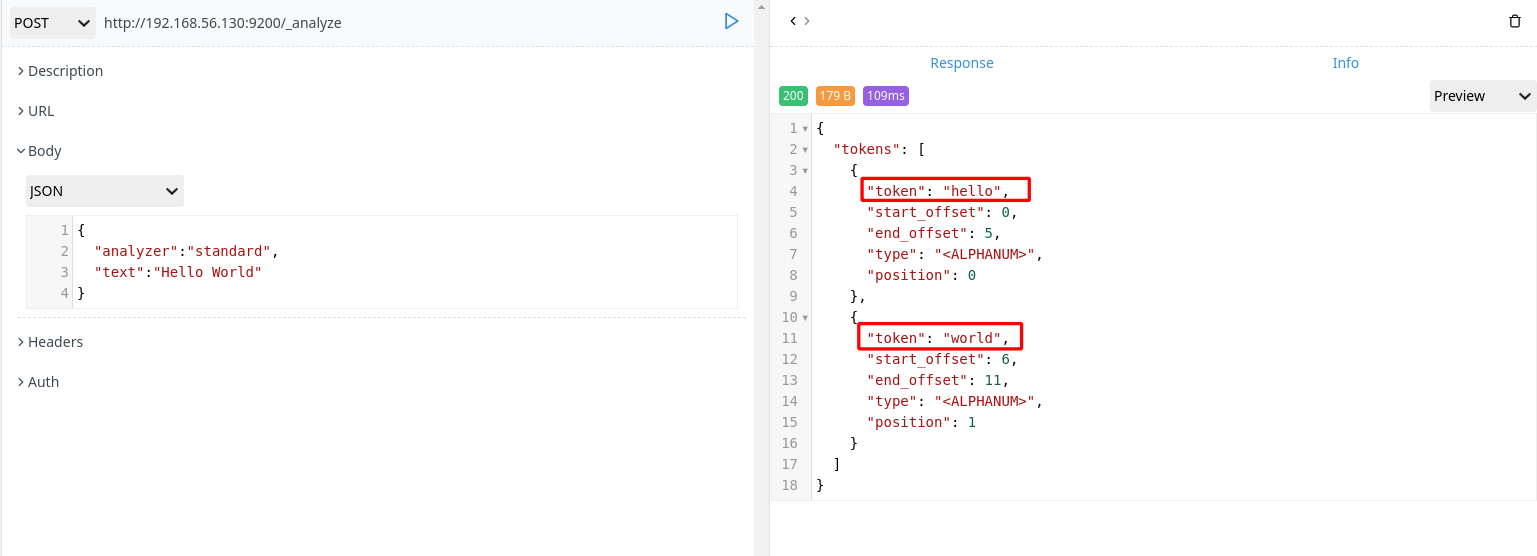
1 | POST http://192.168.56.130:9200/_analyze |
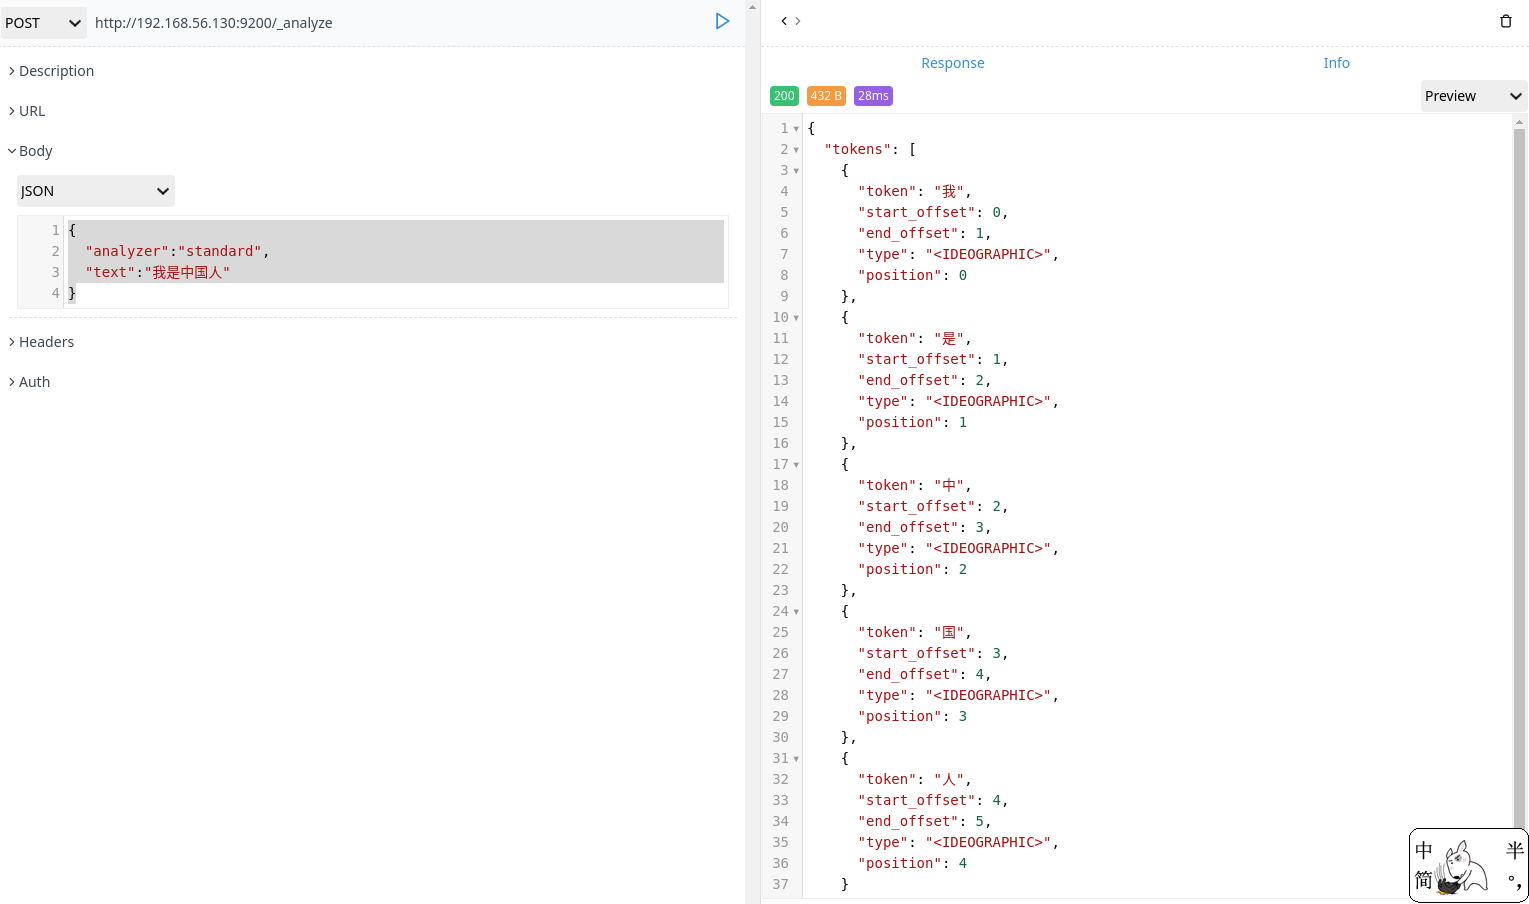
中文分词
中文分词的难点在于,在汉语中没有明显的词汇分界点,如果在英语中,空格可以作为分隔符。中文分词中如果分隔符不正确就会造成歧义。
如:
我/爱/炒肉丝
我/爱/炒/肉丝
常用中文分词器,IK、jieba、THULAC等,推荐使用 IK 分词器
- 安装 ik 分词器(下载相应的版本)
下载 elasticsearch-analysis-ik
1 | [root@promote ~]# mkdir /usr/share/elasticsearch/plugins/ik |
- 重启 elasticsearch 服务
1 | [root@promote ~]# systemctl restart elasticsearch |
- 分词
1 | POST http://192.168.56.130:9200/_analyze |
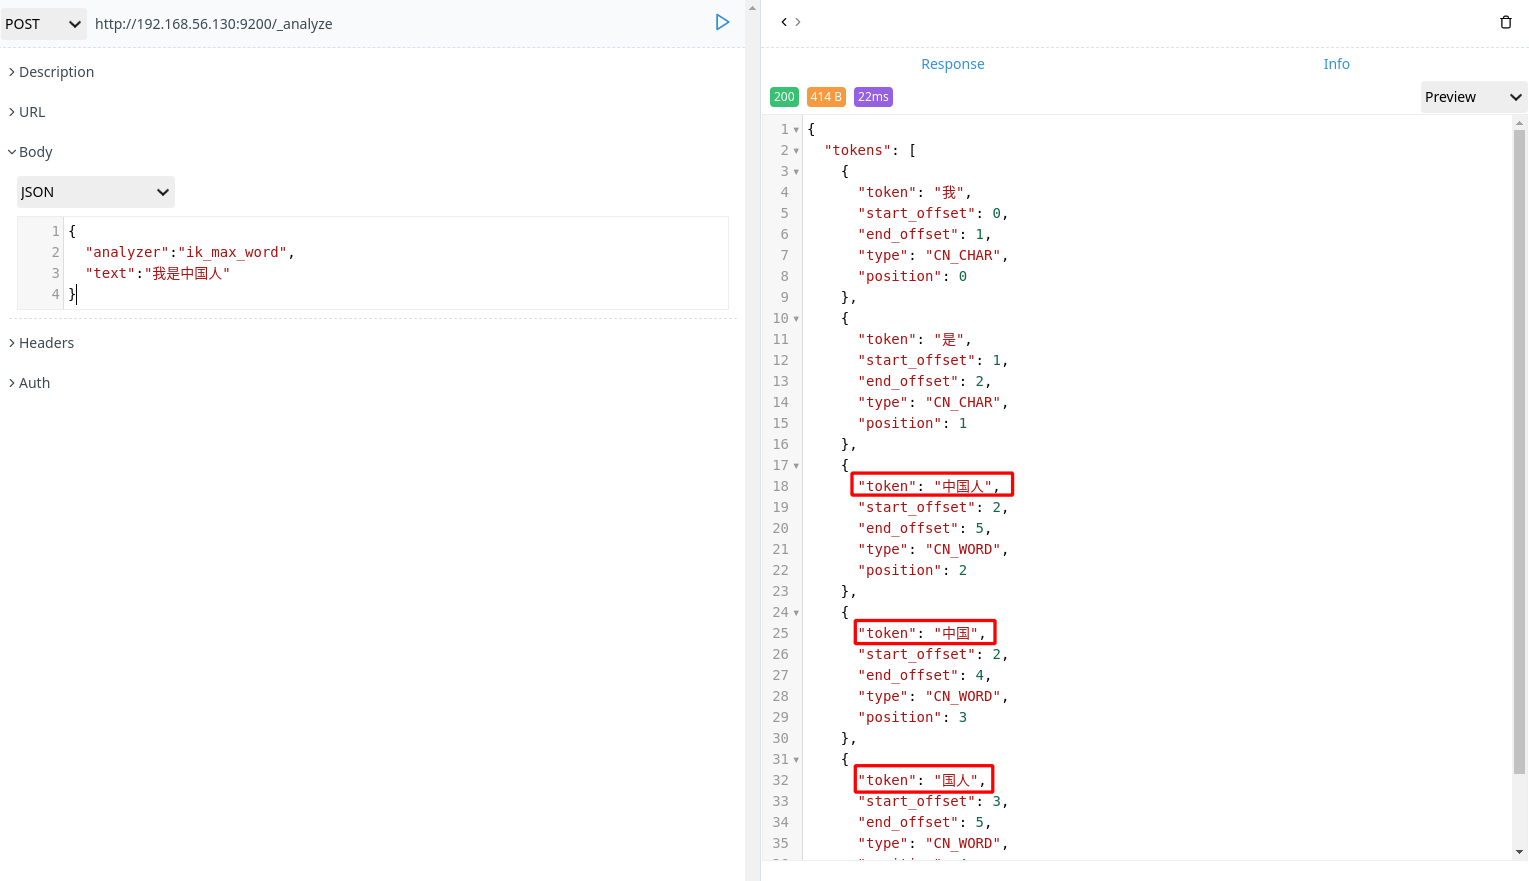
全文搜索
全文搜索有两个最重要的方面是:
- 相关性(Relevance)它是评价查询与其结果的 相关程度,并根据这种相关程度对结果排名的一种能力,这种计算方式可以是 TF/IDE 方法、地理位置临近、模糊相似,或其他的某些算法。
- 分词(Analysis) 它是将文本块转换为有区别的、规范化的 token 的一个过程,目的是为了创建倒排索引以及查询倒排索引。
构造数据
- 创建分词索引
1 | PUT http://192.168.56.130:9200/fenci |
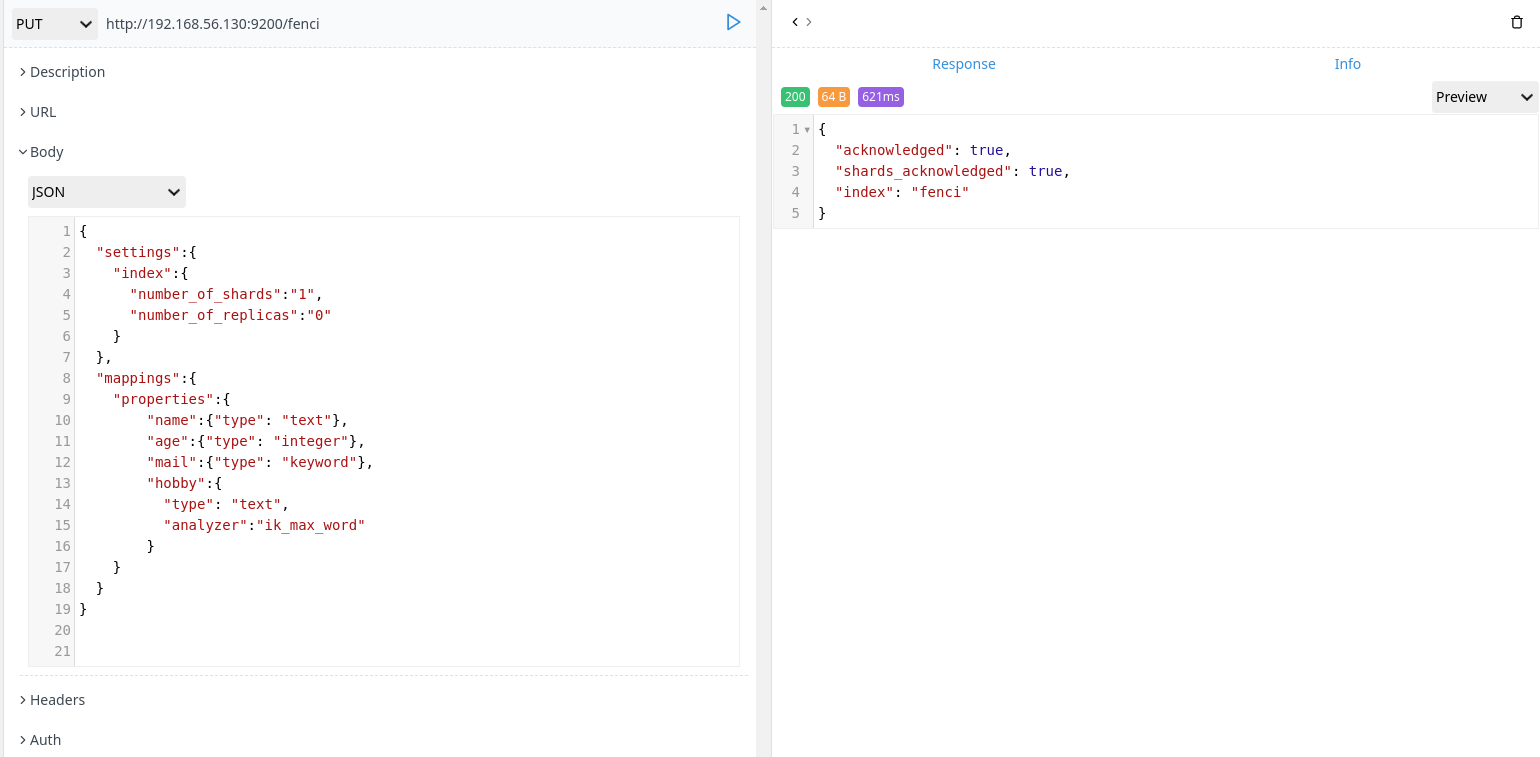
如果是多个 elasticsearch 节点中,每个节点都要安装 analysis-ik 分词器。否则创建索引会出现如下报错:
"shards_acknowledged": flase
- 创建数据
1 | POST http://192.168.56.130:9200/fenci/_bulk |
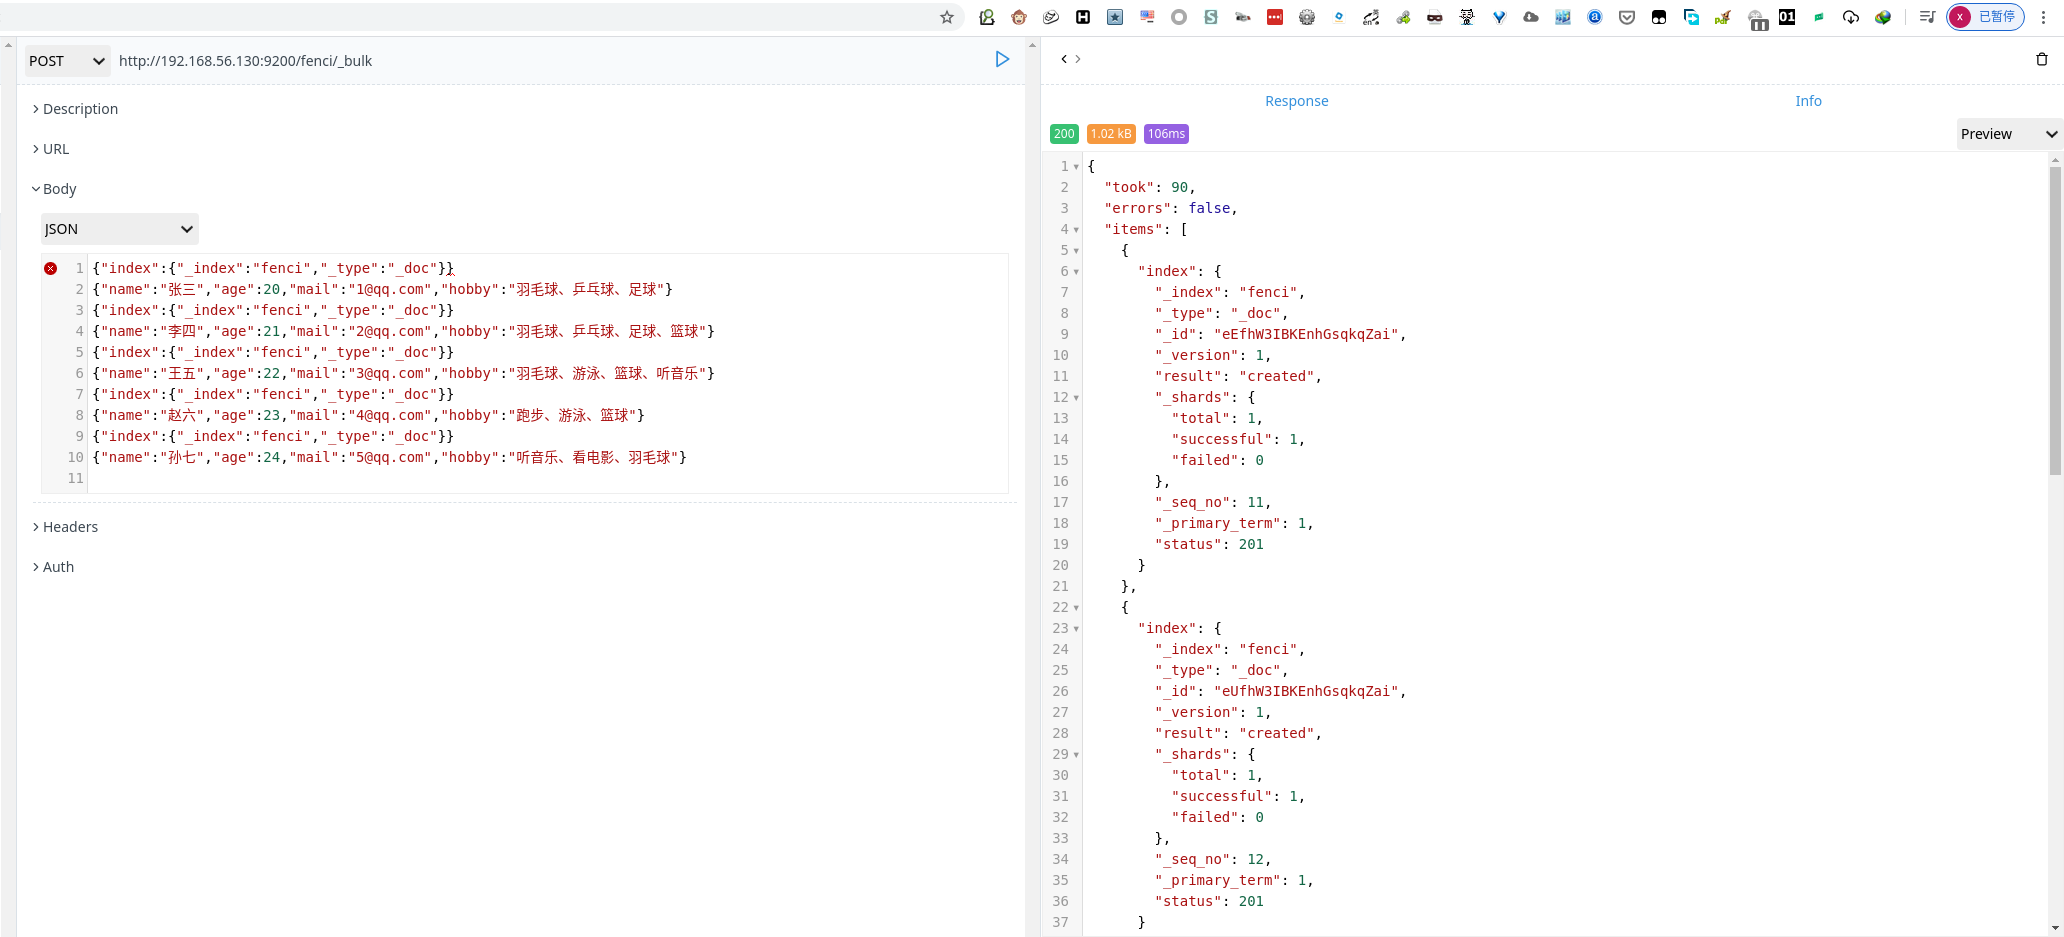
单词搜索
1 | POST http://192.168.56.130:9200/fenci/_doc/_search |
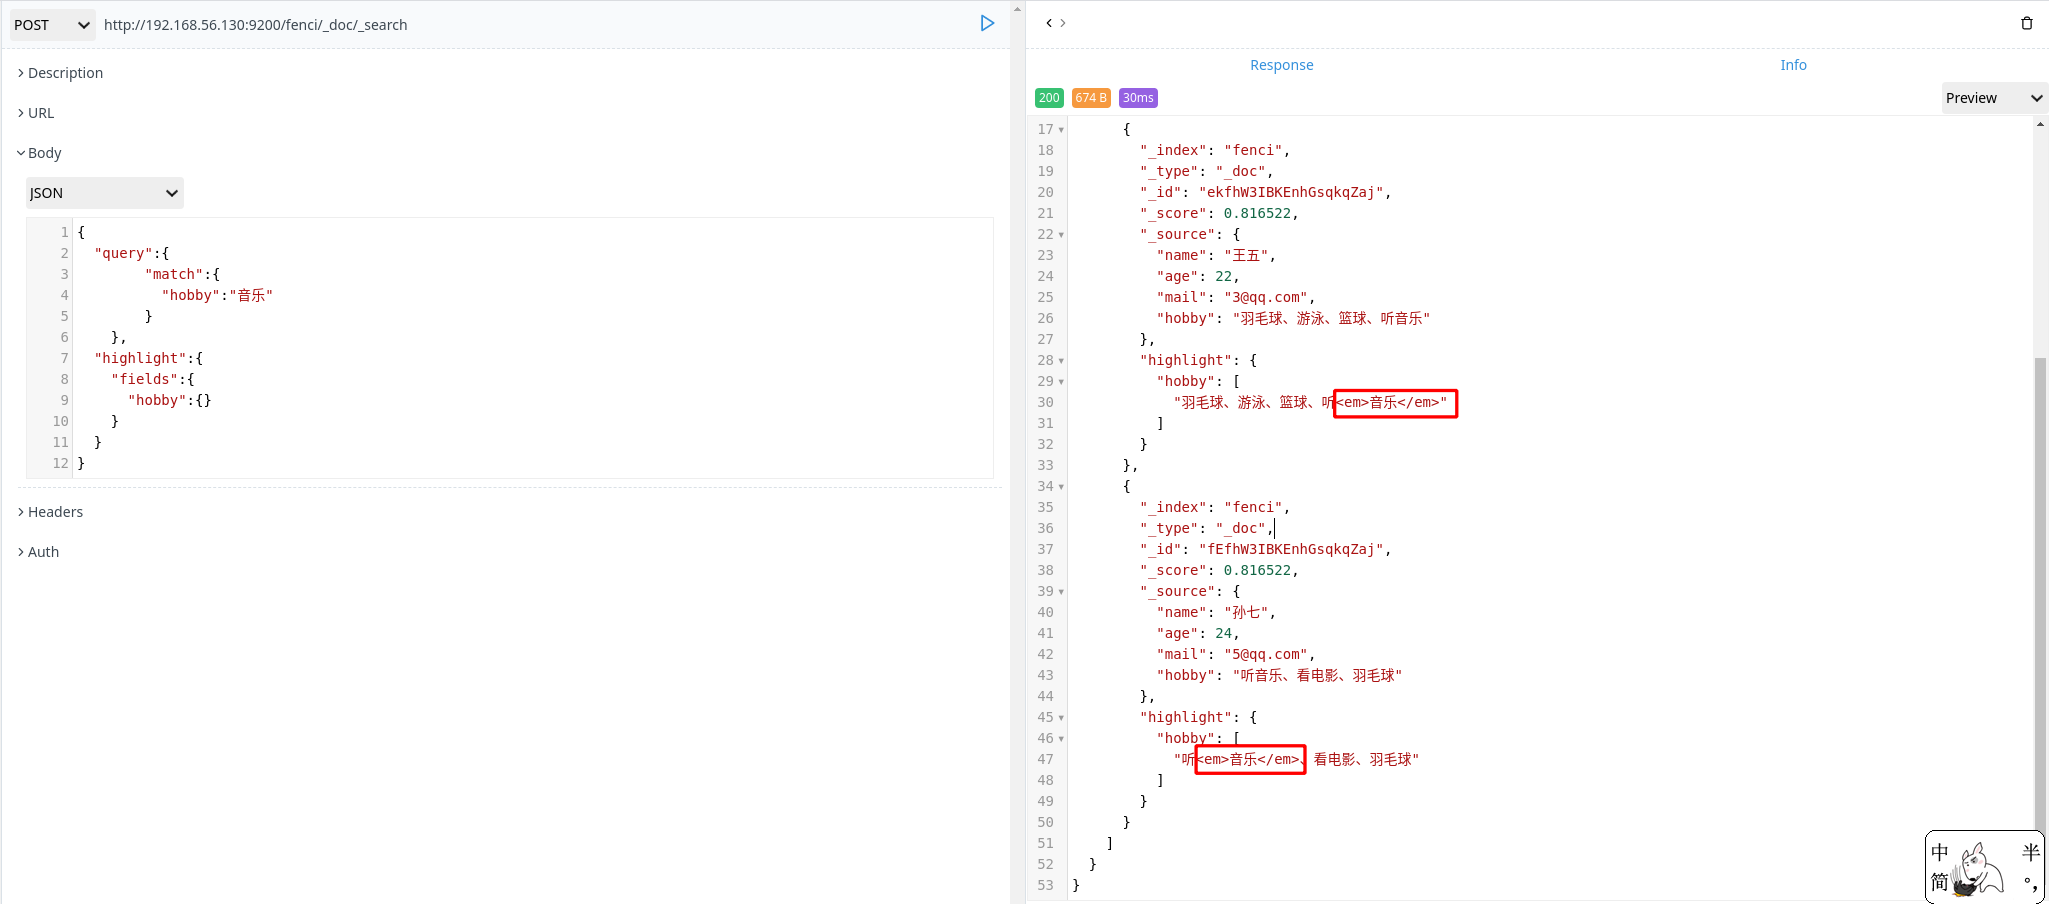
分词过程:
检查字段类型
hobby 字段是一个 text 类型(指定了 IK 分词器),这意味着查询字符串本身也应该被分词分析查询字符串
将查询的字符串“音乐”传入 IK 分词器中,输出的结果是单个项,所以 match 查询执行的是单个底层 term 查询。查找匹配文档
用 term 查询在倒排索引中查找“音乐”然后取一组包含该项的文档。为每个文档评分
用 term 查询计算每个文档相关度评分 _source ,这是一种将 词频(term frequency,即词“音乐”在相关文档的 hobby 字段中出现的频率)和反向文档频率(inverse document frequency,即词 “音乐”在所有文档的 hobby 字段中出现的频率),以及字段的长度(即字段越短相关度越高)相结合的计算方式。
多词搜索
- 使用 OR 逻辑,进行多词搜索
1 | POST http://192.168.56.130:9200/fenci/_doc/_search |

- 使用 AND 逻辑,进行多词搜索
1 | POST http://192.168.56.130:9200/fenci/_doc/_search |
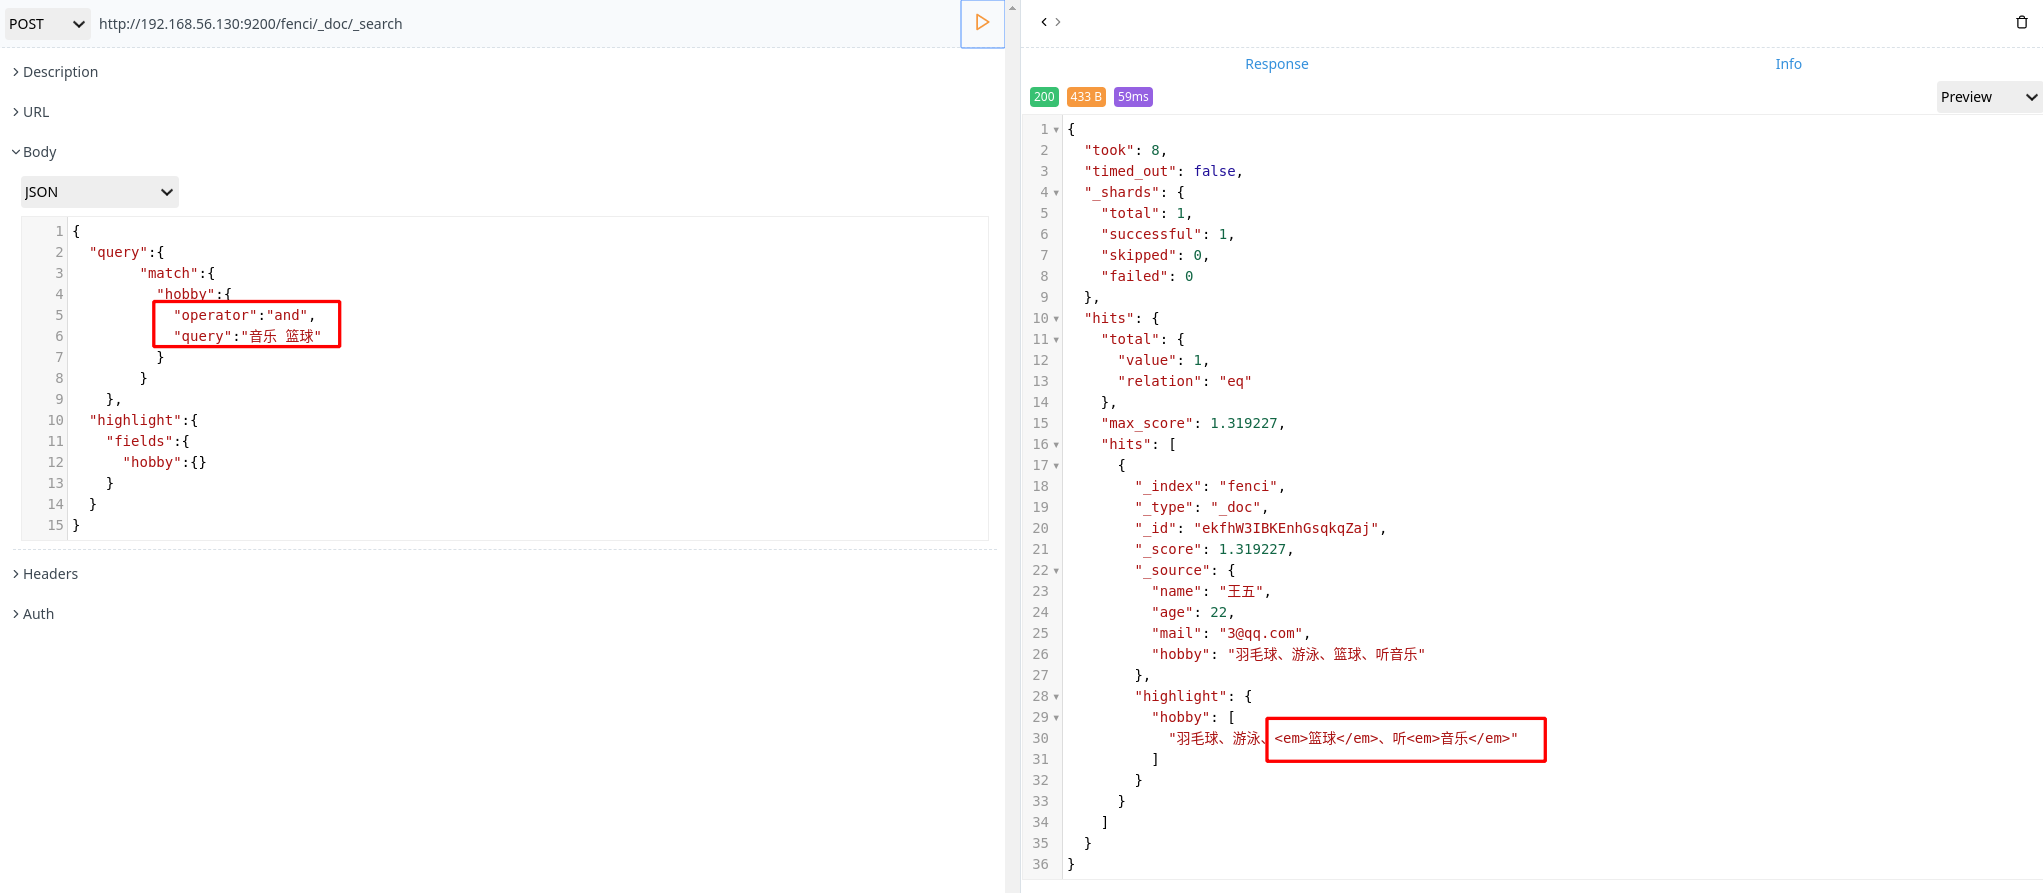
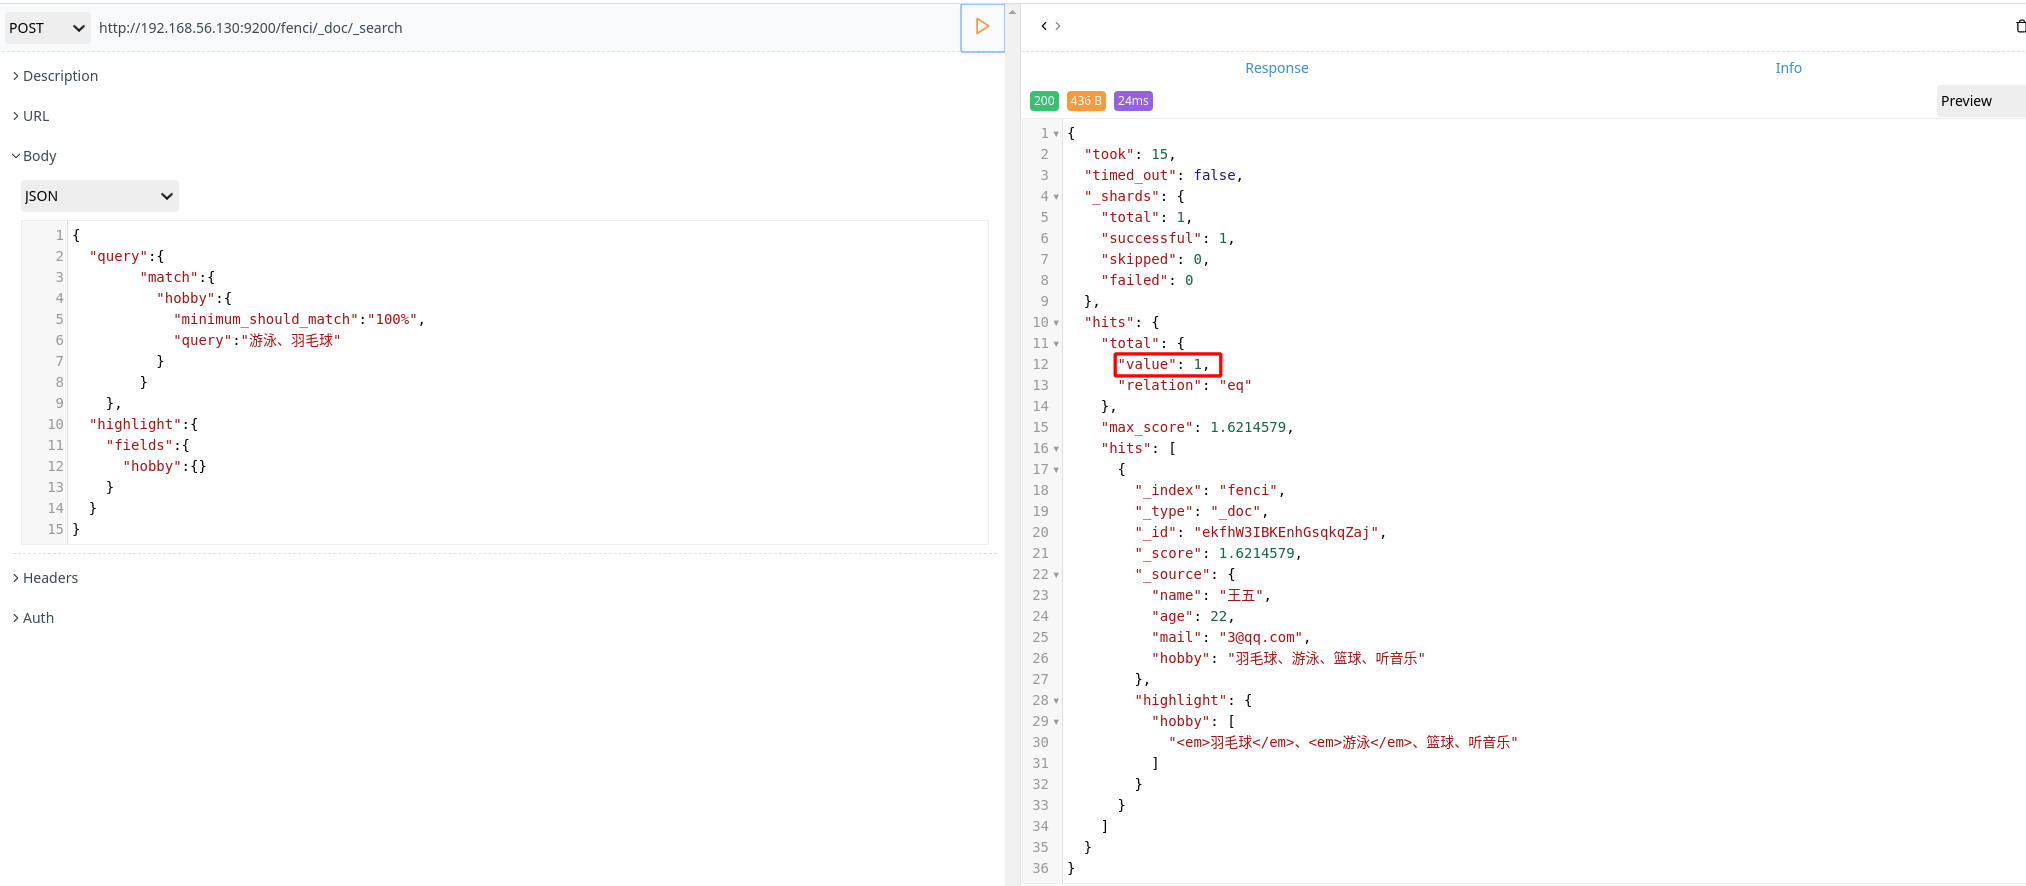
- 使用匹配度进行多词查询
1 | POST http://192.168.56.130:9200/fenci/_doc/_search |
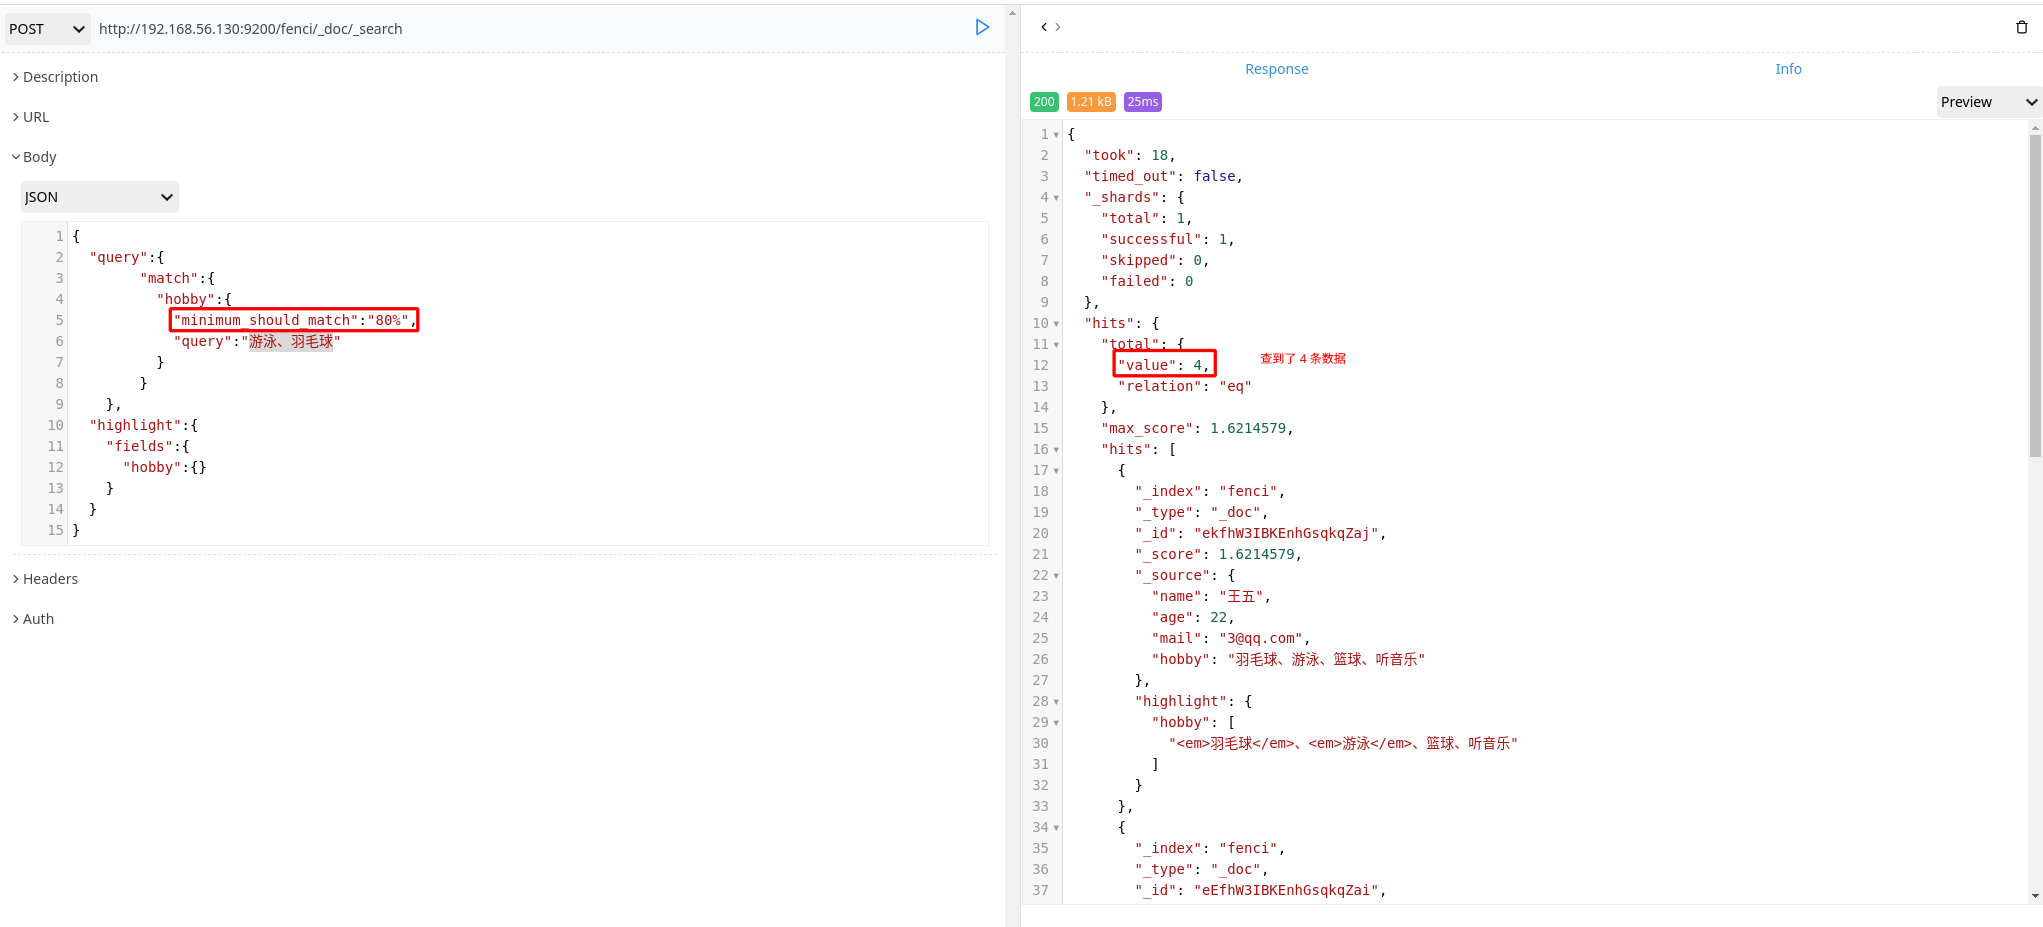
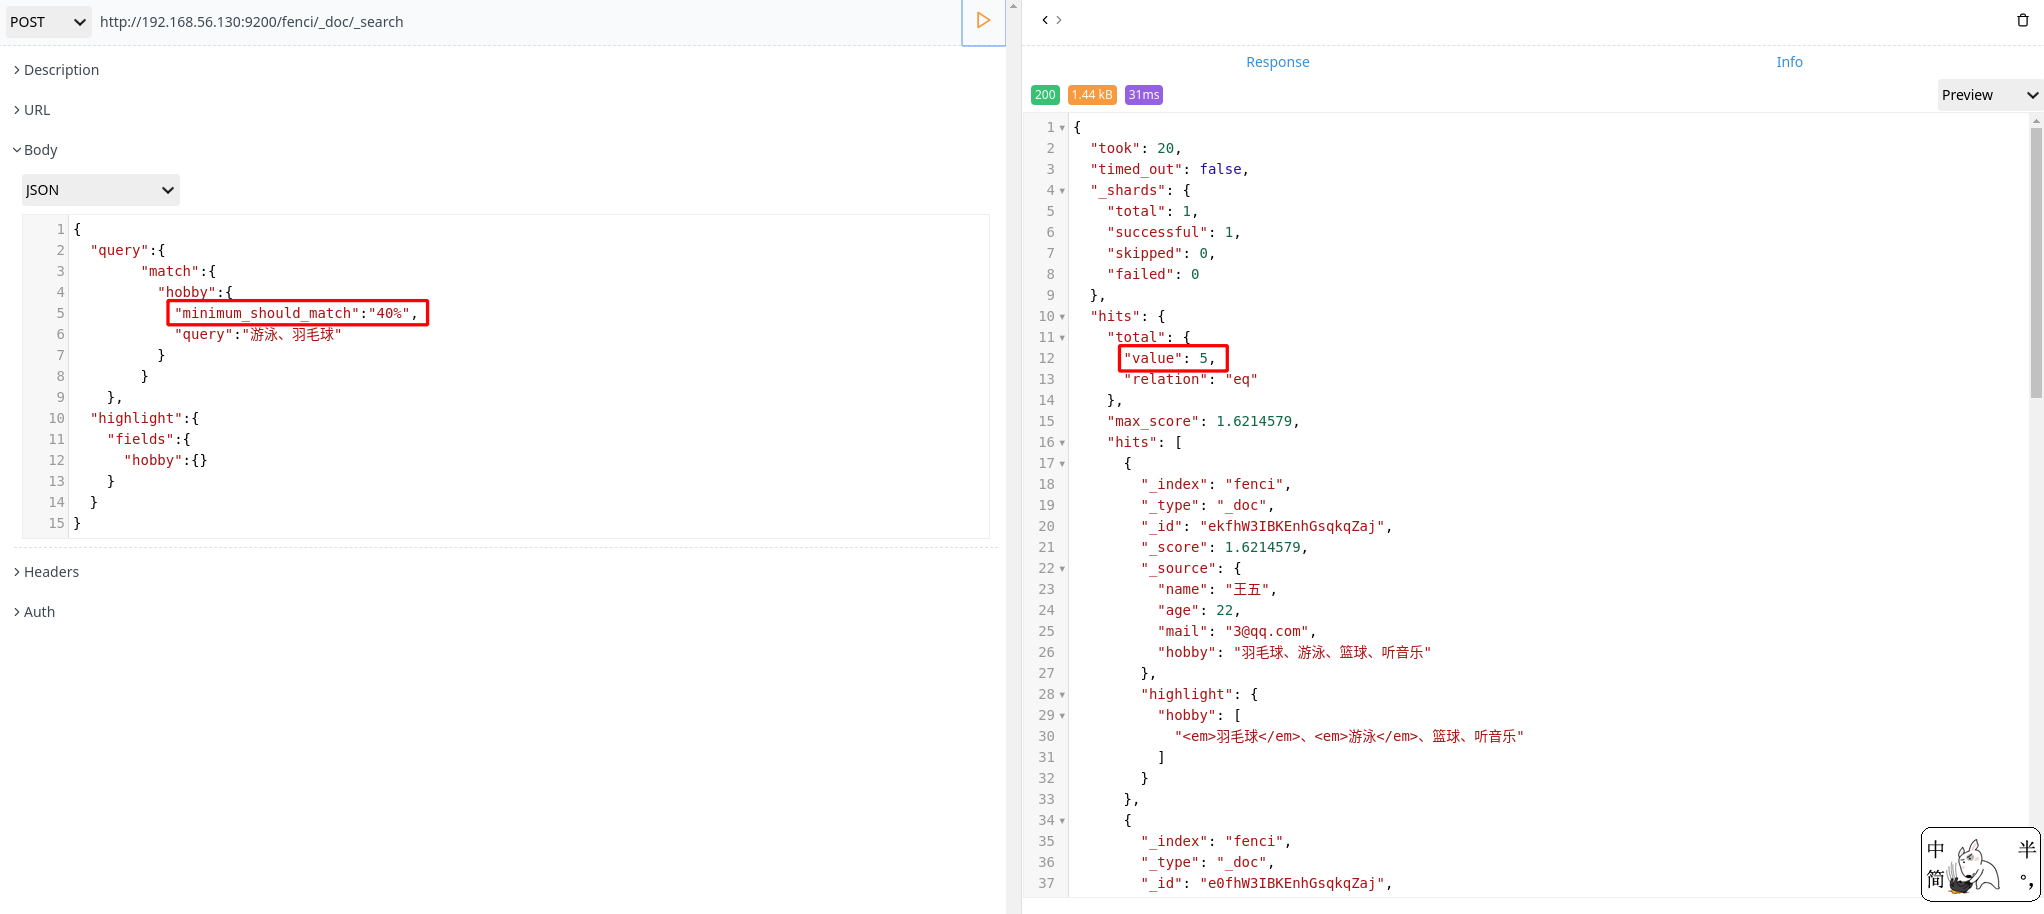
组合搜索
1 | POST http://192.168.56.130:9200/fenci/_doc/_search |
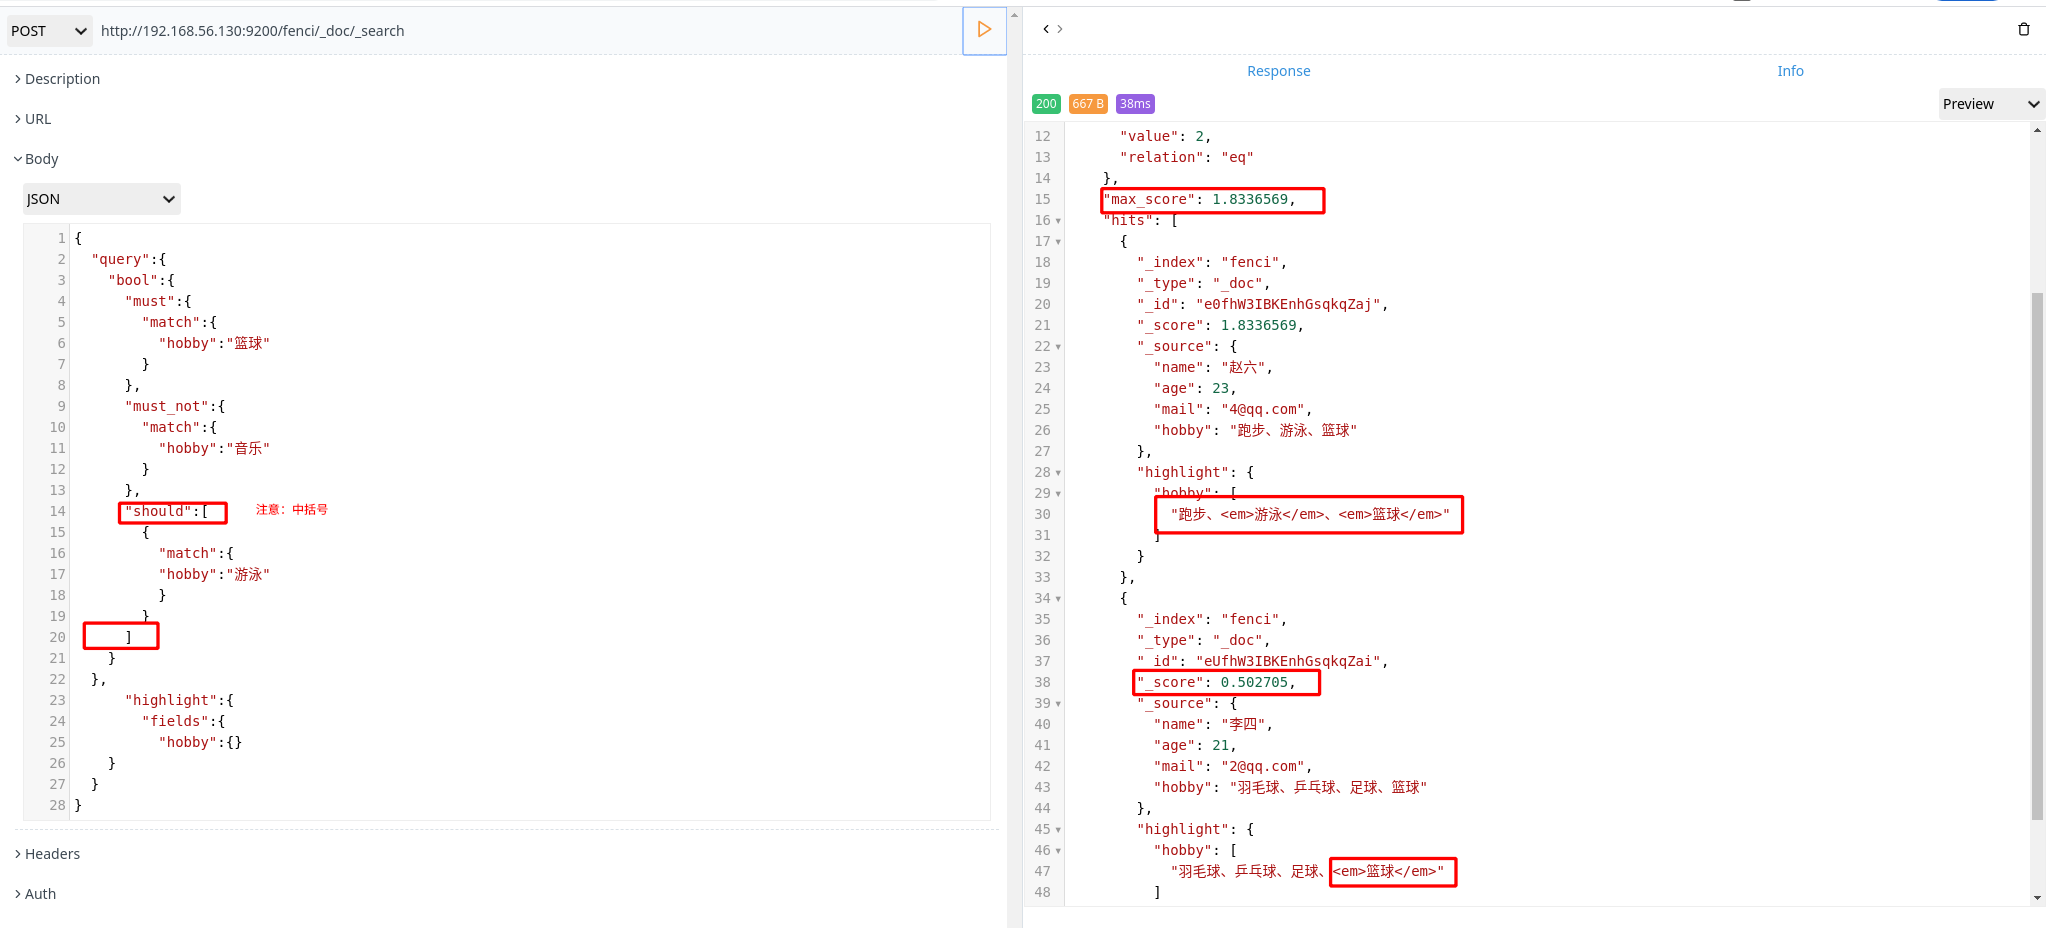
上面搜索的意思是:搜索结果中必须包含篮球、不能包含音乐,如果包含了游泳,那么它的相似度更高
评分计算规则:
bool 查询会为每个文档计算相关评分 _score,再将所有匹配的 must 和 should 语句的分数 _score 求和,最后除以 must 和 should 语句的总数。
must_not 语句不会影响评分,它的作用只是将不相关的文档排除。
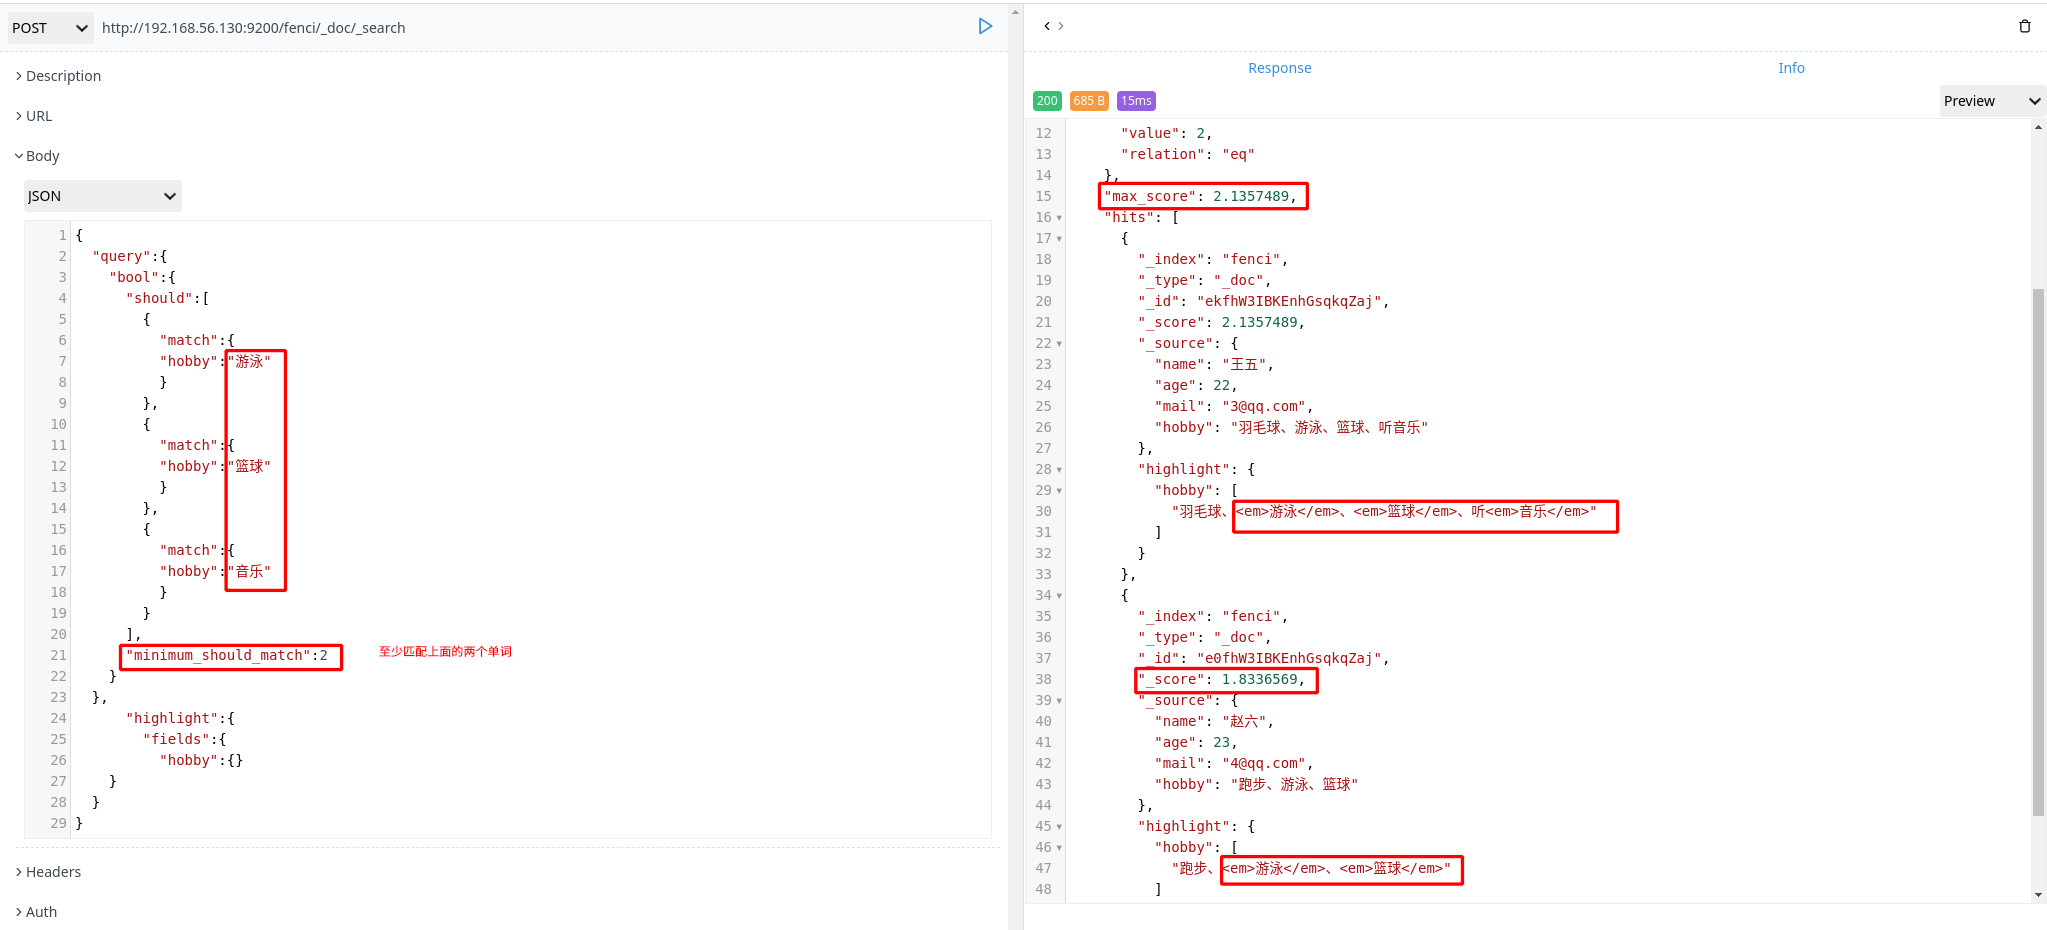
默认情况下,should 中的内容不是必须匹配的,如果查询语句中没有 must,那么就会至少匹配其中一个。当然也可以通过 minimum_should_match 参数进行控制,该值可以是数字或百分比。
1 | POST http://192.168.56.130:9200/fenci/_doc/_search |
权重
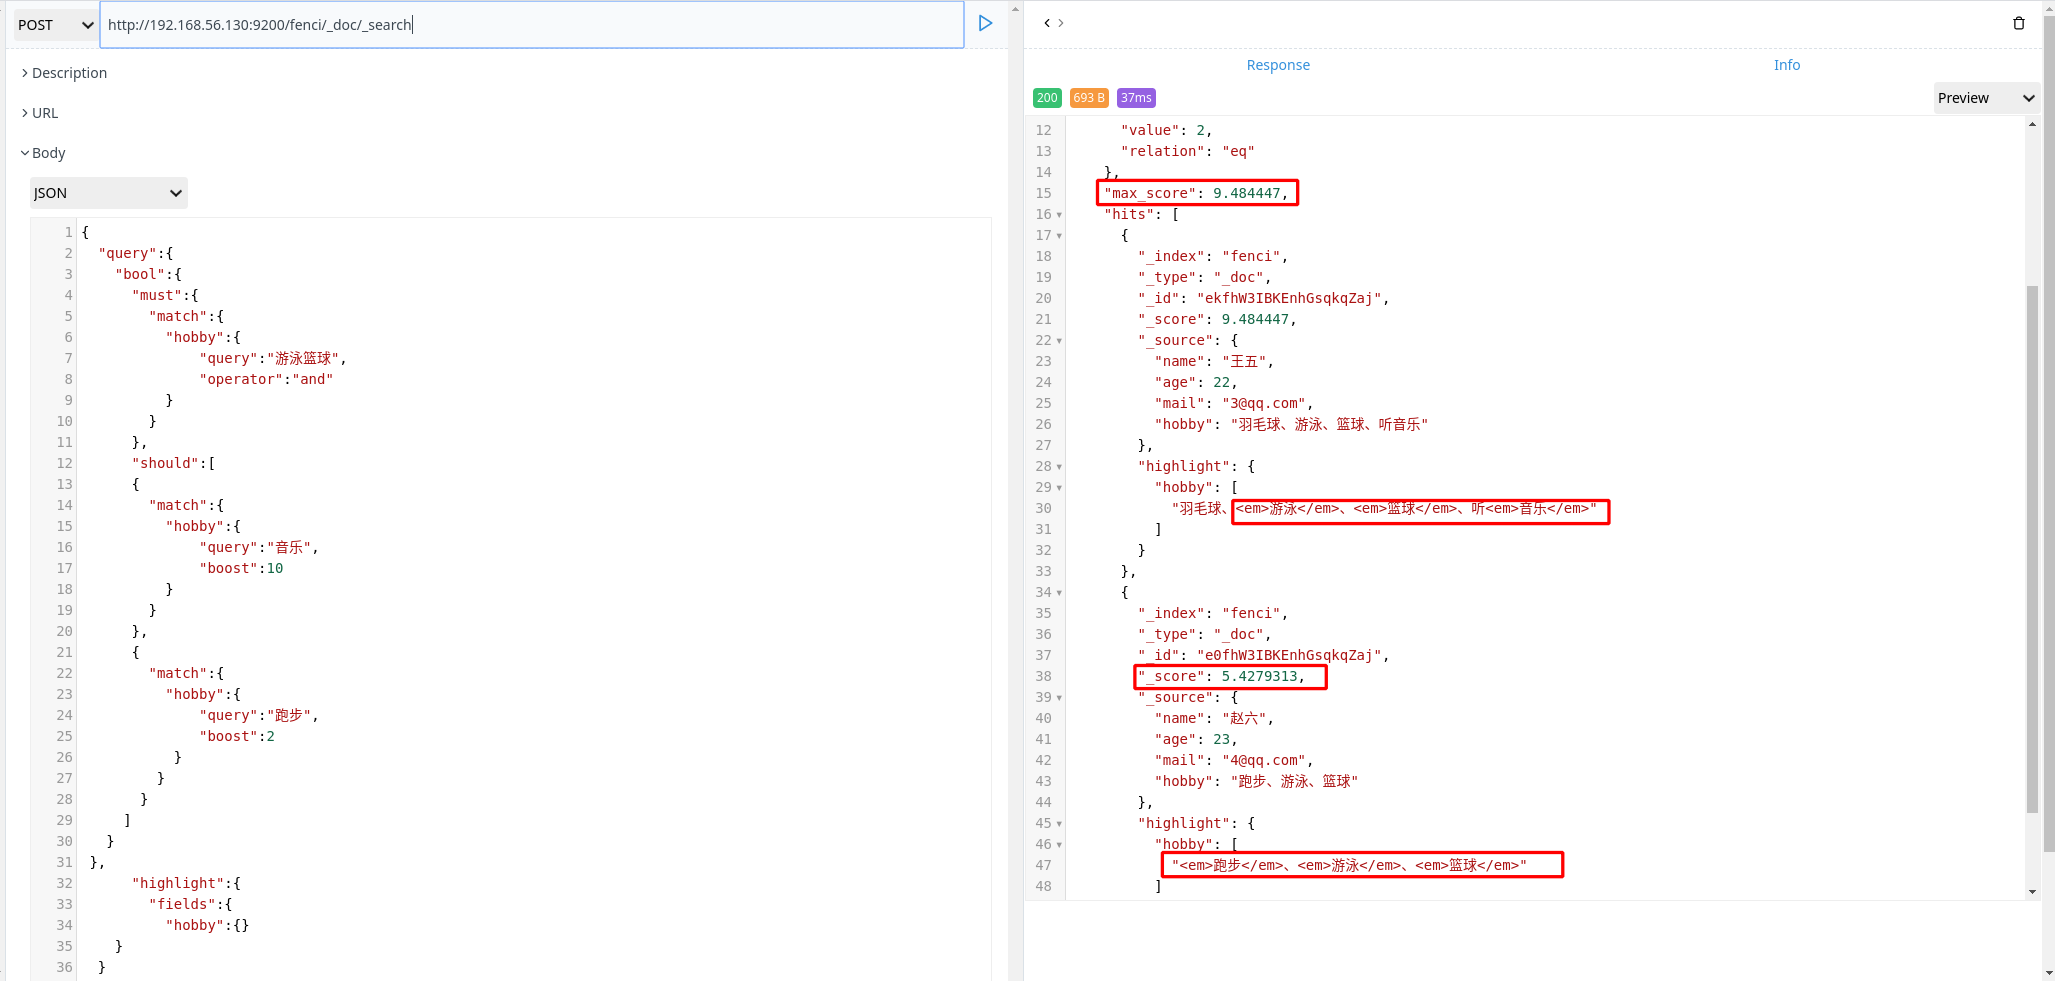
有些时候,我们可能需要对某些词增加权重来影响该条数据的得分。如下:
搜索关键字为“游泳篮球”,如果结果中包含了“音乐”权重为 10,包含了“跑步”权重为2
1 | POST http://192.168.56.130:9200/fenci/_doc/_search |
elasticsearch 集群
elasticsearch 集群搭建
- 创建 3 人台虚拟机,下载并安装 JAVA 和 Elasticsearch
1 | [root@promote ~]# yum -y install java |
- 配置 elasticsearch
- node01
1 | [root@promote ~]# cat /etc/elasticsearch/elasticsearch.yml | grep -v ^# |
discovery.zen.minimum_master_nodes: 2 的意思是:每两个 node 分为一组,然后进行 master 节点选举。剩下的 1 个 node 不能组成一组,没有权限进行 master 选举。
- node02
1 | [root@promote ~]# cat /etc/elasticsearch/elasticsearch.yml | grep -v ^# |
- node03
1 | [root@promote ~]# cat /etc/elasticsearch/elasticsearch.yml | grep -v ^# |
- 启动 elasticsearch
1
[root@promote ~]# systemctl start elasticsearch


线条粗的是主分片,线条细的是副本分片;节点前面是“五角星”说明该节点是主节点,节点前面是“圆形”说明该节点是数据节点。
集群的故障转移
将 node01 节点关闭,从上图中可以看到 node03 自动切换为主节点。 itcast 索引中 “0”的主分片有问题,因此集群显示为“红色”。因为 itcast 索引没有副本分片,所以导致 itcast 的主分片无法进行故障转移。
如果在配置文件中 discovery.zen.minimum_master_nodes 设置的值不是 N/2+1 时,会出现脑裂问题,之前宕机的主节点不会加入到集群。
比如现在discovery.zen.minimum_master_nodes=1,集群就会出现下面的状况:
| 集群节点 | 运行状态 |
|---|---|
| node01(M) ; node02 ; node03 | 正常状态 |
| node01(M);node02(M) ; node03 | node01 宕机,node02 变为主节点 |
| node01(M) ;node02(M) ; node03 | node01 恢复,node01 和 node02 都变为主节点,即脑裂问题 |
- 当 node01 宕机后,集群重新选举主节点,此时 node02 变成了主节点
- 当 node01 恢复后,因为 minimum_master_nodes 为 1 ,简单来说就是 1 个节点分为一组进行 master选举。也就是 node01 进行 master 节点选举,此时 node01 会变成主节点。
- 现在集群中出现了 2 个主节点,而一个集群中只能存在一个主节点,所以 node01 就不会加入到集群中。
- 一个集群中因为某些原因出现多个主节点的现象,被称为脑裂问题
分布式文档
路由
在 elasticsearch 中,文档存储在哪个节点是由下面的计算公式来确定的:
1 | shard = hash(Routing)% number_of_primary_shards |
- routing 值是一个任意字符串,它默认是_id但也可以自定义
- 这个 Routing 字符串是通过哈希函数生成一个数字,然后除以主分片的数量得到一个余数(remainder),余数的范围永远是0到number_of_paimary_shards-1,这个数字就是特定文档所在的分片
如果修改主分片,shard 值就会发生改变,最终导致无法找到文档数据。这就是为什么创建主分片后,不能修改的原因。
文档写操作
新建、索引】删除请求都是写(write)操作,它们必须在主分片上成功完成复制到相关副本分片上。
下面解释主分片和副本分片上成功新建、索引和删除一个文档必要的顺序步骤:
- 客户端给 node 1发送新建、索引或删除请求
- 节点使用文档的_id确定文档属于 P0 。node 1 转发请求给 node 3。
- node 3 在主分片上执行请求,如果成功,node 3 转发请求到响应位于 node 1 和node 2 的副本分片(R0)上面,当所有副本分片操作完成后,返回操作成功的信息给 node 3。最后 node 3 报告成功到请求节点(node 1),请求节点再报告给客户端。
- 客户端接受到成功响应的时候,文档修改已经被应用于主分片和所有的副本分片。你的修改已经生效。
文档搜索(单文档)
文档能够从主分片或任意一个副本分片被检索。
下面解释主分片和副本分片上检索一个文档必要的顺序步骤:
- 客户端给 node 1 发送 get 请求。
- 节点使用文档_id确定文档属于 P0。P0 在三个节点上都有,此时 node 1 转发请求给 node 2。
- node 2 返回文档(document)给 node 1 然后返回给客户端。
对于读请求,为了平衡负载,请求节点会向所有分片进行轮询访问。
可能会出现的情况是,一个被索引的文档已经存贮在主分片上却还没有来得及同步到副本分片上。这时副本分片就会报告文档未找到,主分片会成功返回文档。一旦索引请求成功返回给用户,文档则在主分片和副本分片上都是可用的。
全文搜索
对于全文搜索而言,文档可能分散在各个节点上,那么在分布式的情况下,如何搜索文档呢?
搜索,分为 2 个阶段,搜索(query)+取回(fetch)
搜索(query)

查询阶段包含以下 3 步:
- 客户端发送一个 search(搜索)请求给 node 3, node 3创建了一个长度为 from+size 的空有限级队列
- node 3 转发这个搜索请求到索引中每个分片的原本和副本。每个分片在本地执行这个查询并且将结果放到一个大小为 from+size 的有序本地优先队列里去。
- 每个分片返回 document 的 ID 和它优先队列里的所有 document 的排序值给协调点 node 3。node 3 把这些值合并到自己的优先队列里并产生全局排序结果。
取回(fetch)

取回阶段是由以下步骤构成:
- 协调节点辨别出哪个 document 需要取回,并且向相关分片发出 GET 请求。
- 每个分片加载 document 并且根据需要丰富(enrich)它们(之前是获得文档 ID,这次是获取完整的数据),然后再将 document 返回协调节点。
- 一旦所有的 document 都被取回,协调节点会将结果返回给客户端。
beats 简介
Beats是 Elastic 公司开发提供的开源数据收集器集合,只需要将其端(Agent)安装到服务器上,通过简单的配置,就可以将指定的数据发送到 Elasticsearch。Elastic 提供了多种类的 Beats 用来收集不同的数据。
filebeat 入门
Filebea t是一个轻量级日志传输 Agent,可以将指定日志转发到 Logstash、Elasticsearch、Kafka、Redis等中。Filebeat 占用资源少,而且安装配置也比较简单,支持目前各类主流 OS 及 Docker 平台。
安装部署
- 安装 filebeat
1 | [root@localhost beats]# rpm -ivh filebeat-7.6.2-x86_64.rpm |
- 创建 filebeat 配置文件
1 | [root@localhost filebeat]# cat itcast.yml |
- 执行配置文件
1 | [root@localhost filebeat]# cd cd /etc/filebeat/ |
读取文件
- 创建配置文件
1 | [root@localhost filebeat]# cd cd /etc/filebeat/ |
- 执行配置文件
1 | [root@localhost filebeat]# filebeat -e -c itcast-log.yml |
PS: 此时向文件 a.log 追加内容,filebeat 会继续读取并输出内容
输出到 elasticsearch
- 创建配置文件
1 | [root@localhost filebeat]# cat itcast-log.yml |
- 执行配置文件
1 | [root@localhost filebeat]# filebeat -e -c itcast-log.yml |

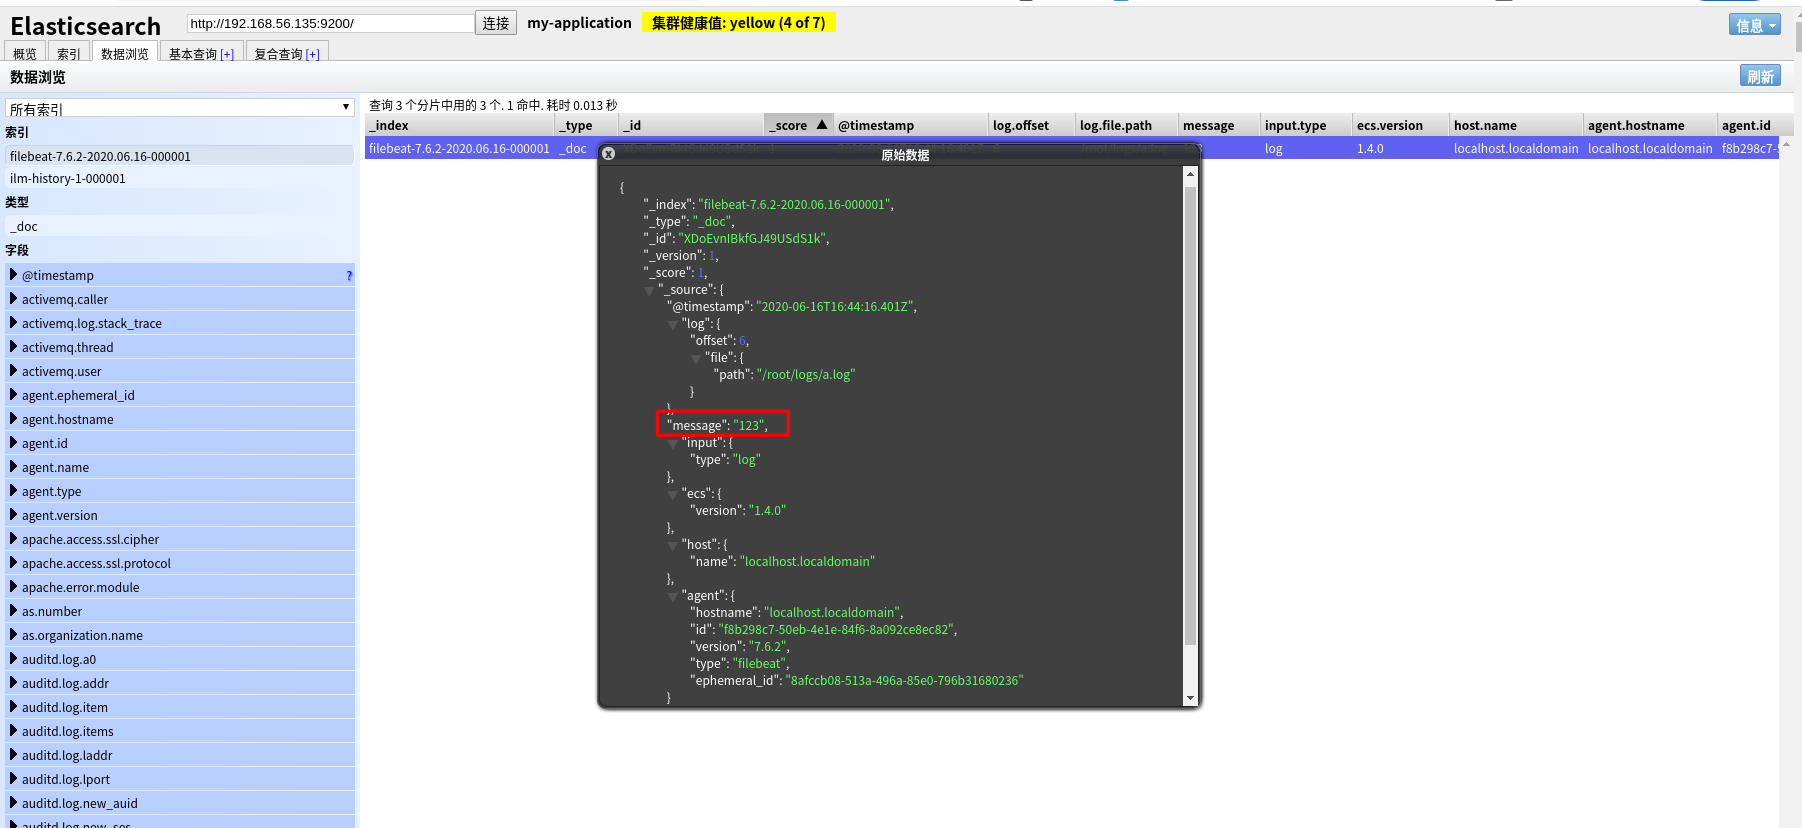
注意:执行命令后,需要手动向 a.log 文件中添加内容,filebeat 才会 将内容输出到 elasticsearch
工作原理
filebeat 由两个主要组件组成:prospector 和 harvester
harvester 并找到所有要读取的文件来源
负责读取单个文件的内容
如果文件在读取时被删除或重命名,Filebeat 将继续读取文件
prospector
- prospector 负责管理 harvester 并找到所有要读取的文件来源
- 如果输入类型为日志,则查找器将查找路径匹配的所有文件,并为每个文件启动一个 harvester。
- Filebeat 目前支持两种 prospector 类型:log 和 stdin
Filebeat 如何保持文件状态
- filebeat 保存每个文件的状态并经常将状态刷新到磁盘上的注册文件中
- 该状态用于记住 harvester 正在读取最后的偏移量,并确保发送所有日志行
- 如果输出(例如 elasticsearch 或 logstash)无法访问,filebeat 会跟踪最后发送的行,并在输出再次可用时继续读取文件
- 在 Filebeat 运行时,每个 prospector 内存中也会保存文件状态信息,当重启 Filebeat 时,将使用注册文件的数据来重建文件状态,Filebeat 将每个 harvester 在从保存的最后偏移继续读取
- 文件状态记录在 data/registry 文件中
filebeat 命令参数
1 | filebeat -e -c filename -d "public" |
当 filebeat 将内容输出到 elasticsearch 时,可以使用该 -d 参数,从命令行中看到 filebeat 的输出内容。
读取 Nginx 日志文件
- 安装、启动 nginx
1 | [root@localhost ~]# yum -y install nginx |
- 创建配置文件
1 | [root@localhost filebeat]# cat itcast-nginx.yml |
- 执行配置文件
1 | [root@localhost filebeat]# filebeat -e -c itcast-nginx.yml |
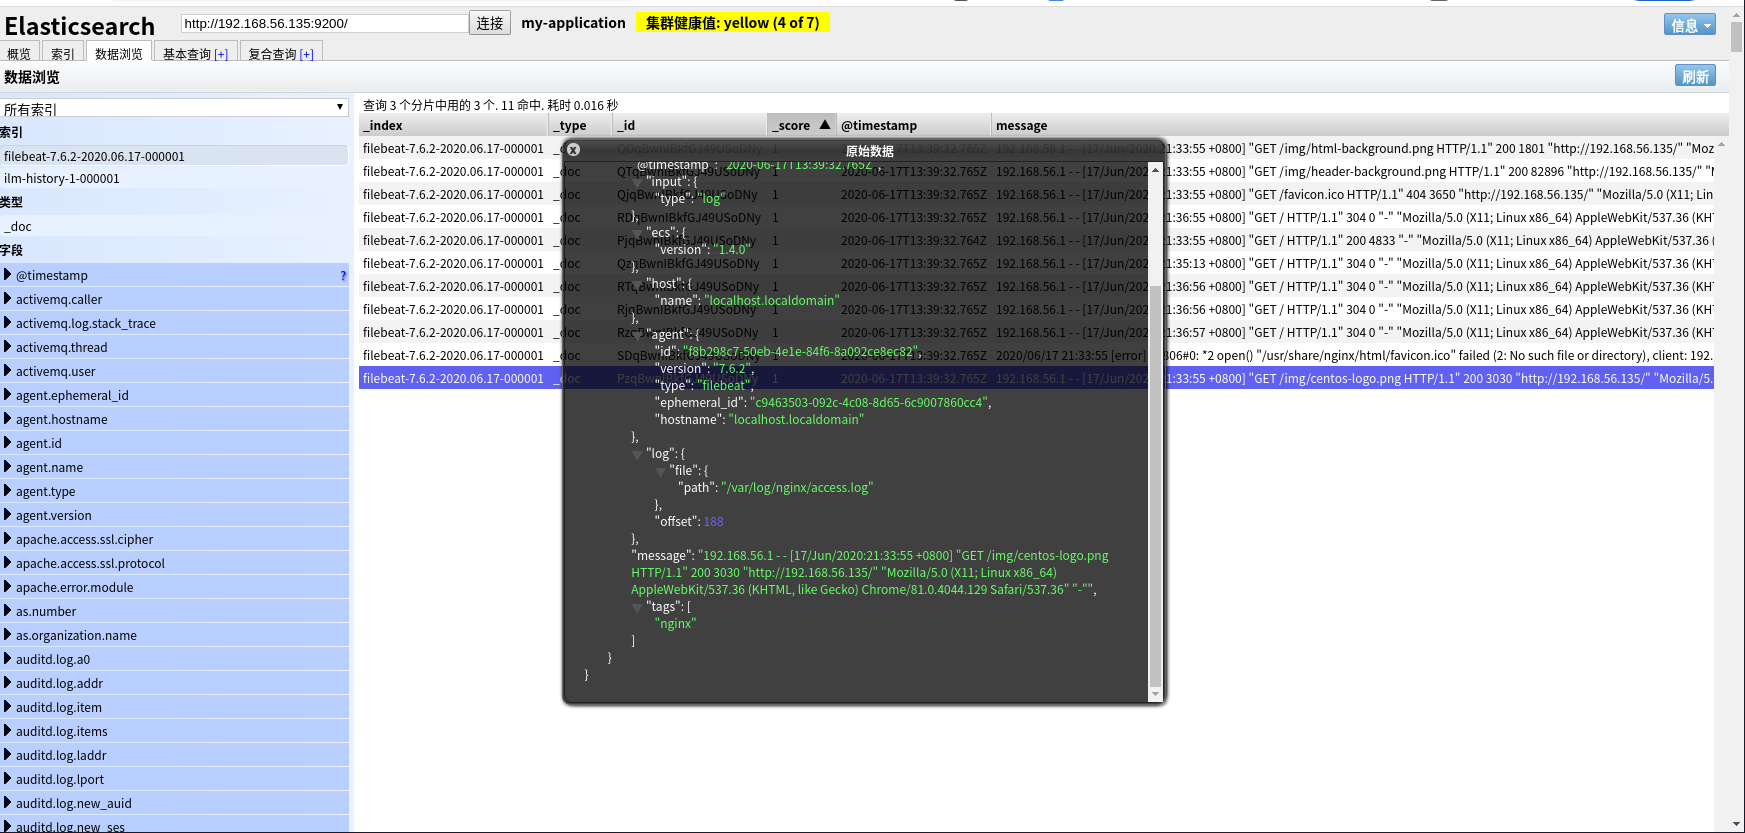
PS:在执行配置文件前,最好把之前的 filebeat 索引删掉;执行配置文件后,用浏览器访问 nginx,让其产生日志信息。
Moudule 的使用
- 查看 filebeat 的 modules
1 | [root@localhost filebeat]# filebeat modules list |
- 启用 nginx module
1 | [root@localhost filebeat]# filebeat modules enable nginx |
禁用 nginx module 使用如下命令:filebeat modules disable nginx
- 配置 nginx module
1 | [root@localhost ~]# cd /etc/filebeat/modules.d |
modules 的配置文件路径:/etc/filebeat/modules.d
- 创建配置文件
1 | [root@localhost filebeat]# cat itcast-nginx.yml |
- 执行配置文件
1 | [root@localhost filebeat]# filebeat -e -c itcast-nginx.yml |
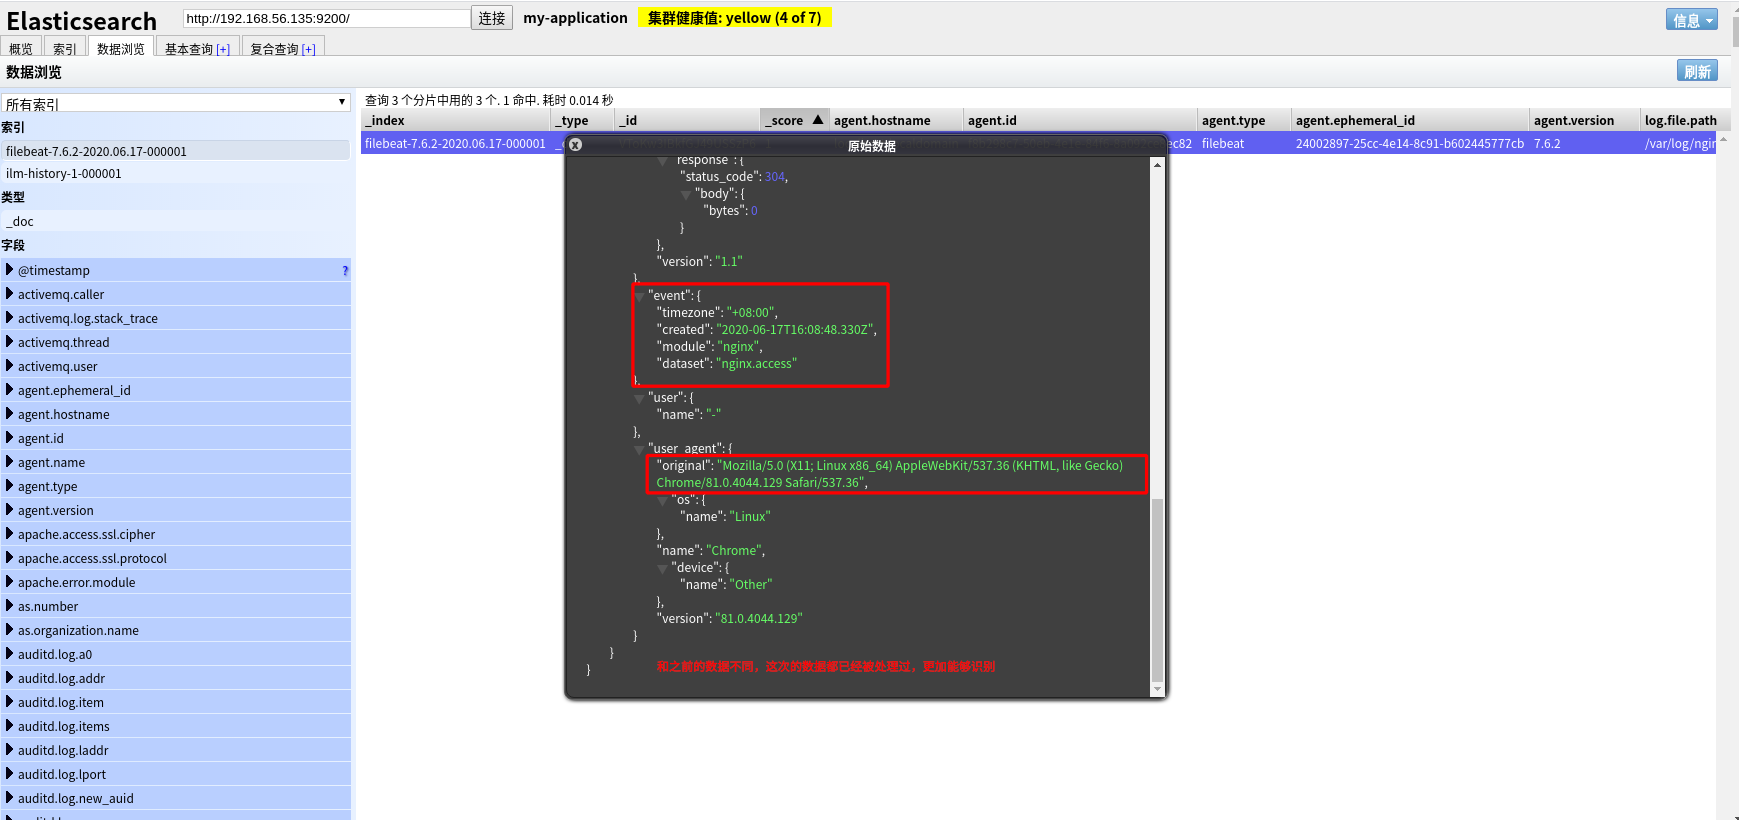
PS:在执行配置文件前,最好把之前的 filebeat 索引删掉;执行配置文件后,用浏览器访问 nginx,让其产生日志信息。
从图片张可以看到,这次的数据都已经被处理过,使数据看的更加清晰
Metricbeat
用于从系统和服务收集指标。Metricbeat 能够以一种轻量型的方式,输送各种系统和服务统计数据,从 cpu 到内存,从 Redis 到 Nginx。
- 定期收集操作系统或应用服务的指标数据
- 存储到 Elasticsearch 中,进行实时分析
组成
Metricbeat 由两部分组成,一部分是 Module,另一部分为 Metricset。
- Module
- 收集对象,如:mysql、redis、nginx、操作系统等;
- Metricset
- 收集指标的集合,如:cpu、memory、network等;
部署
- 安装 metricbeat
1 | [root@192 beats]# rpm -ivh metricbeat-7.6.2-x86_64.rpm |
- 配置 metricbeat
1 | [root@192 beats]# cd /etc/metricbeat/ |
- 启动 metricbeat
1 | [root@192 metricbeat]# metricbeat -e |
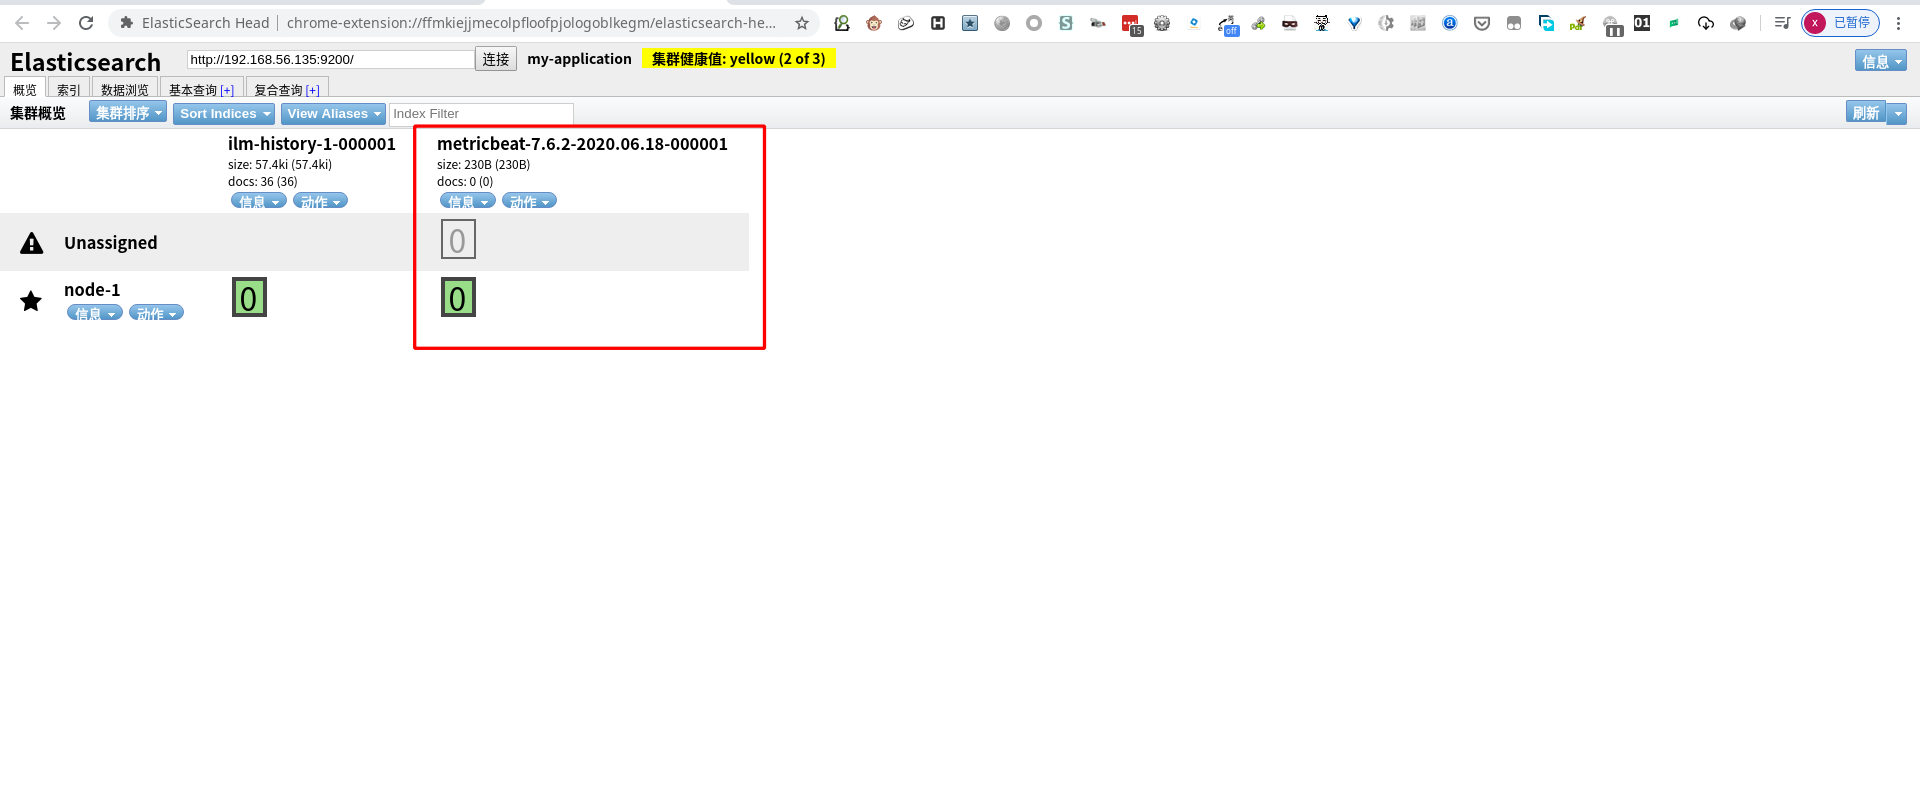
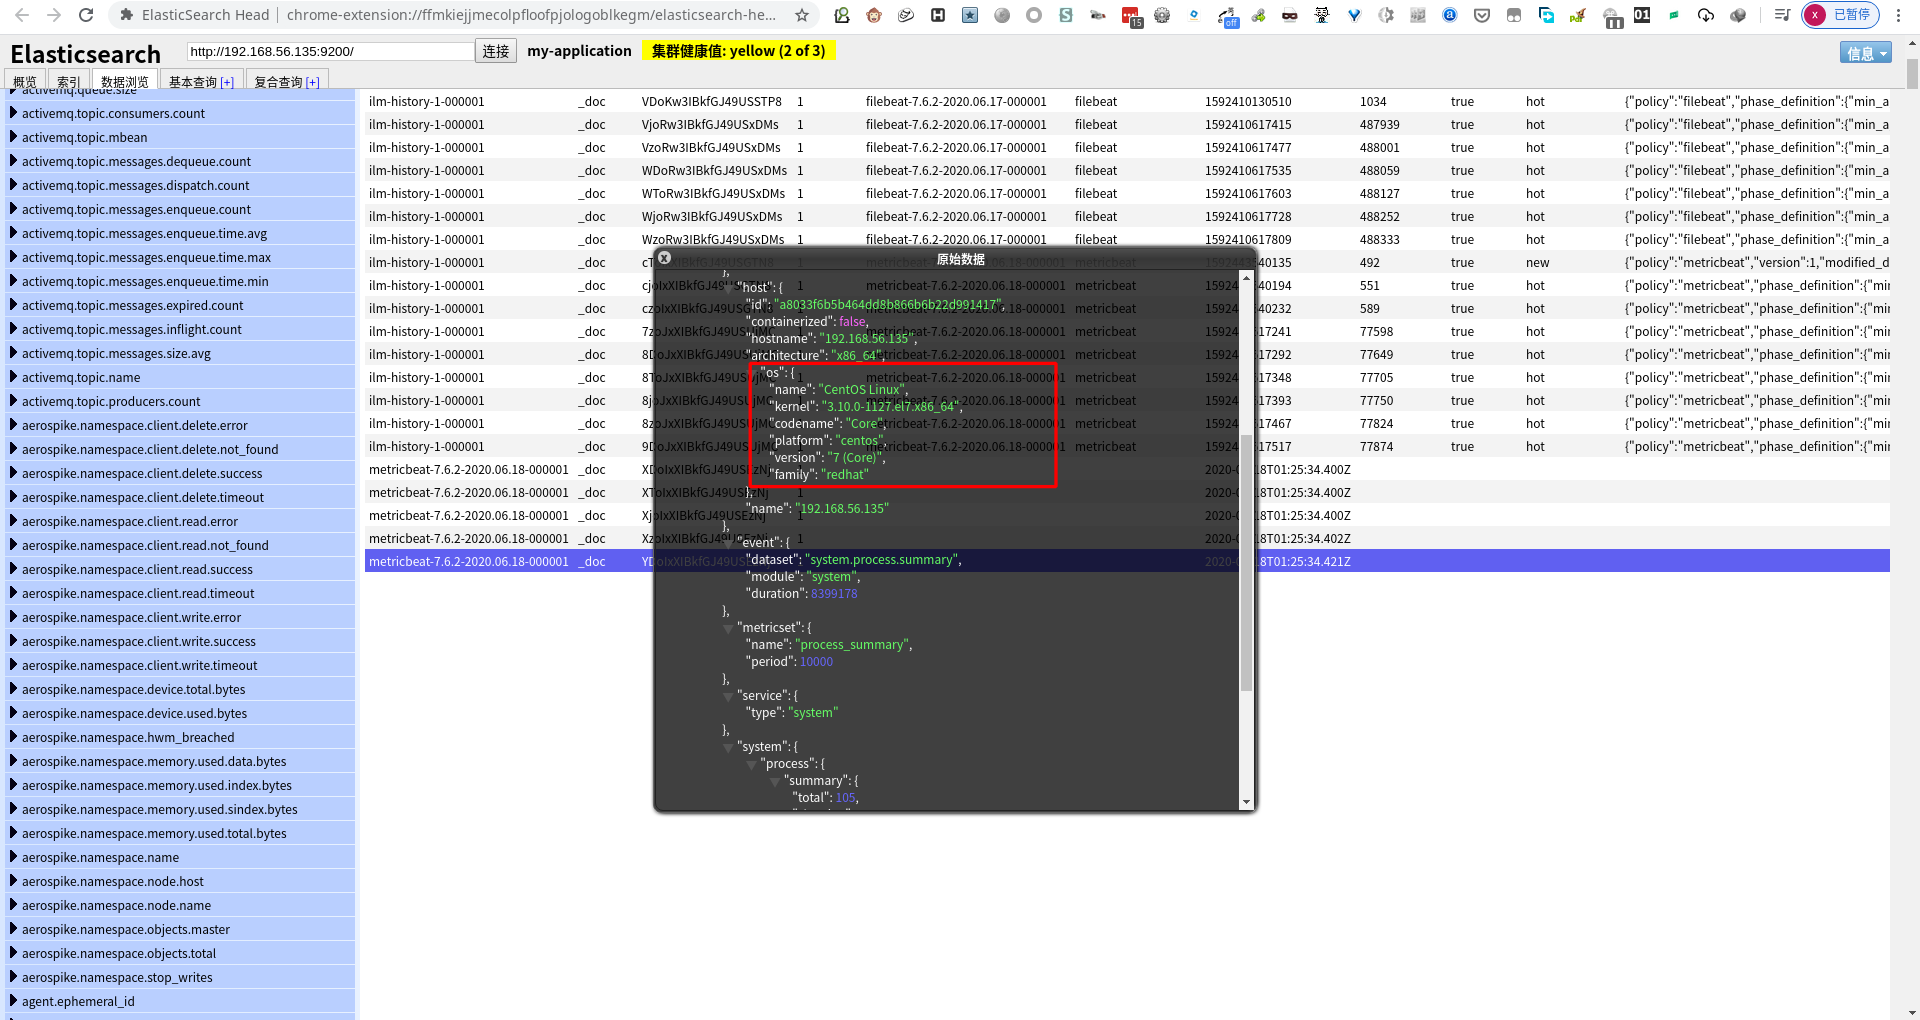
metricbeat modules
- 查看 modules
1 | [root@192 modules.d]# metricbeat modules list |
metricbeat modules 路径:/etc/metricbeat/modules.d(默认开启了 system module)
- 开启 nginx 状态查询
1 | [root@192 nginx]# vim nginx.conf |
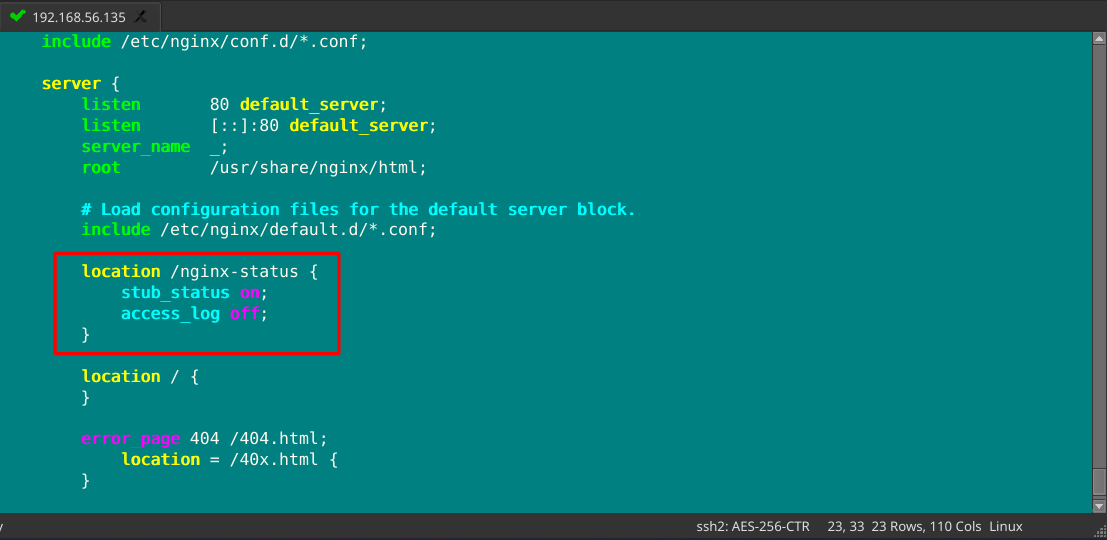
- 重启 nginx
1 | [root@192 nginx]# systemctl restart nginx |
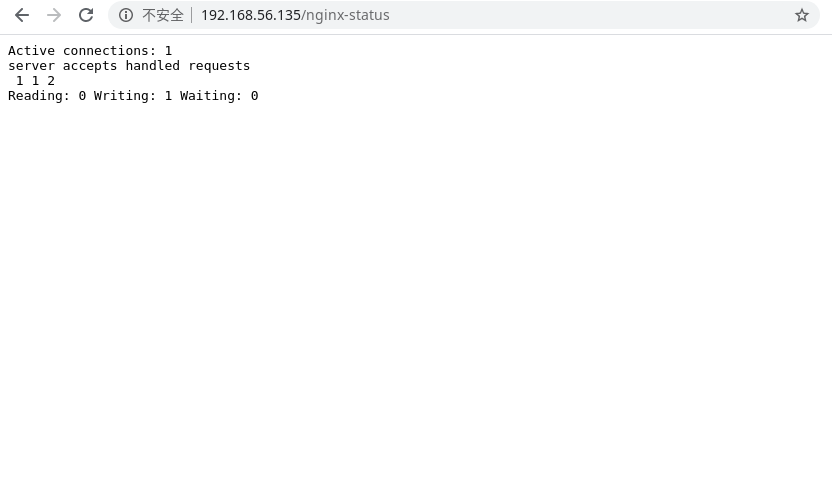
结果说明:
- Active connections:正在处理的活动连接数
- server accepts handled requests
- 第一个 server 表示 Nginx 启动到现在共处理了 1 个连接
- 第二个 accepts 表示 Nginx 启动到现在共成功创建 1 词握手
- 第三个 handled requests 表示总共处理了 2 次请求
- 请求丢失数=握手数-连接数,可以看出目前为止没有丢失请求
- Reading:0 Writing:1 Wating:0
- Reading:Nginx 读取到客户端的 header 信息数
- Writing:Nginx 返回给客户端 Header 信息数
- Wating:Nginx 已经处理完正在等候下一次请求指令的驻留链接(开启 keep-alive 的情况下,这个值等于 Active-(Reading+Writing))
- 配置 nginx module
1 | [root@192 nginx]# metricbeat modules enable nginx |
- 启动 metricbeat
1 | [root@192 metricbeat]# metricbeat -e |
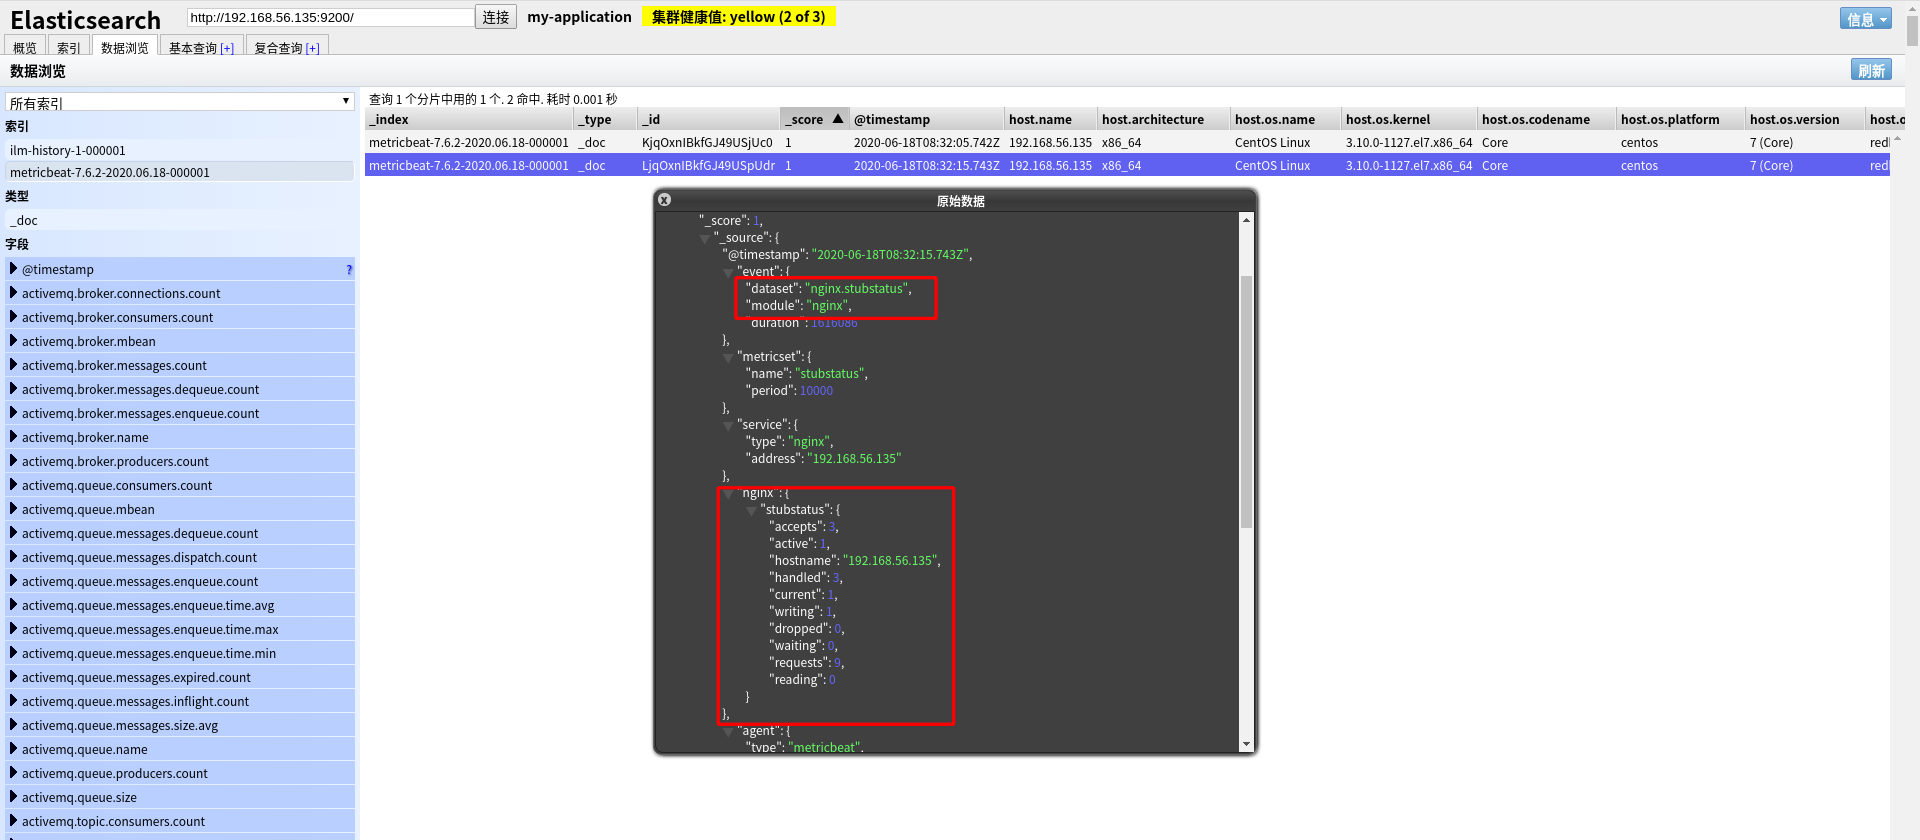
Kibana
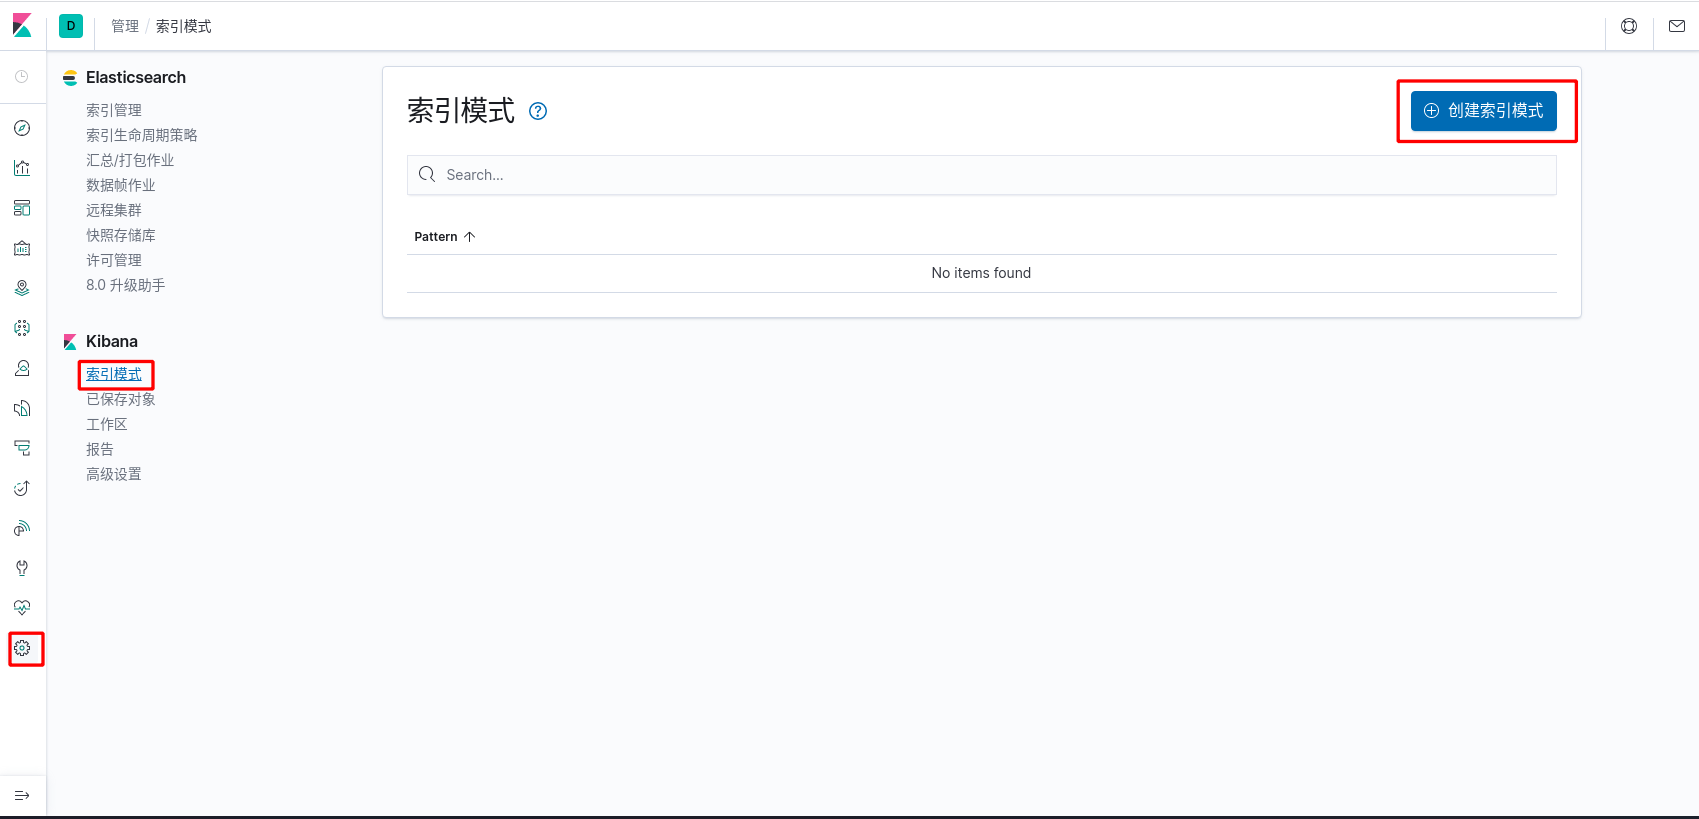
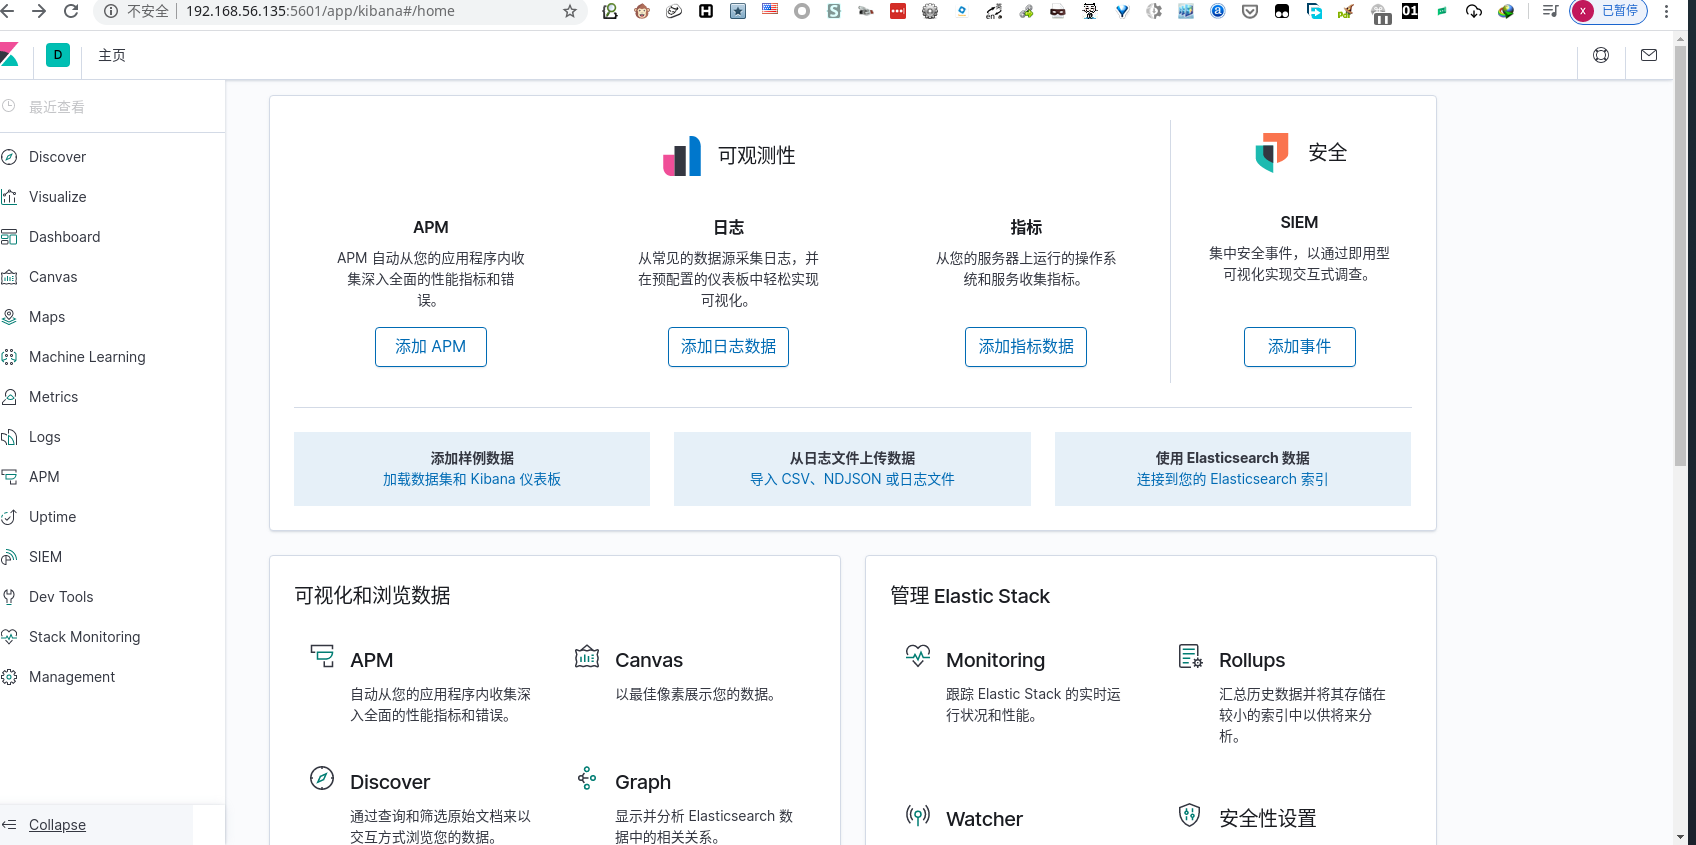
Kibana 是一个为 Elasticsearch 平台分析和可视化的开源平台,使用 Kibana 能够搜索、展示存储在 Elasticsearch 中的索引数据。使用它可以很方便用图表、表格、地图展示和分析数据。
Kibana 能够轻松处理大量数据,通过浏览器接口能够轻松的创建和分享仪表盘,通过改变Elasticsearch查询时间,可以完成动态仪表盘。
部署安装
- 安装 kibana
1 | [root@192 ~]# rpm -ivh kibana-7.6.2-x86_64.rpm |
- 配置 kibana
1 | [root@192 ~]# vim /etc/kibana/kibana.yml |

- 数据探索


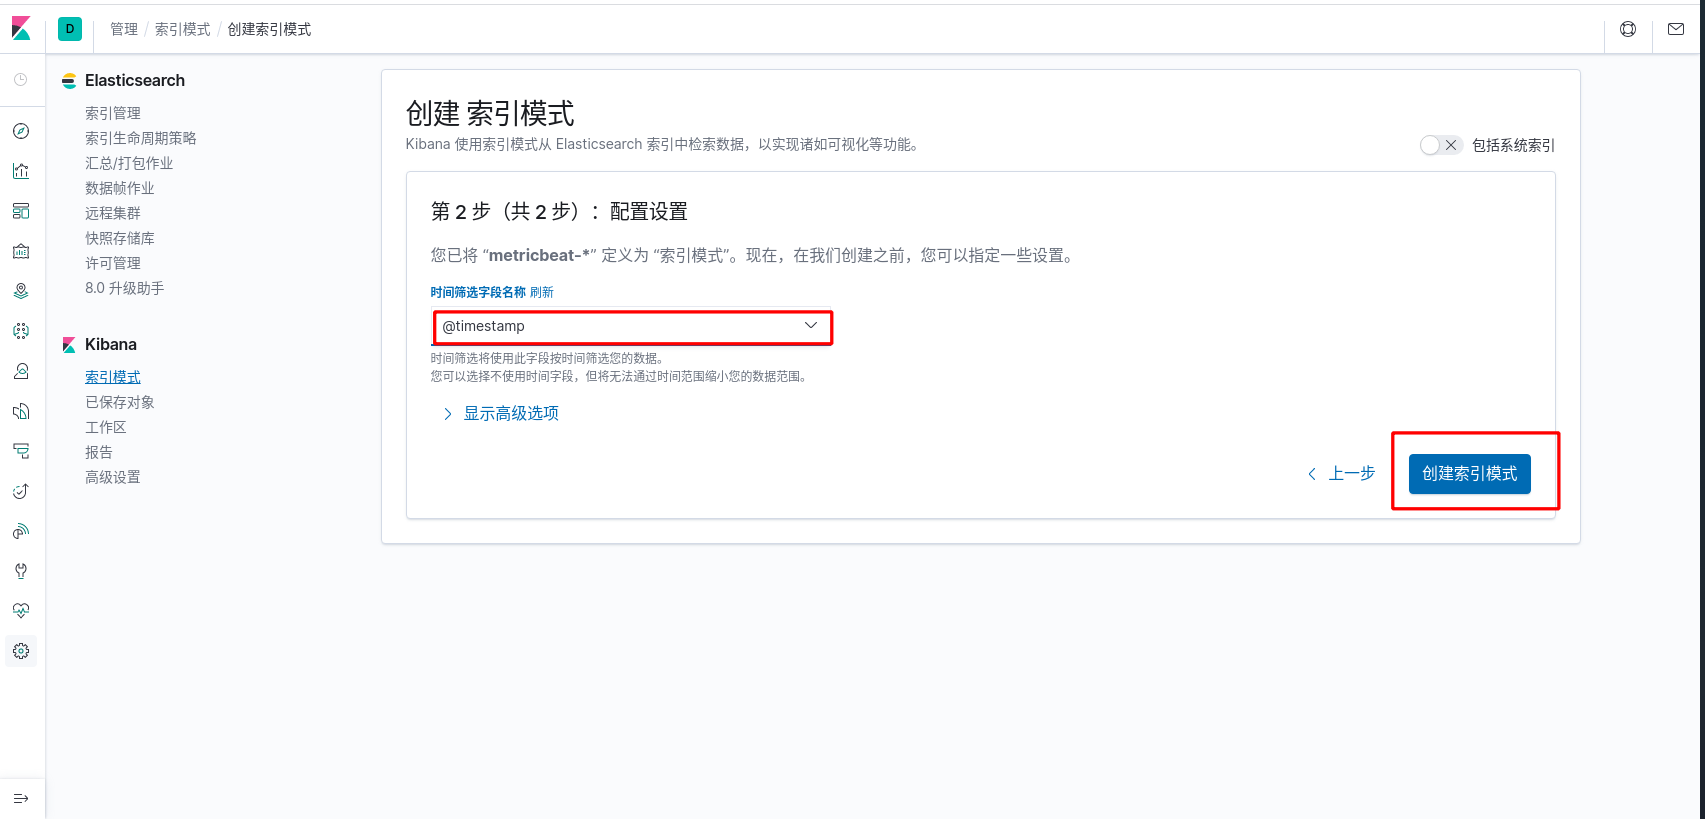
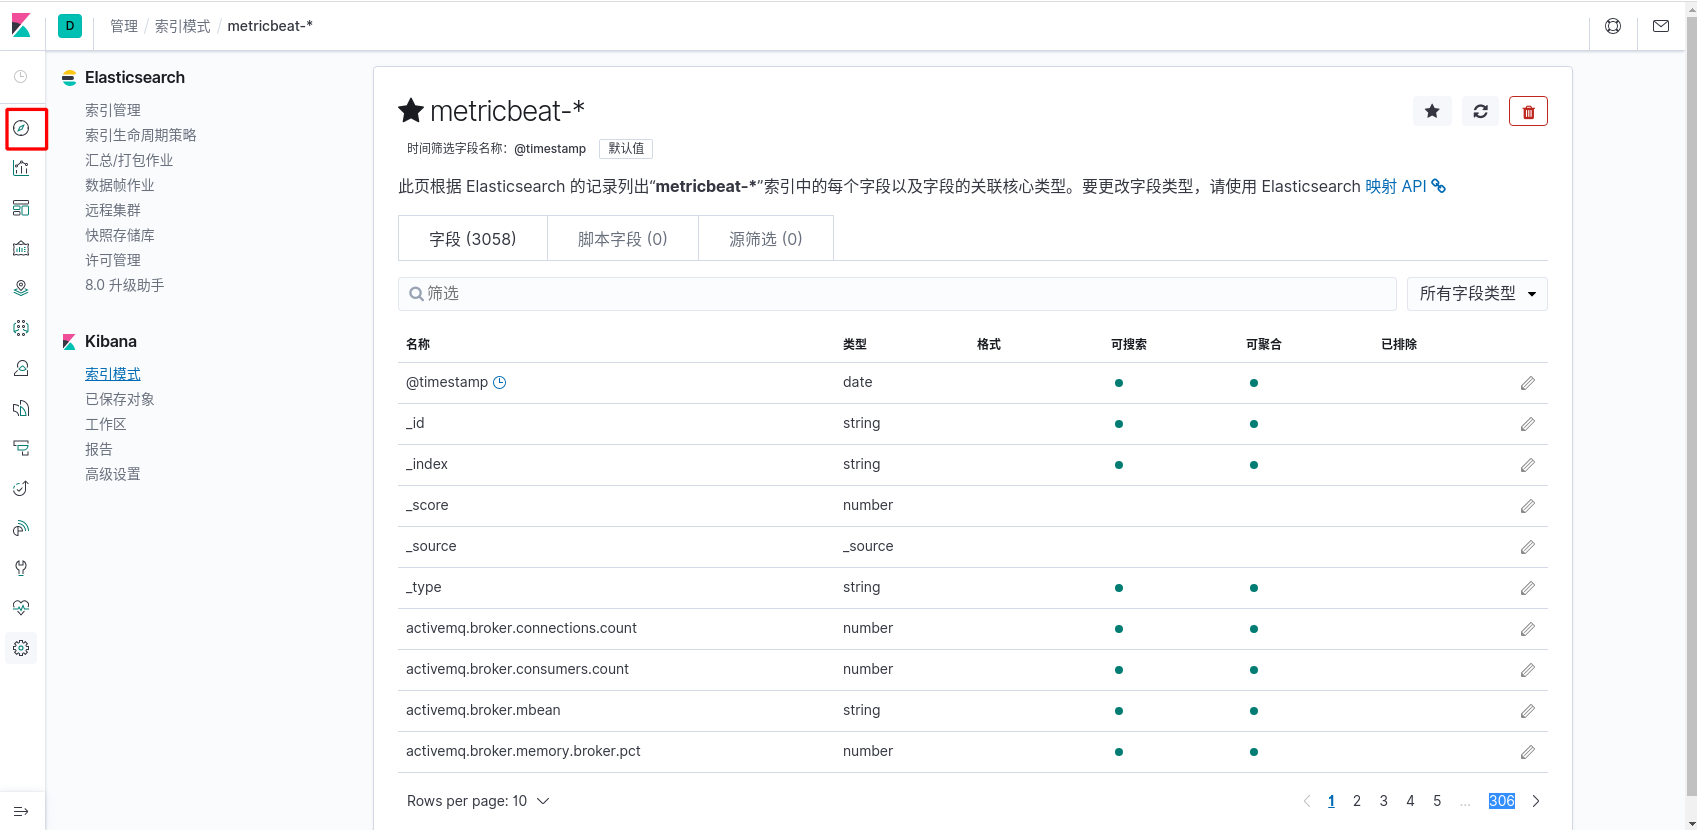
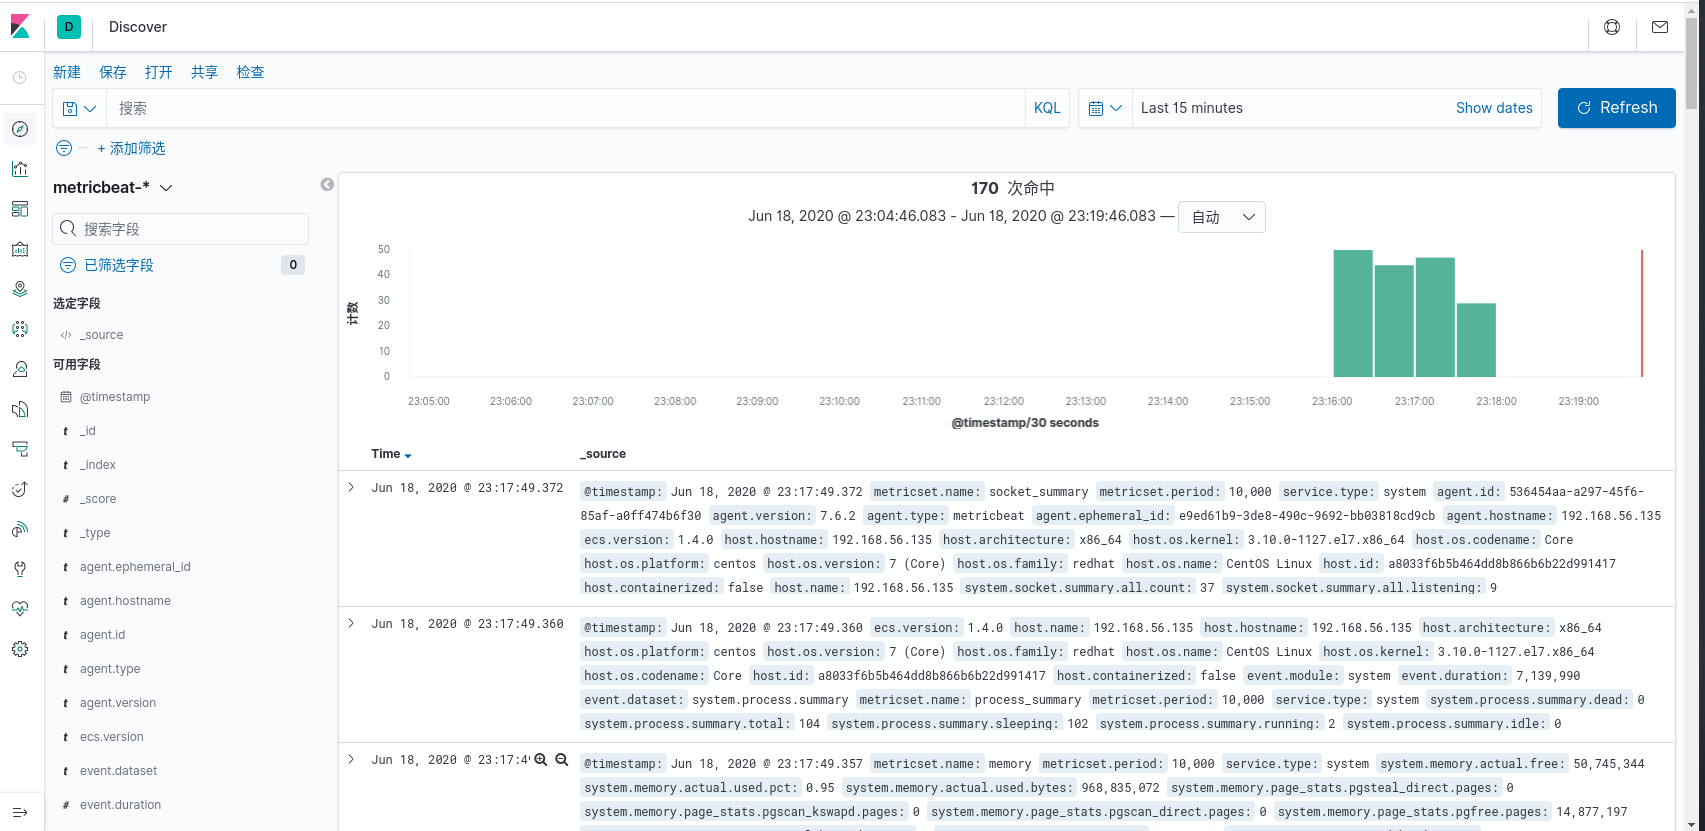
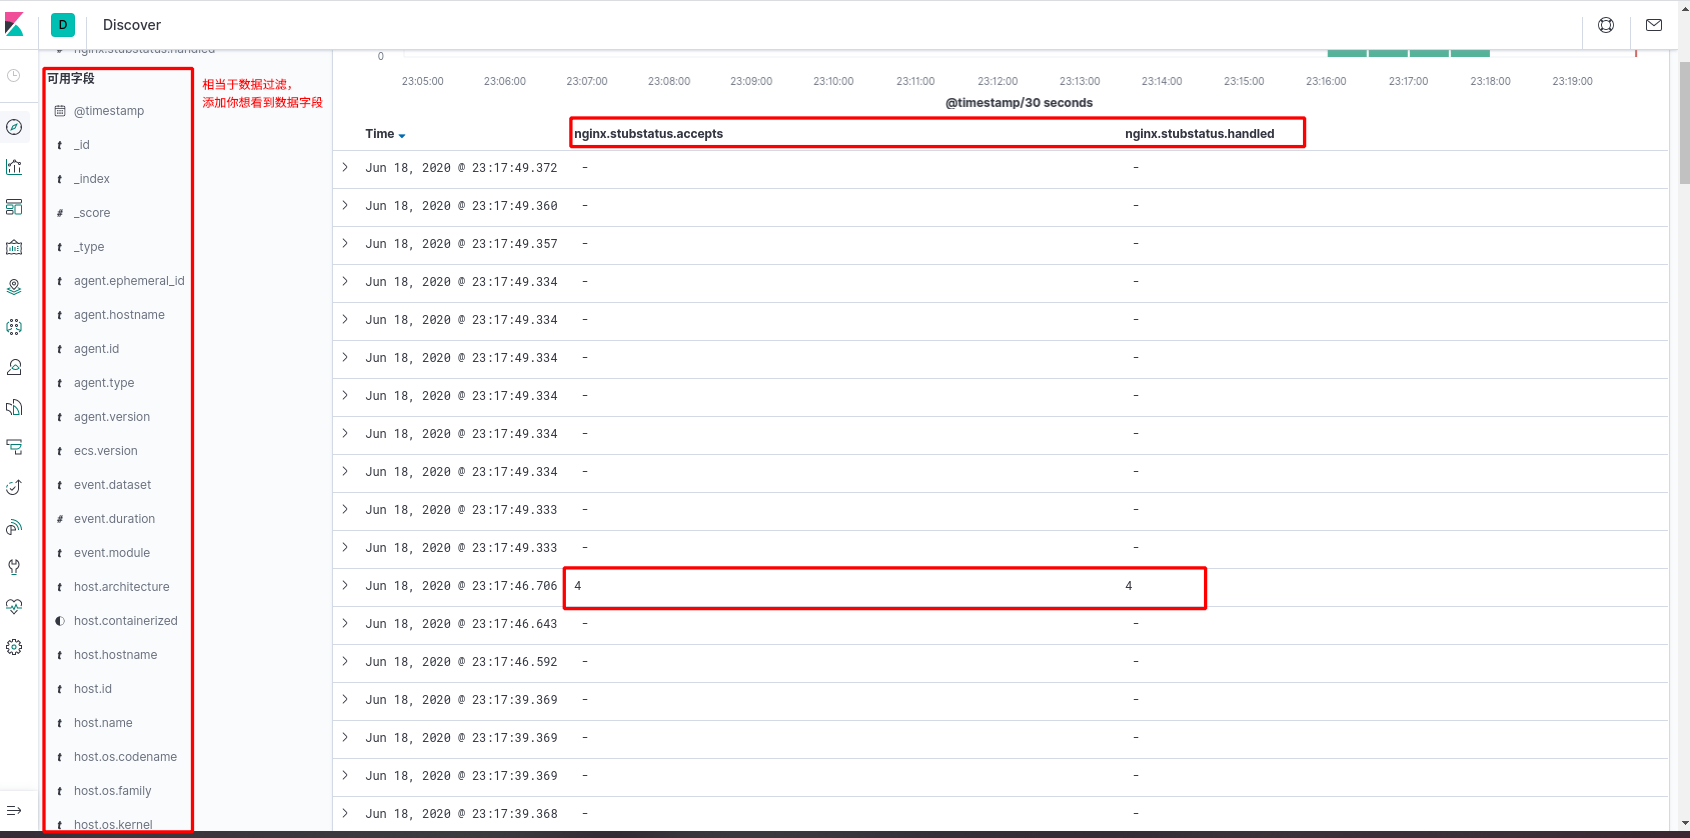
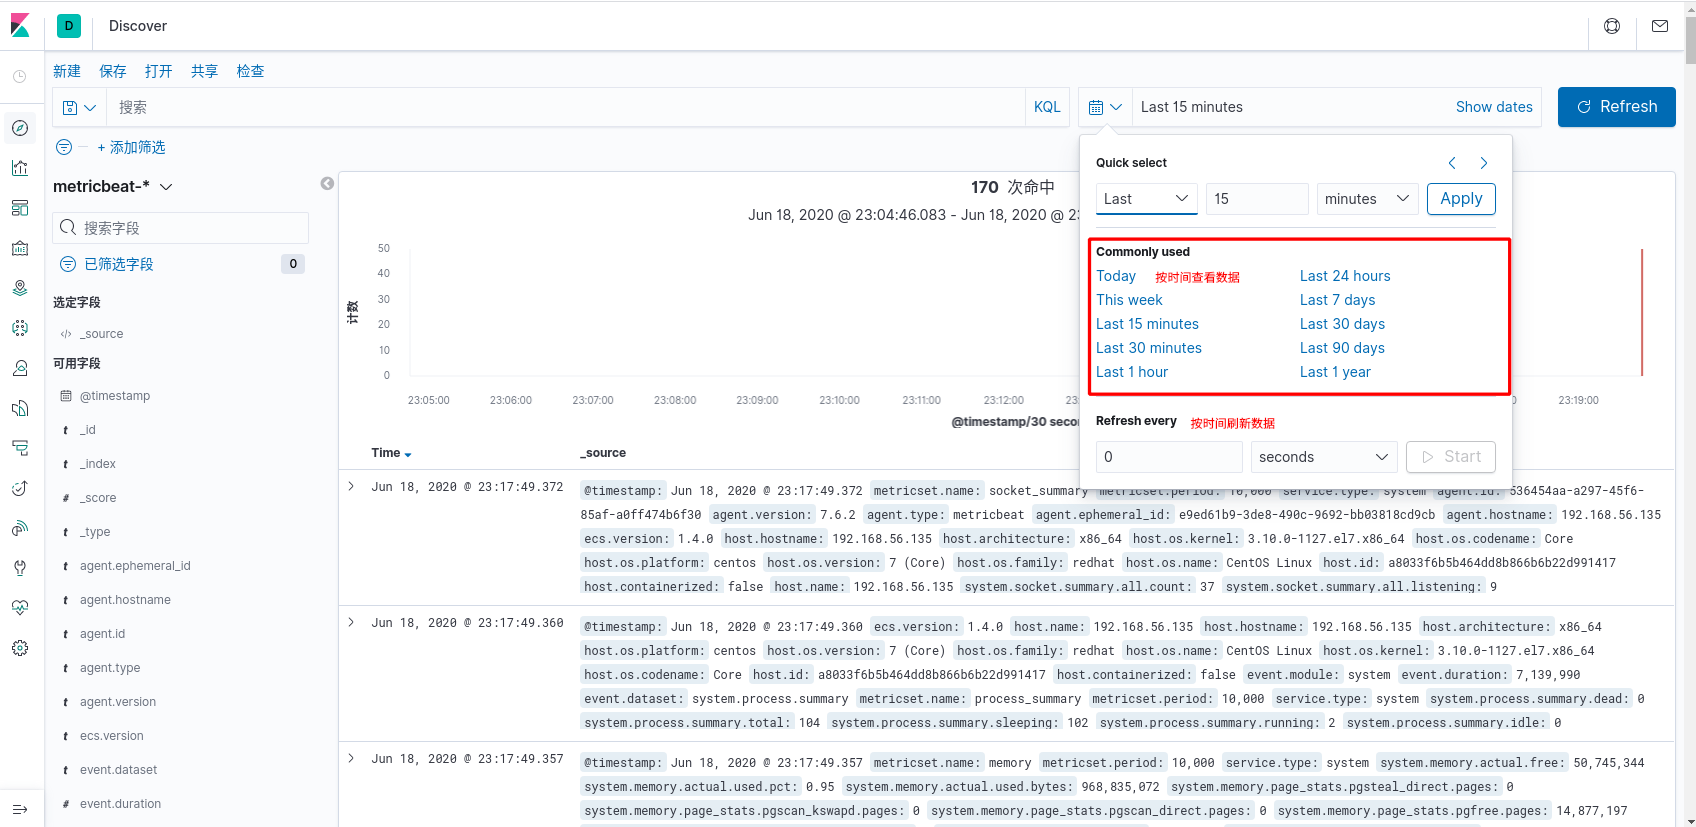
metricbeat 仪表盘安装
- 配置 metricbeat
1 | [root@192 ~]# vim /etc/metricbeat/metricbeat.yml |
- 安装仪表盘
1 | [root@192 ~]# metricbeat setup --dashboards |
- 运行 metricbeat
1 | [root@192 ~]# metricbeat -e |
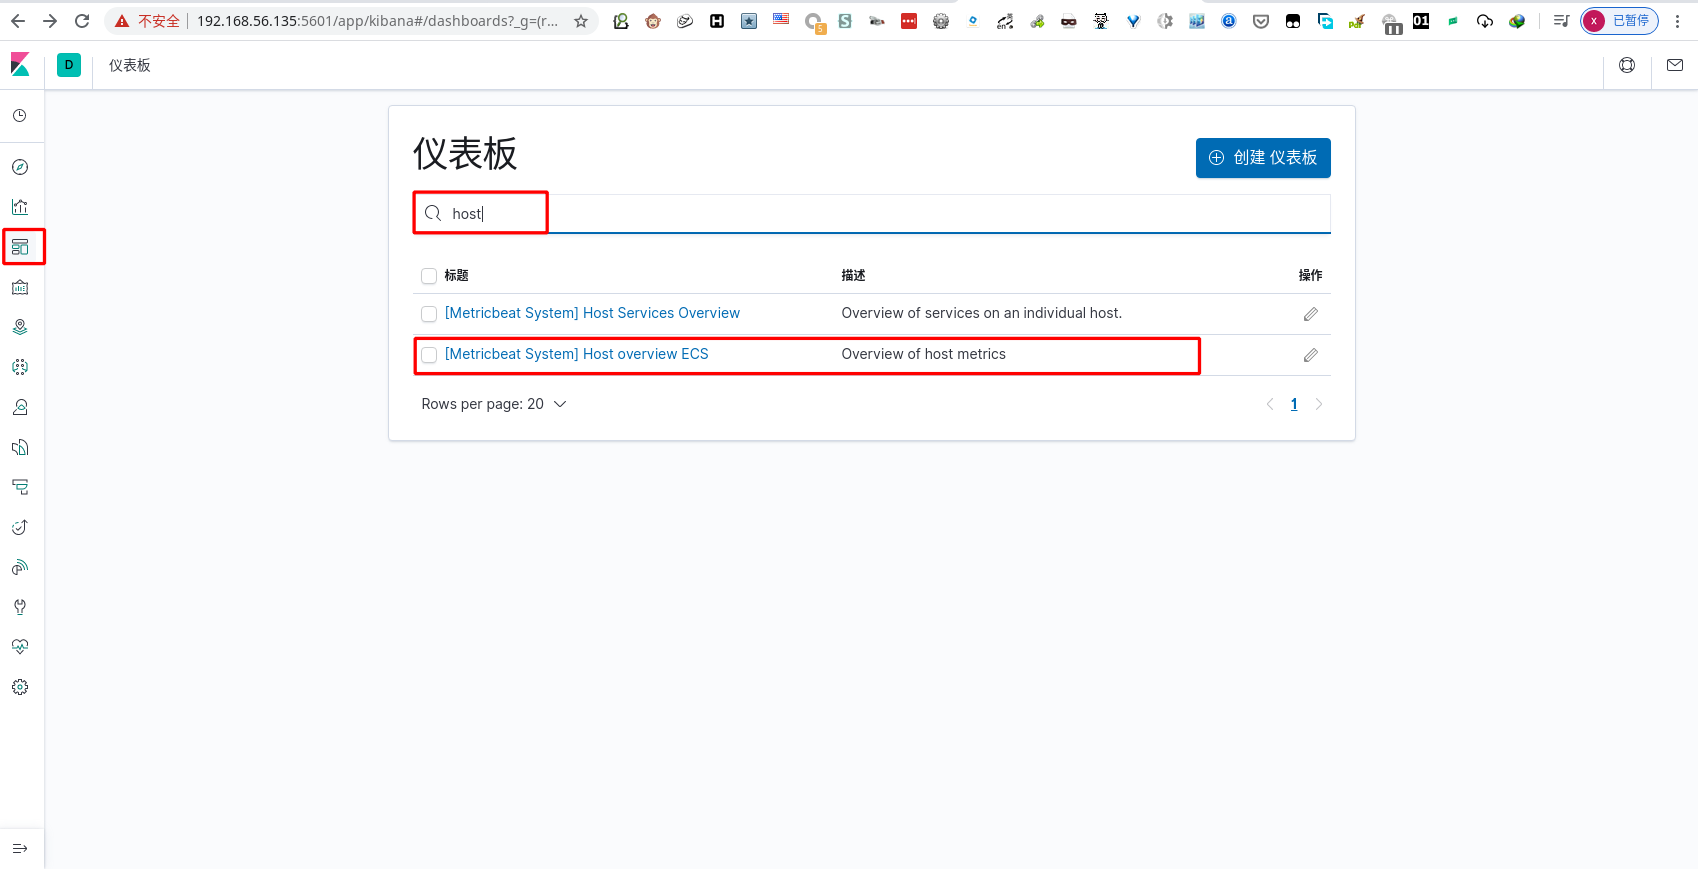
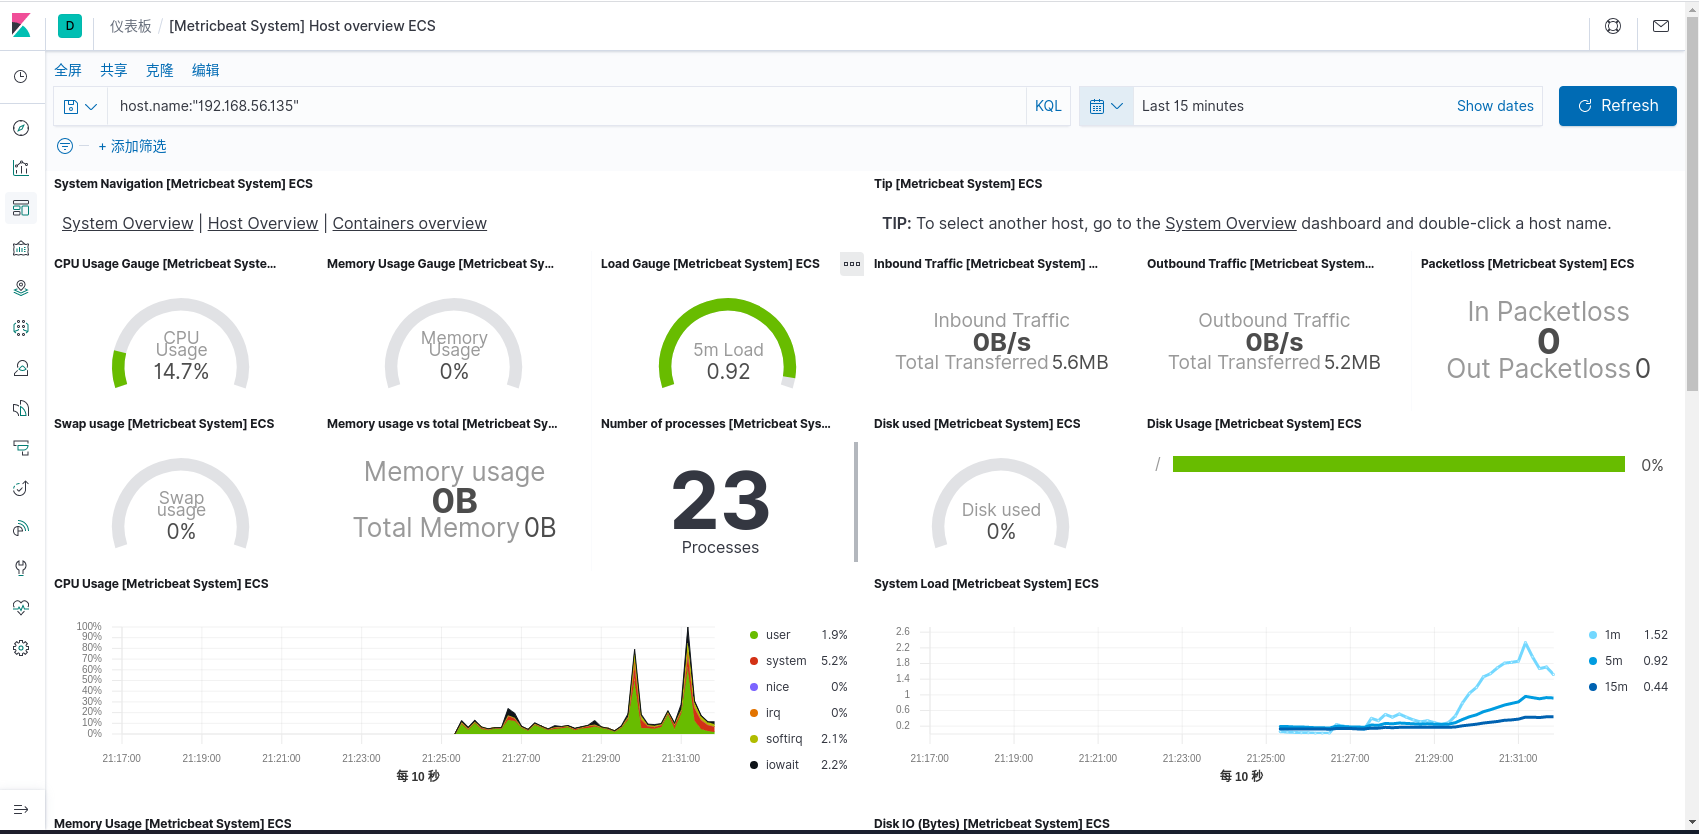
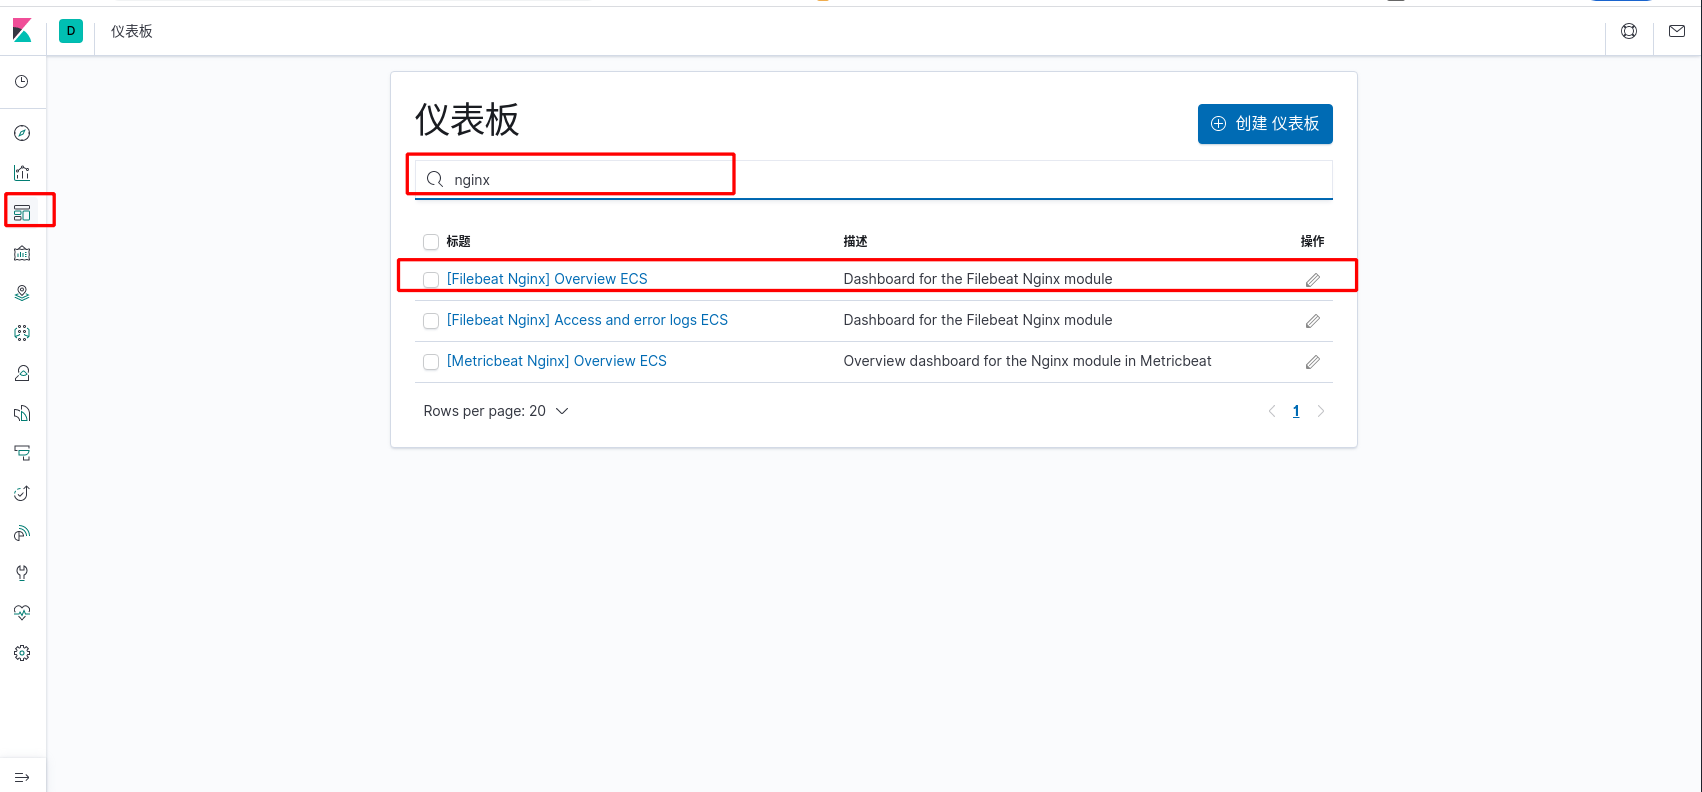
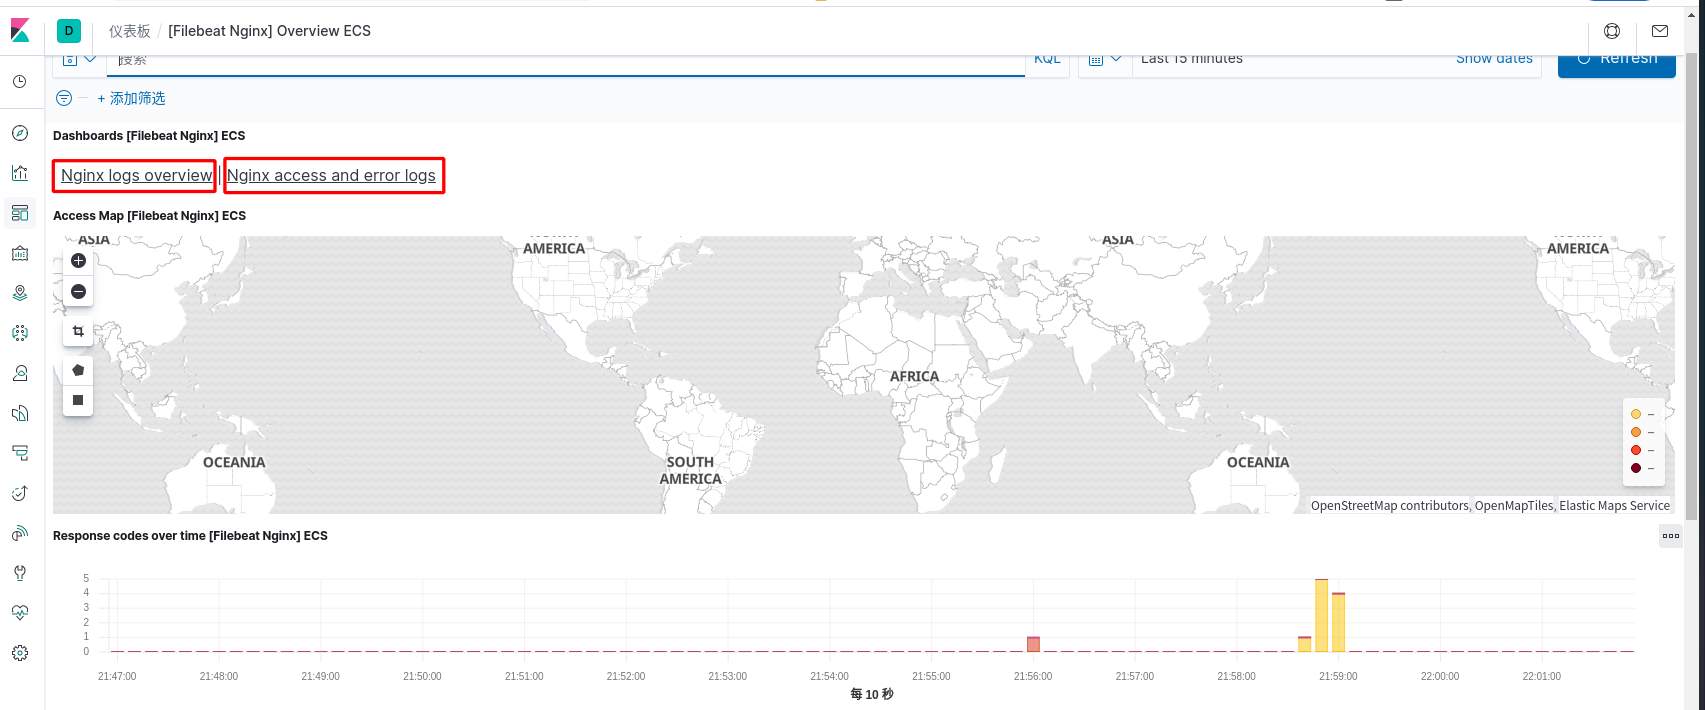
nginx 日志仪表盘安装
- 配置 filebeat 文件
1 | [root@192 ~]# vim /etc/filebeat/itcast-nginx.yml |
- 安装仪表盘
1 | [root@192 filebeat]# filebeat -c itcast-nginx.yml setup |
- 运行 filebeat
1 | [root@192 filebeat]# filebeat -e -c itcast-nginx.yml |
开发者工具
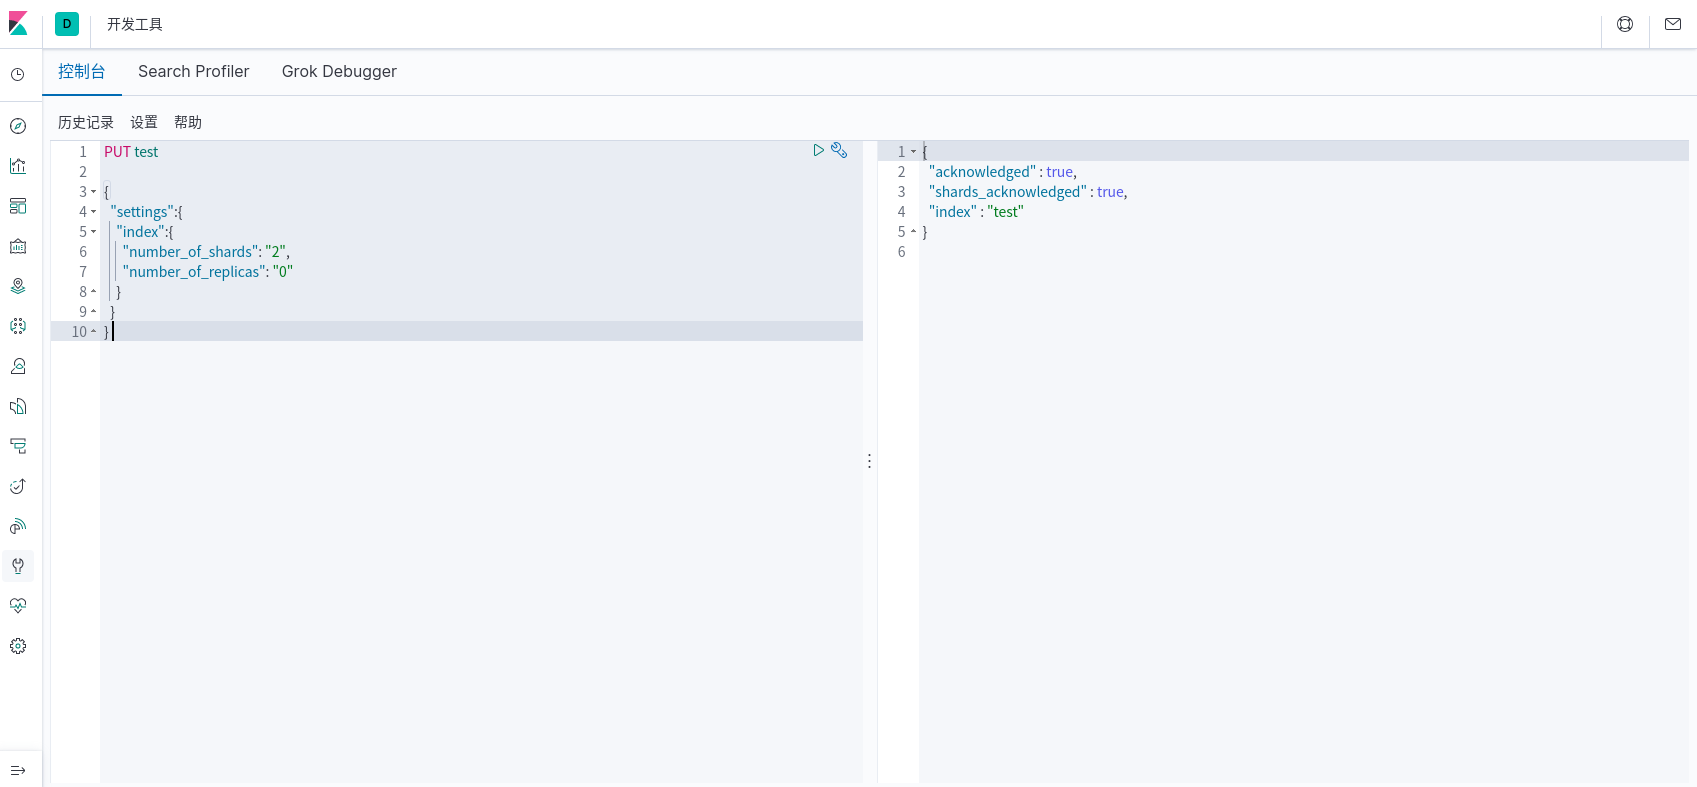
创建索引

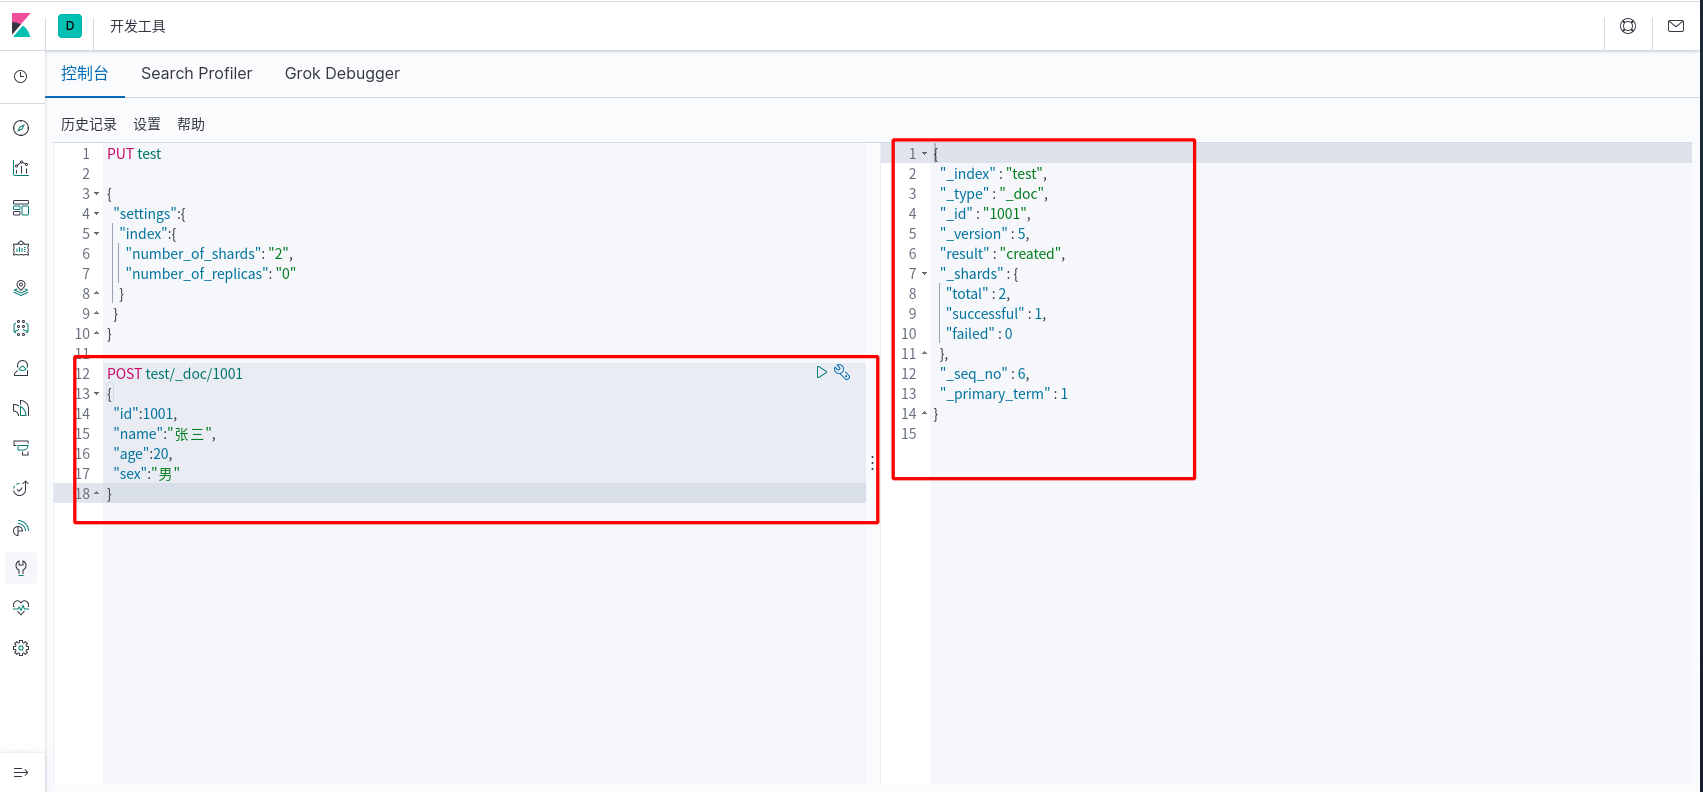
创建数据


Logstash
简单来说 logstash 就是具备实时数据传输能力的管道,负责将数据信息从管道的输入端传输到管道的输出端;与此同时这根管道还可以让你根据自己的需求在中间加上滤网,Logstash 提供里很多功能强大的滤网以满足你的各种应用场景。
部署安装
- 安装 jdk1.8(logstash 依赖)
1 | [root@192 ~]# yum -y install java |
- 安装logstash
1 | [root@192 ~]# rpm -ivh logstash-7.6.2.rpm |
- 自动生成 logstash.service 启动程序,创建软连接
1 | [root@192 ~]# /usr/share/logstash/bin/system-install /etc/logstash/startup.options systemd |
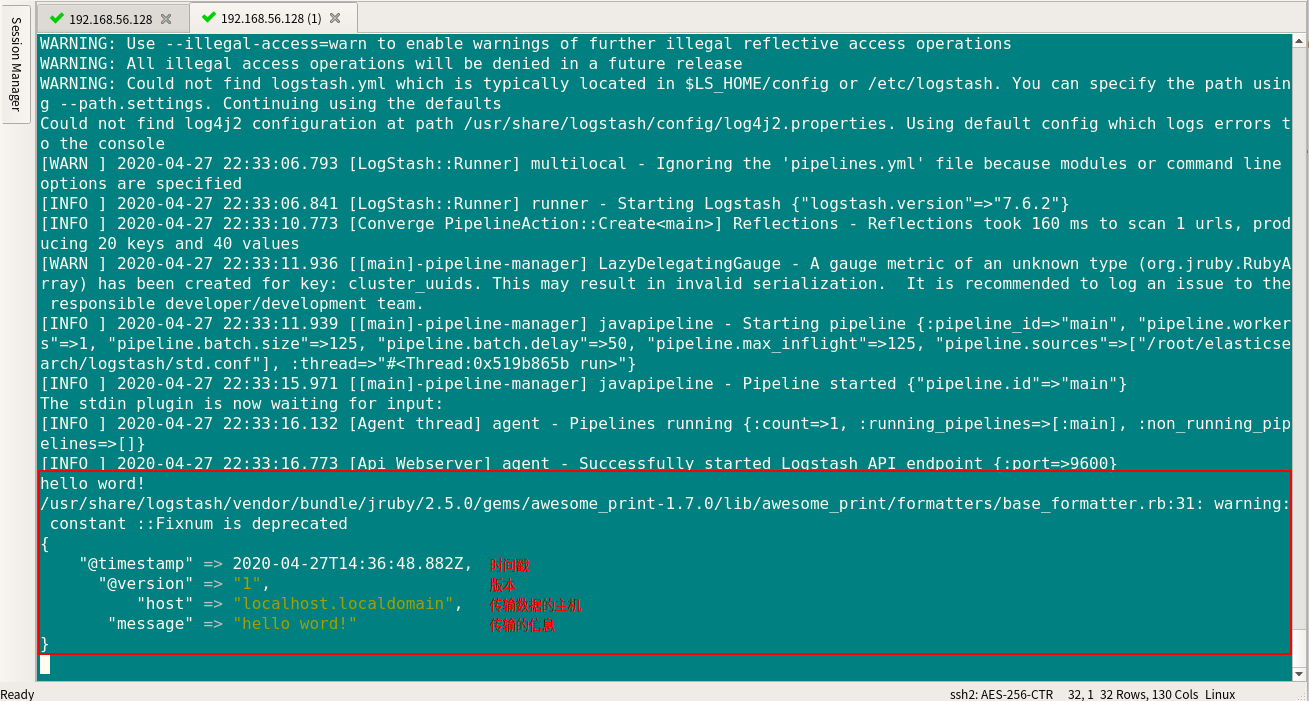
从 shell 中读取输出信息
- 创建 logstash 配置文件
1 | [root@192 ~]# vim std.conf |
- 运行logstash
1 | //测试脚本是否有问题 |
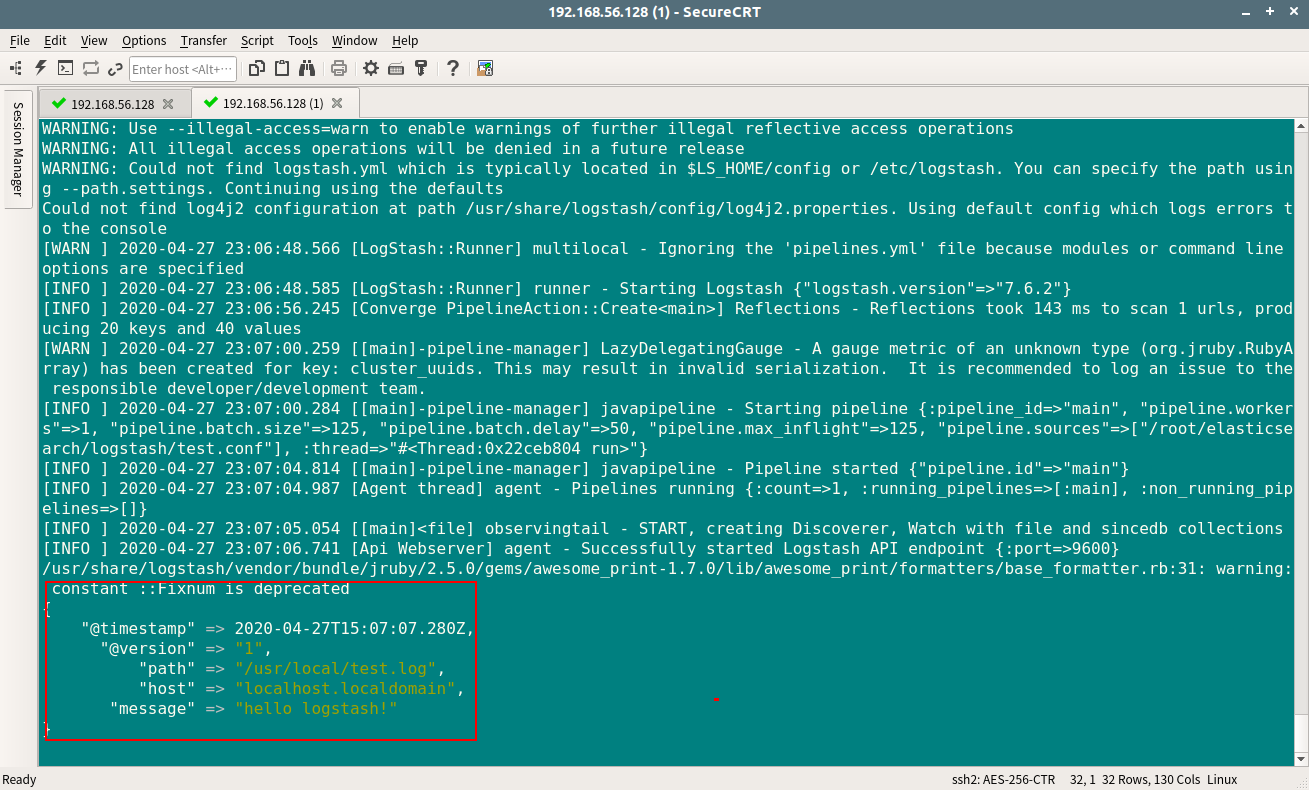
从日志文件中读取信息
- 创建日志文件
1 | [root@localhost ~]# vim /usr/local/test.log |
- 创建配置文件
1 | [root@localhost ~]# vim test.conf |
- 启动 Logstash
1 | [root@localhost ~]# logstash -f test.conf |
从日志文件中读取信息,并输出到执行的文件中
- 修改配置文件
1 | [root@localhost ~]# vim test.conf |
- 启动Logstash
1 | [root@localhost ~]# /usr/share/logstash/bin/logstash -f test.conf |
启动后,/usr/local/目录下多了test.log.out文件。

Logstash 关联 Elasticsearch 和 Kibana
- 修改配置文件
1 | [root@localhost ~]# vim test.conf |
- 启动Logstash
1 | [root@localhost ~]# /usr/share/logstash/bin/logstash -f ~/test.conf |
- 查看索引
浏览器访问 http://192.168.56.128:9200/_cat/indices?v

其中有个索引是logstash的,这就是我们想要查看的数据索引。
- 查看数据
浏览器访问 http://192.168.56.128:9200/logstash-2020.04.27-000001/_search
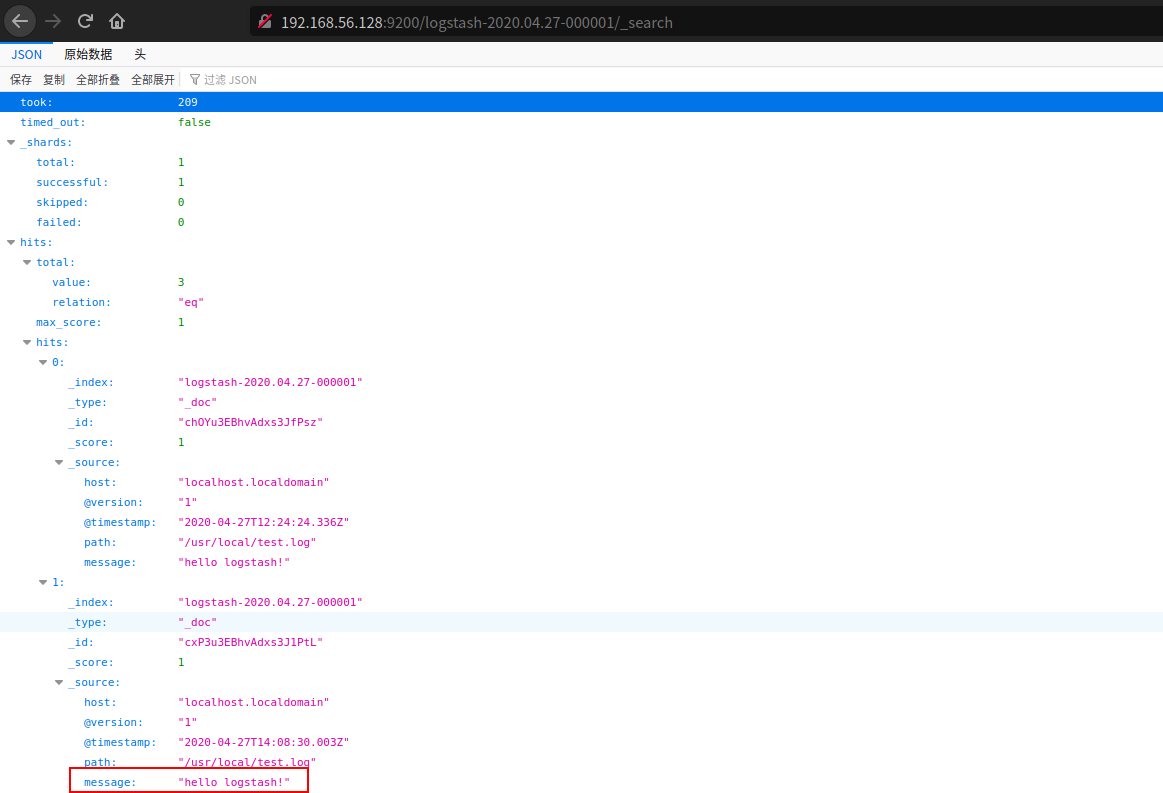
看到了 hello logstash! ,说明数据已经成功传递到了 Elasticsearch。链接后添加 ?pretty 参数,可以进行格式化显示。
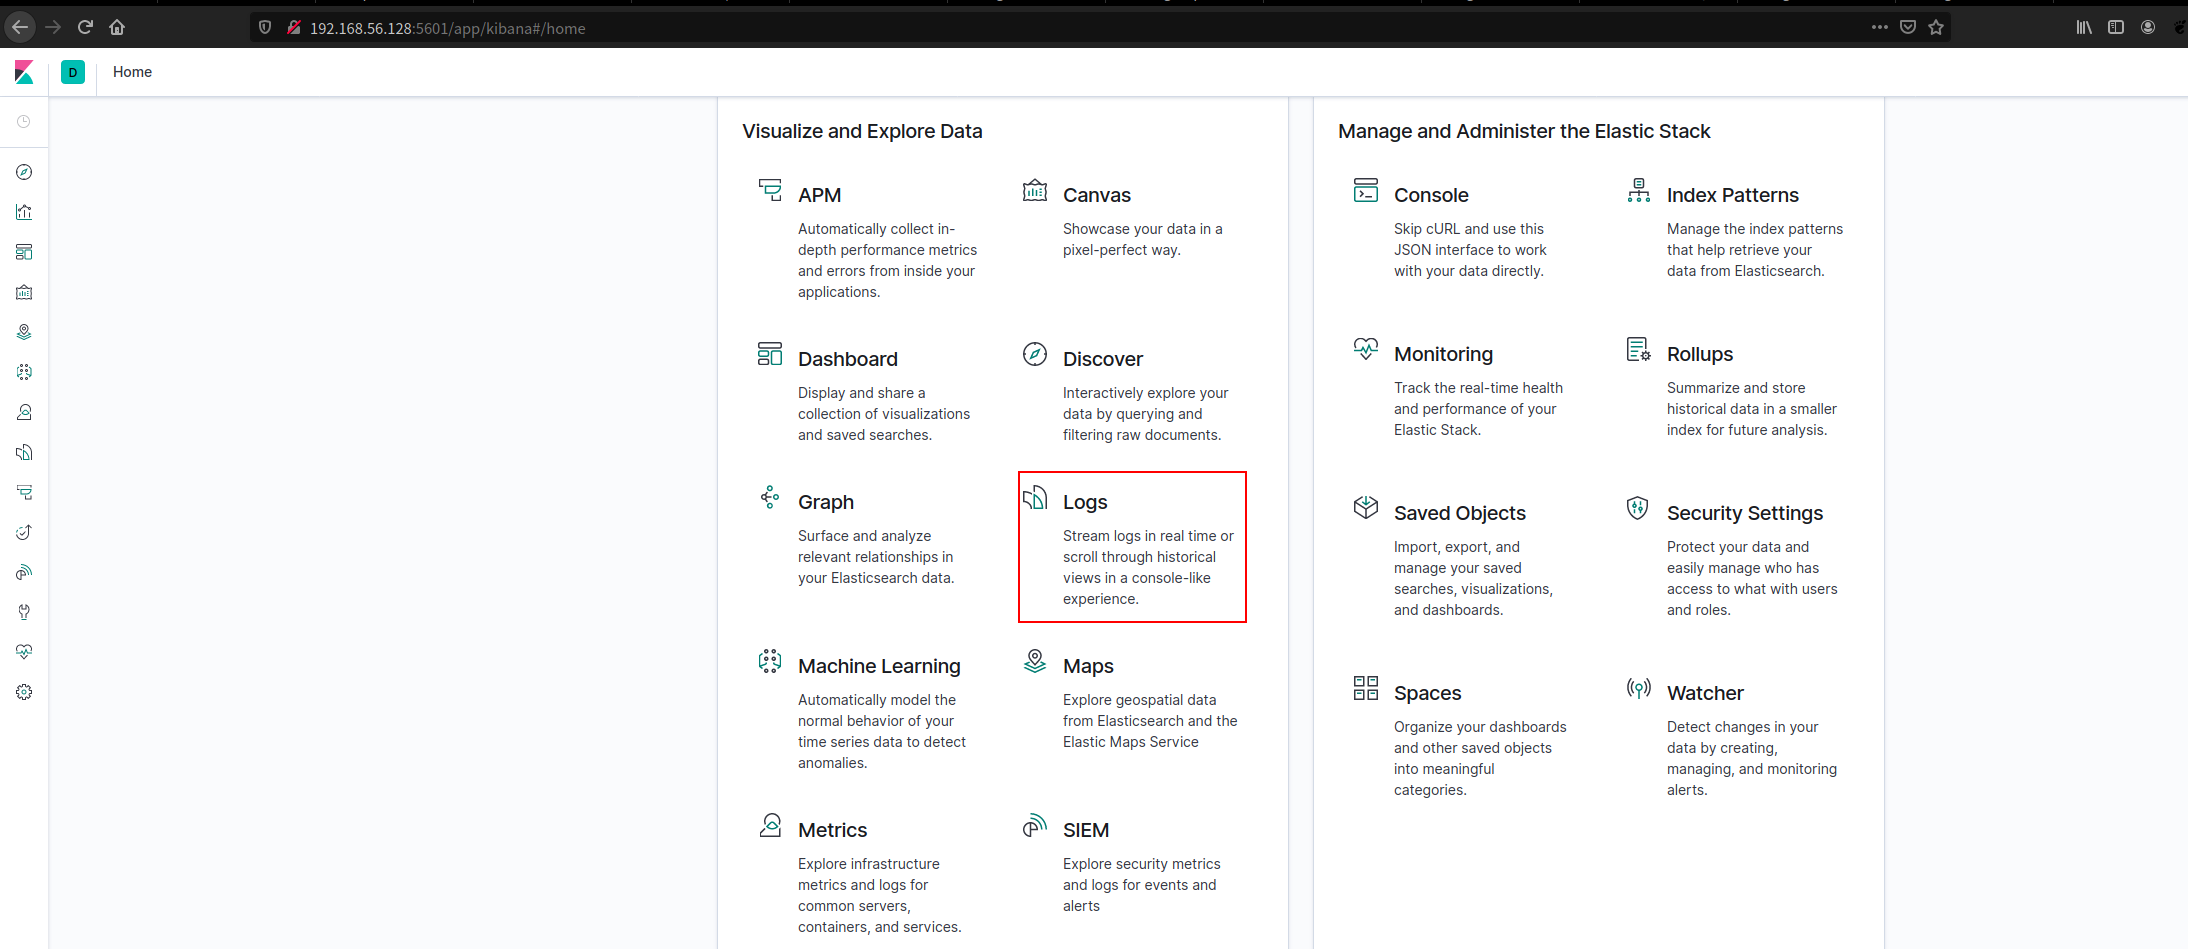
- 点击页面上的Logs
浏览器访问 Kibana http://192.168.56.128:5601
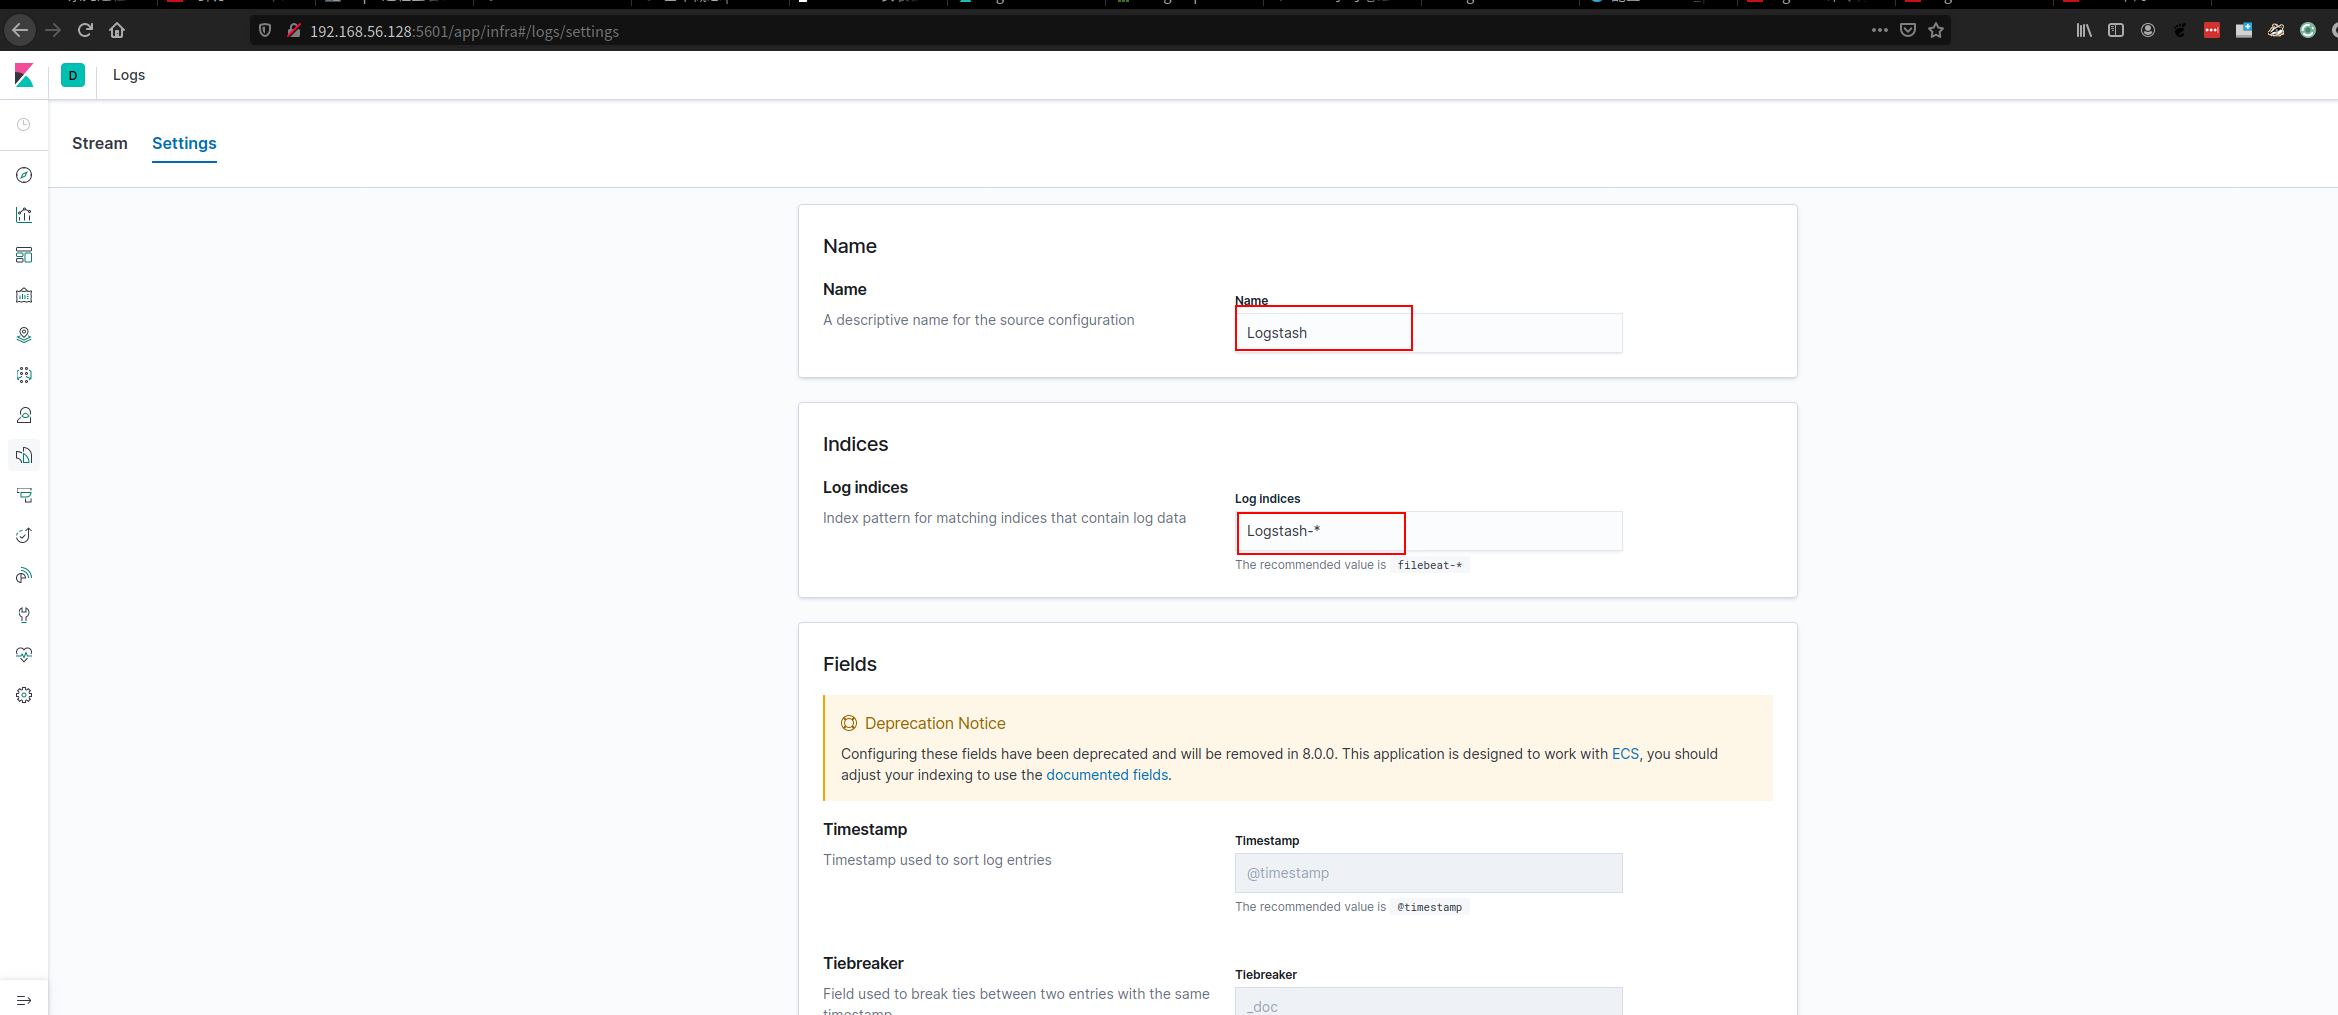
- 配置日志显示

- 填写indices相关信息。
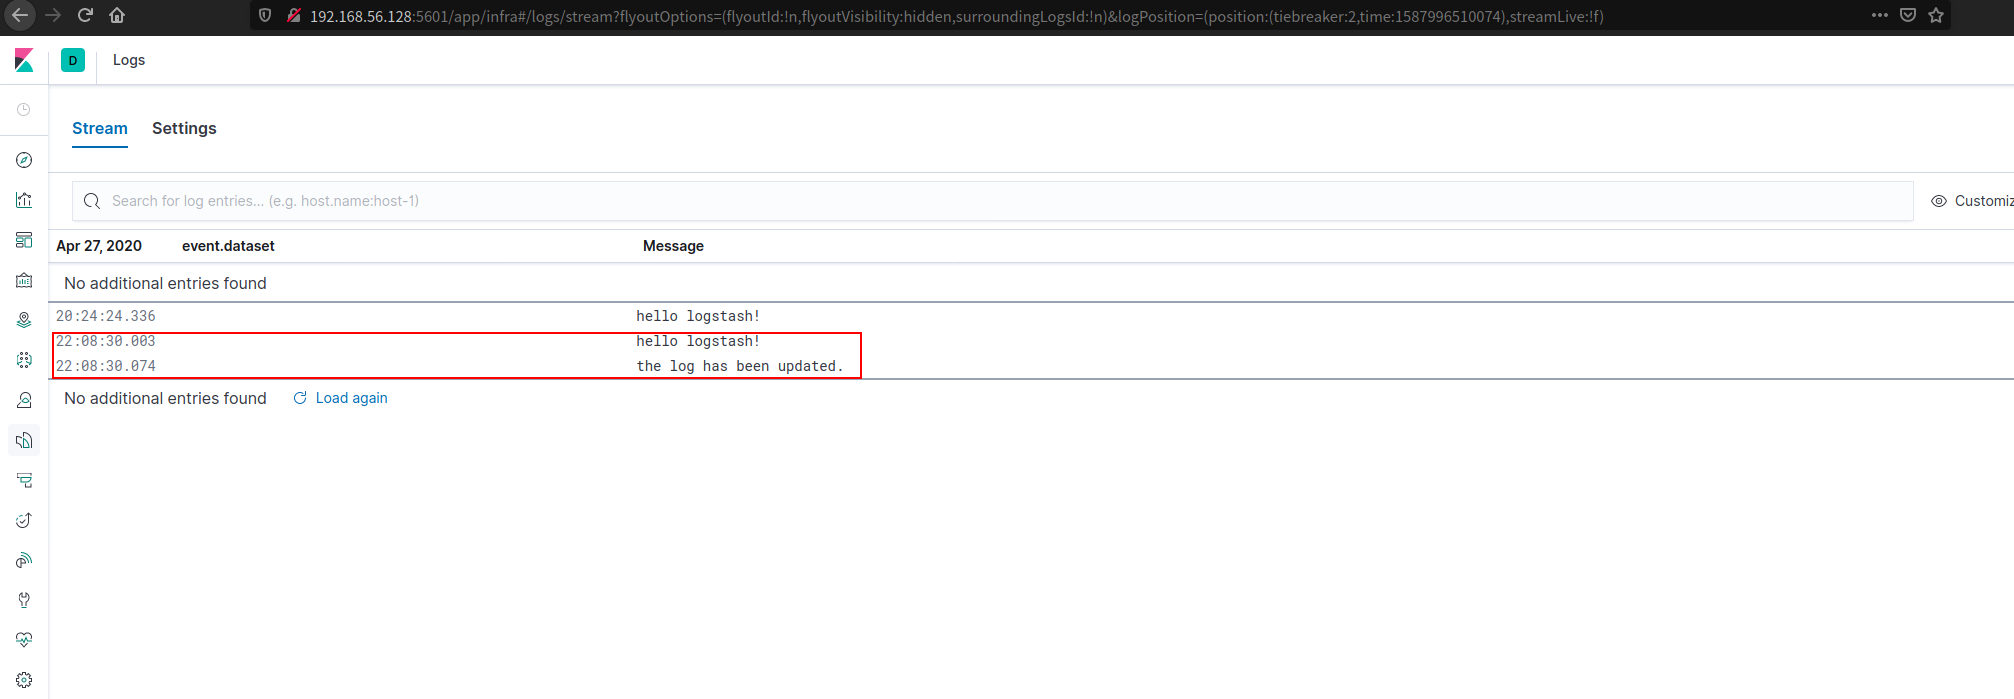
- 查看日志显示

- 修改 test.log
1 | [root@localhost ~]# vim /usr/local/test.log |
再次查看 Kibana 的日志显示,可以看到更新。
reference
剖析ElasticSearch核心概念,NRT,索引,分片,副本等
掌握它才说明你真正懂 Elasticsearch - ES(三)
Elasticsearch 7安装elasticsearch-analysis-ik分词器
- 本文标题:Elastic Stack笔记
- 本文作者:9unk
- 创建时间:2020-04-30 11:14:25
- 本文链接:https://9unkk.github.io/2020/04/30/elastic-stack-bi-ji/
- 版权声明:本博客所有文章除特别声明外,均采用 BY-NC-SA 许可协议。转载请注明出处!


